Expense approval workflow using Google Forms and Apps Script
Organizations usually create different types of approval workflows to ensure compliance with company policy or law. A workflow is a mechanism to ensure there are checks and balances in the system. A common example of an approval workflow is the expense report approval workflow.
When employees make a purchase for work, they can submit it to the company for reimbursement. These expense reports get sent to a designated approver who then decides whether to approve the expense or not. If the expense report is approved, the company reimburses the employee.
In many companies, these workflows are ad hoc and leverage emails, spreadsheets and manual processes. The result is an inefficient and error prone workflow which can cause expensive mistakes to occur. There is a better way to do this and that is through automation!
In this tutorial, I will show you how to build a simple expense report approval workflow using Google Forms, Google Sheets and Google Apps Script. You can customize the code in this tutorial based on your use case and needs.
Prerequisites
This tutorial assumes that you are familiar with the following concepts:
Creating Google Forms
Configuring the form to accept file uploads.
The basics of working with Google Sheets.
The basics of coding using Google Apps Script.
If you're new to coding, I've written a detailed tutorial on learning to code using Google Sheets and Apps Script.
6 steps to build an expense approval workflow using Google Sheets and Google Forms
Step 1 — Create a Google Form that employees will use to submit expense reports
Step 2 — Link the Google Form to a Google Sheets spreadsheet
Step 3 — Try submitting a few sample expense reports to confirm that the form is working correctly
Step 4 — Configure the spreadsheet to record expense report approvals
Step 5 — Write Apps Script code to send expense report approval notifications
Step 6 — Create a clickable button in the spreadsheet to send out notifications
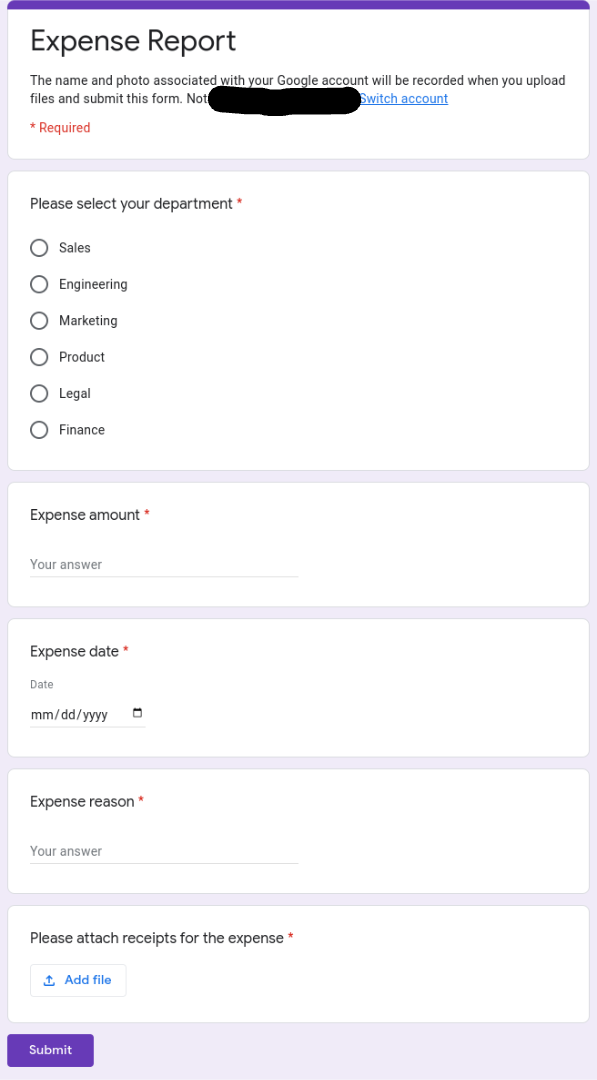
Step 1 — Create a Google Form that employees will use to submit expense reports
The first step is to create a Google Form that employees will use to submit expense reports. The form will require them to submit the following information:
Department: The department they work in (e.g., Sales, Engineering, etc.)
Expense date: When was the expense incurred?
Expense amount: What was the expense amount?
Expense reason: Why was the expense incurred?
Receipt: The receipt for the expense.
The video below will show you how to create the above form.
Step 2 — Link the Google Form to a Google Sheets spreadsheet
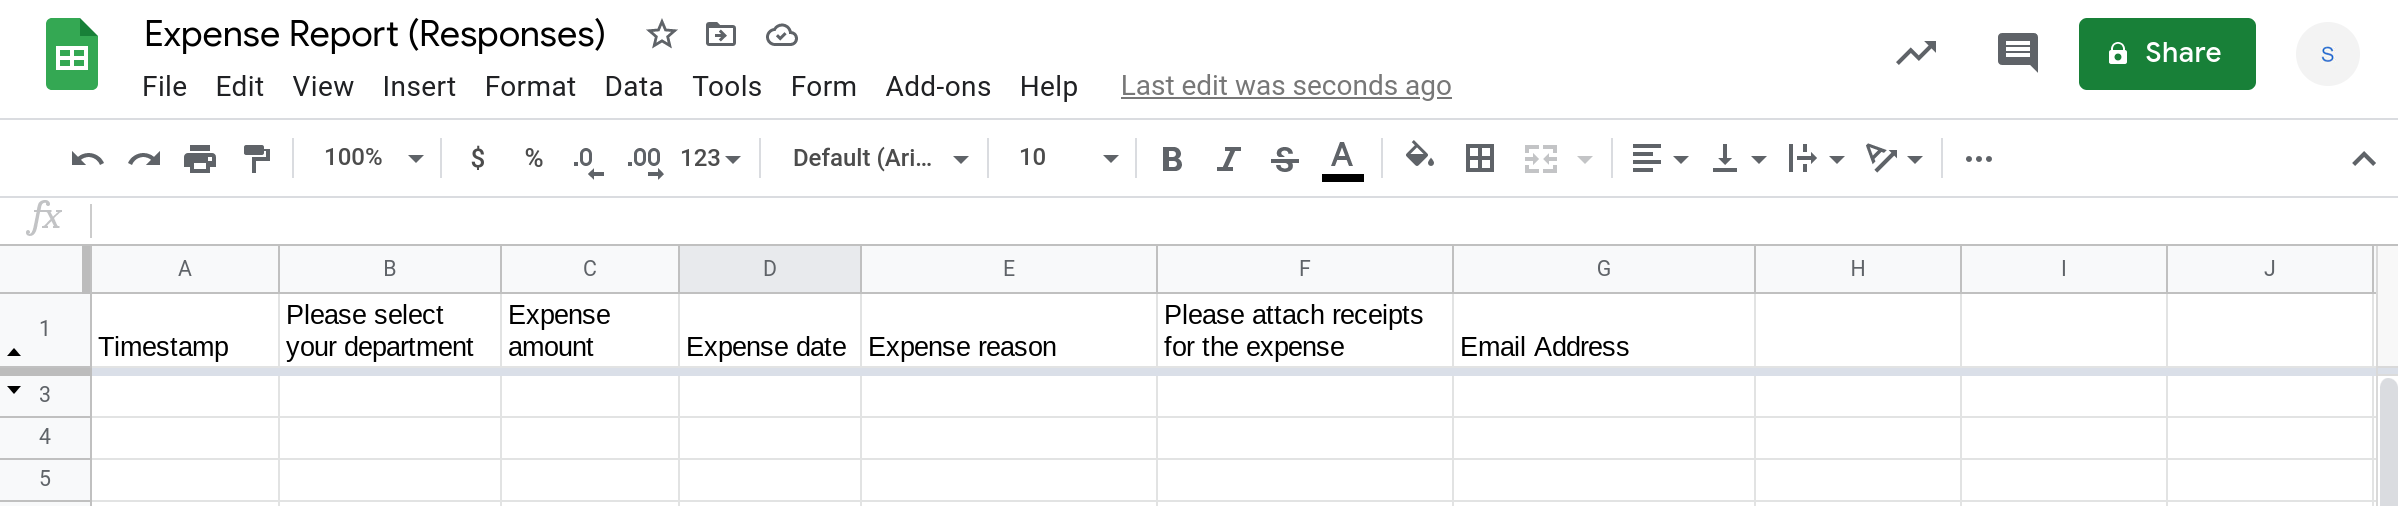
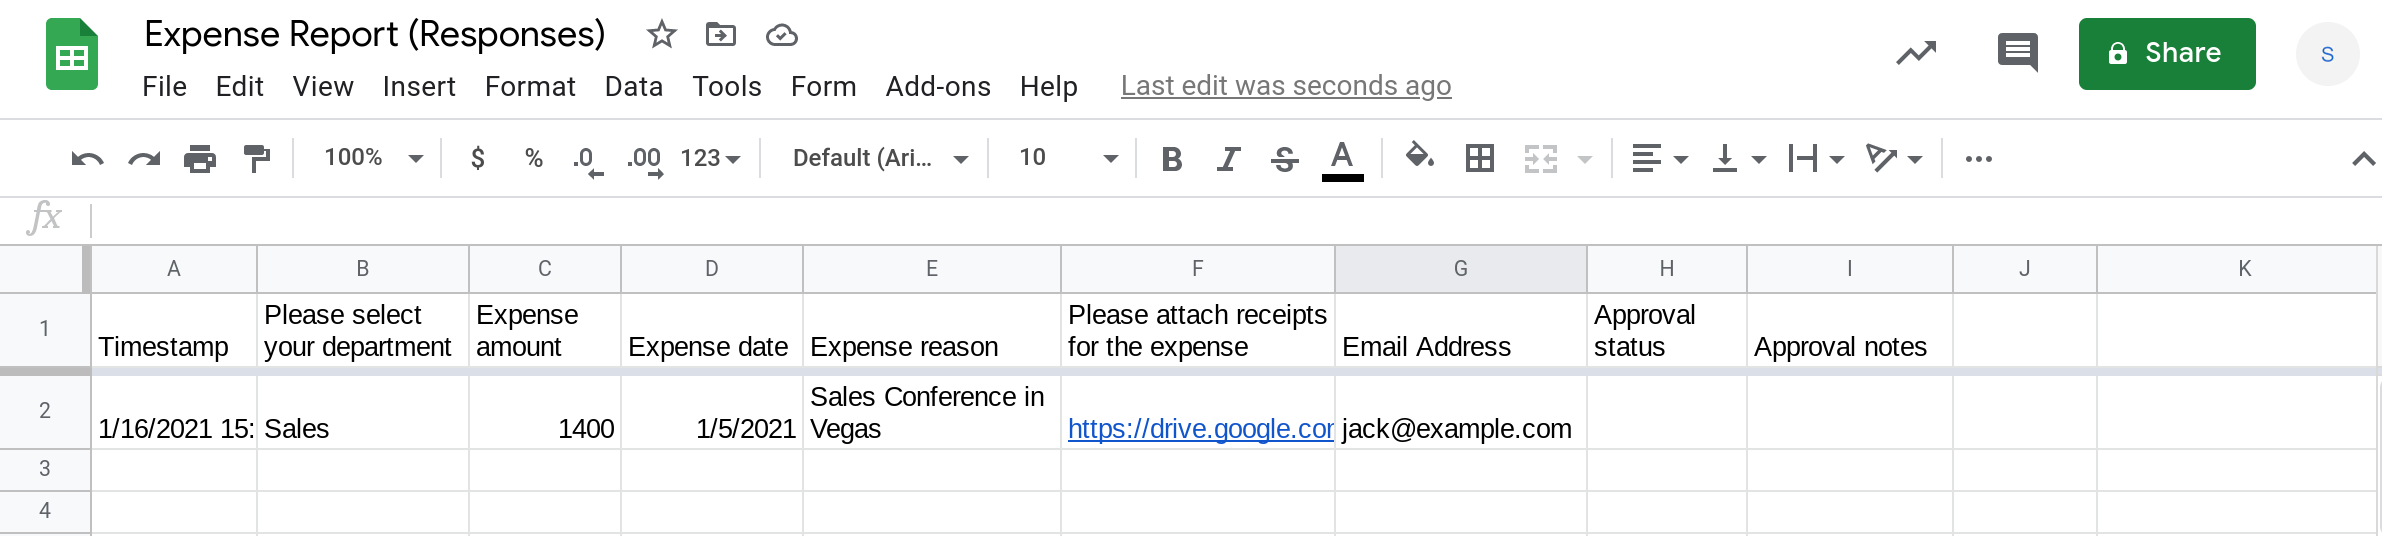
The next step is to link the Google Form to a Google Sheets spreadsheet where the responses will be stored.
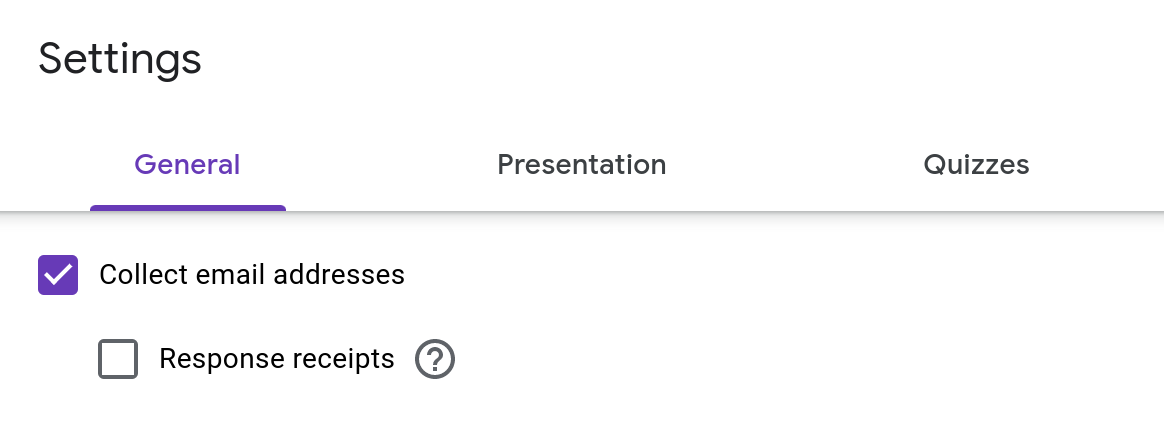
Then configure the form to collect the email address of the person submitting the form. We will use this email address later in this tutorial to send notifications when the expense report is processed.
To enable collecting email addresses, click on the settings icon (i.e., the gear icon ⚙) and select the Collect email addresses checkbox.
When you complete this step, you should have a Google Sheets spreadsheet containing columns that correspond to the fields in your form.
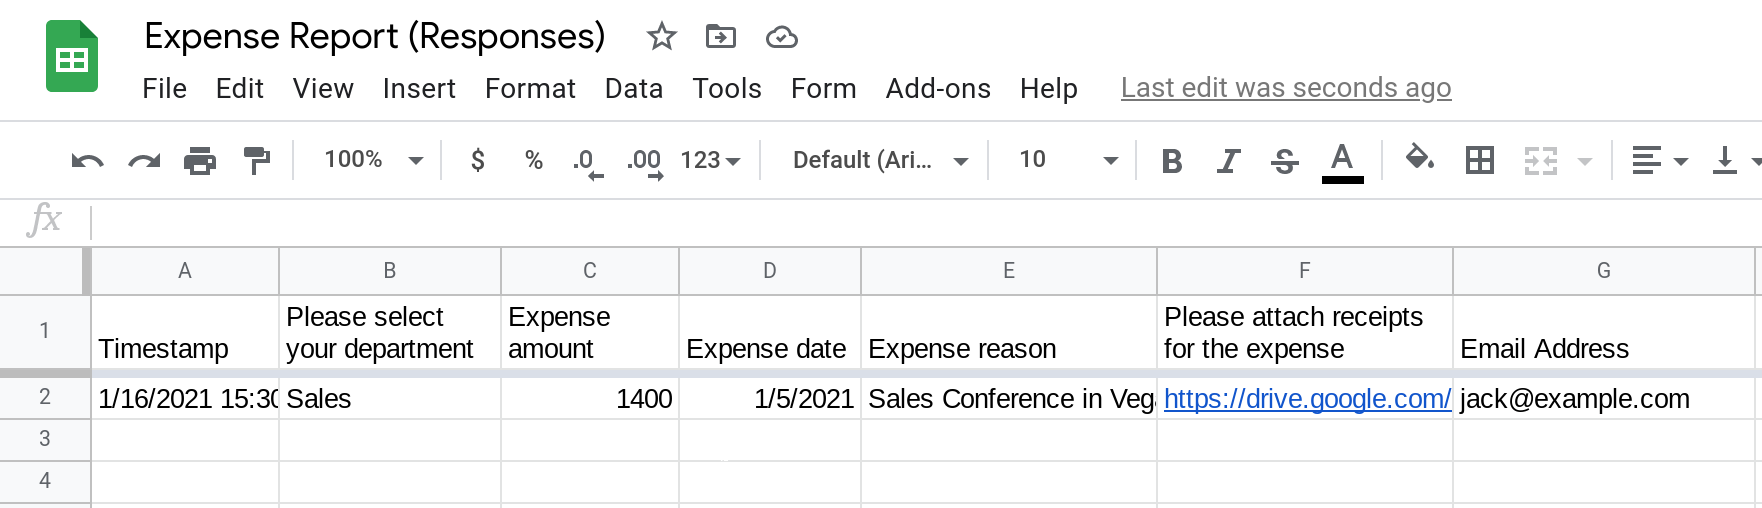
Step 3 — Confirm that the form is working correctly
Try submitting a few sample expense reports to confirm that these submissions are being recorded in your spreadsheet.

Step 4 — Configure the spreadsheet to record expense report approvals
So far, we've successfully built the expense report submission form and we've tested that the information submitted via this form is captured correctly. Next, we need to build the approval workflow.
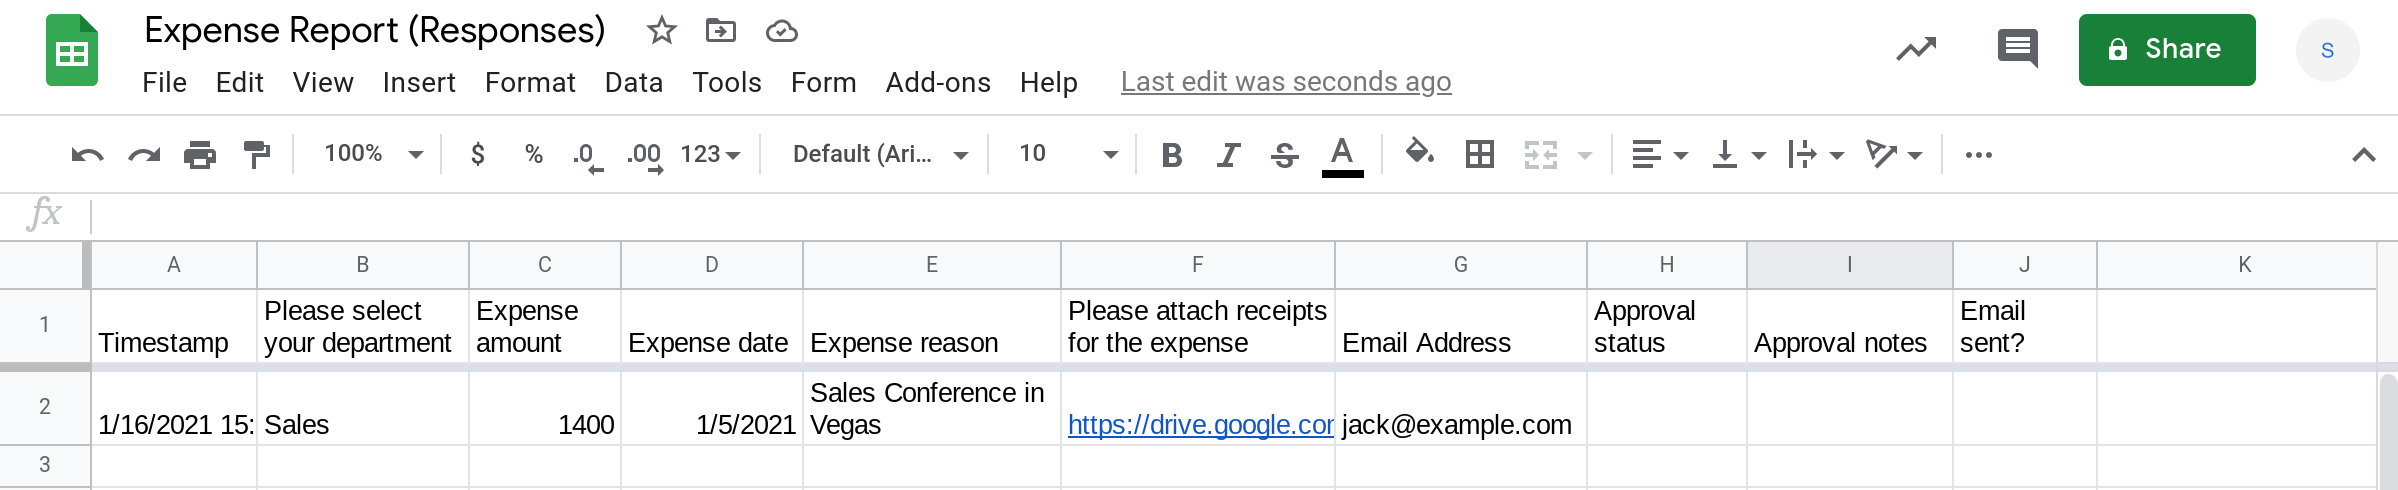
We will add a few columns to the spreadsheet so the approver can record their decision for each expense report. Let's add two columns to record the approver's decision:
Approval status: The approver will enter Approved or Rejected alongside each expense report.
Approval notes: The approver can optionally add a note when they approve or reject an expense report.
Note
To further streamline the approval workflow, you can add Data Validation to the Approval status column so the decision maker can simply choose "Approved" or "Rejected" from a drop down menu.
Step 5 — Write Apps Script code to send expense report approval notifications
At the end of step 4, we have a working form that employees can use to submit expense reports and a way for the designated approver to approve or reject each report. Next, we need to notify the person who submitted the expense report of the approver's decision.
We will use Apps Script to send out email notifications to employees when their expense report is processed.
Note
I've written a detailed guide on sending email from Google Sheets using Apps Script. Please refer to that tutorial for detailed information on building rich applications using the power of spreadsheets and email.
Here is how this will work:
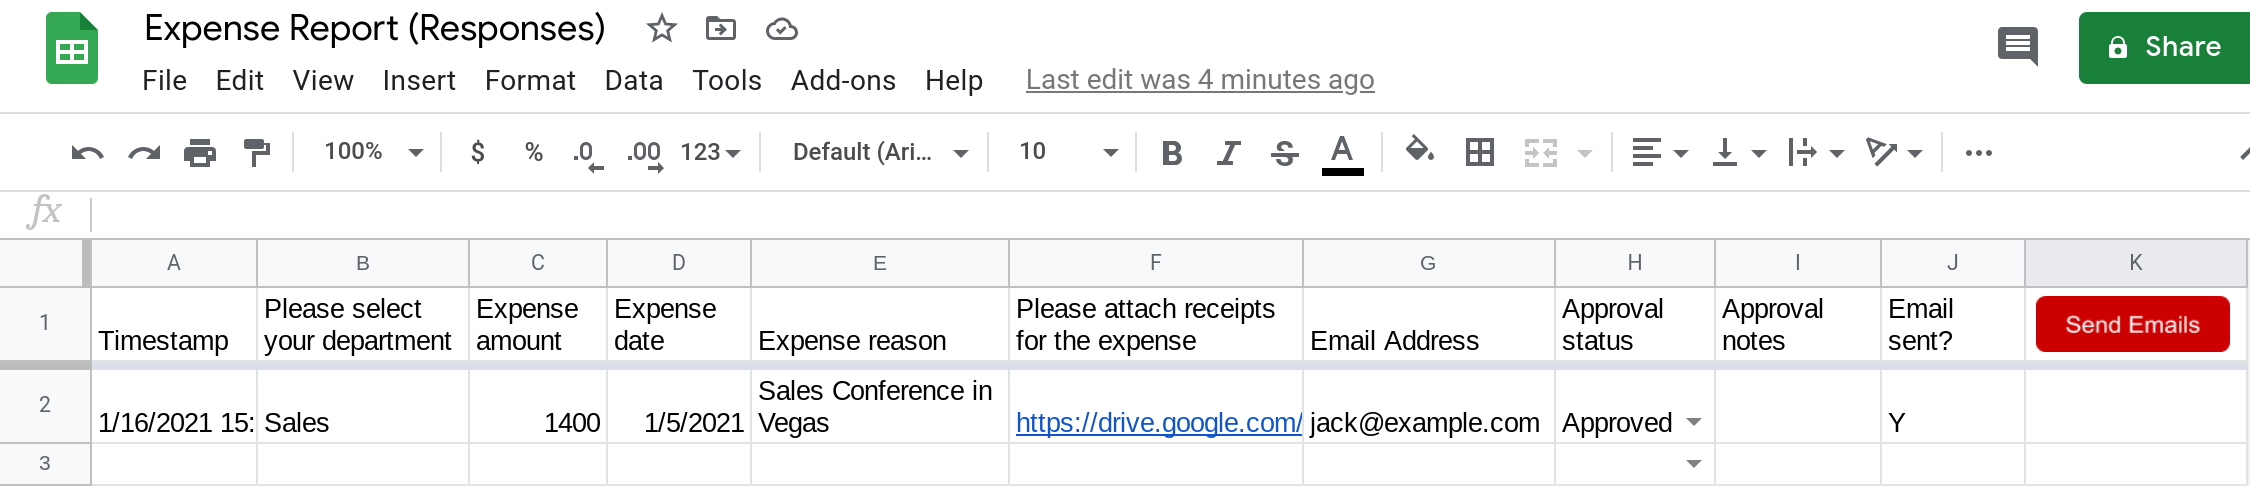
We will add a column called "Email sent" where we will record if an email notification was previously sent for an expense report.
The Apps Script will load all the rows in the sheet and for each row, it will check if the Approval status is set. If the approval status is set, it means that the approver has made a decision and the submitter of the expense report needs to be notified if they haven't been notified already.
The script will therefore only send email notifications if the "Approval status" is not blank AND the "Email sent" column is blank.
Upon sending the notification, the script will set the "Email sent" column to "Y" to record the fact that the submitter of the expense report has been notified successfully.
Step 5.1 — Open the script editor from the Google Sheets spreadsheet
Open the script editor by selecting Tools —> Script editor and then rename the script from "Untitled" to something more meaningful.
Step 5.2 — Use Apps Script to send out expense report status notifications
Then replace the code in the editor with the code below and save the file.
Note
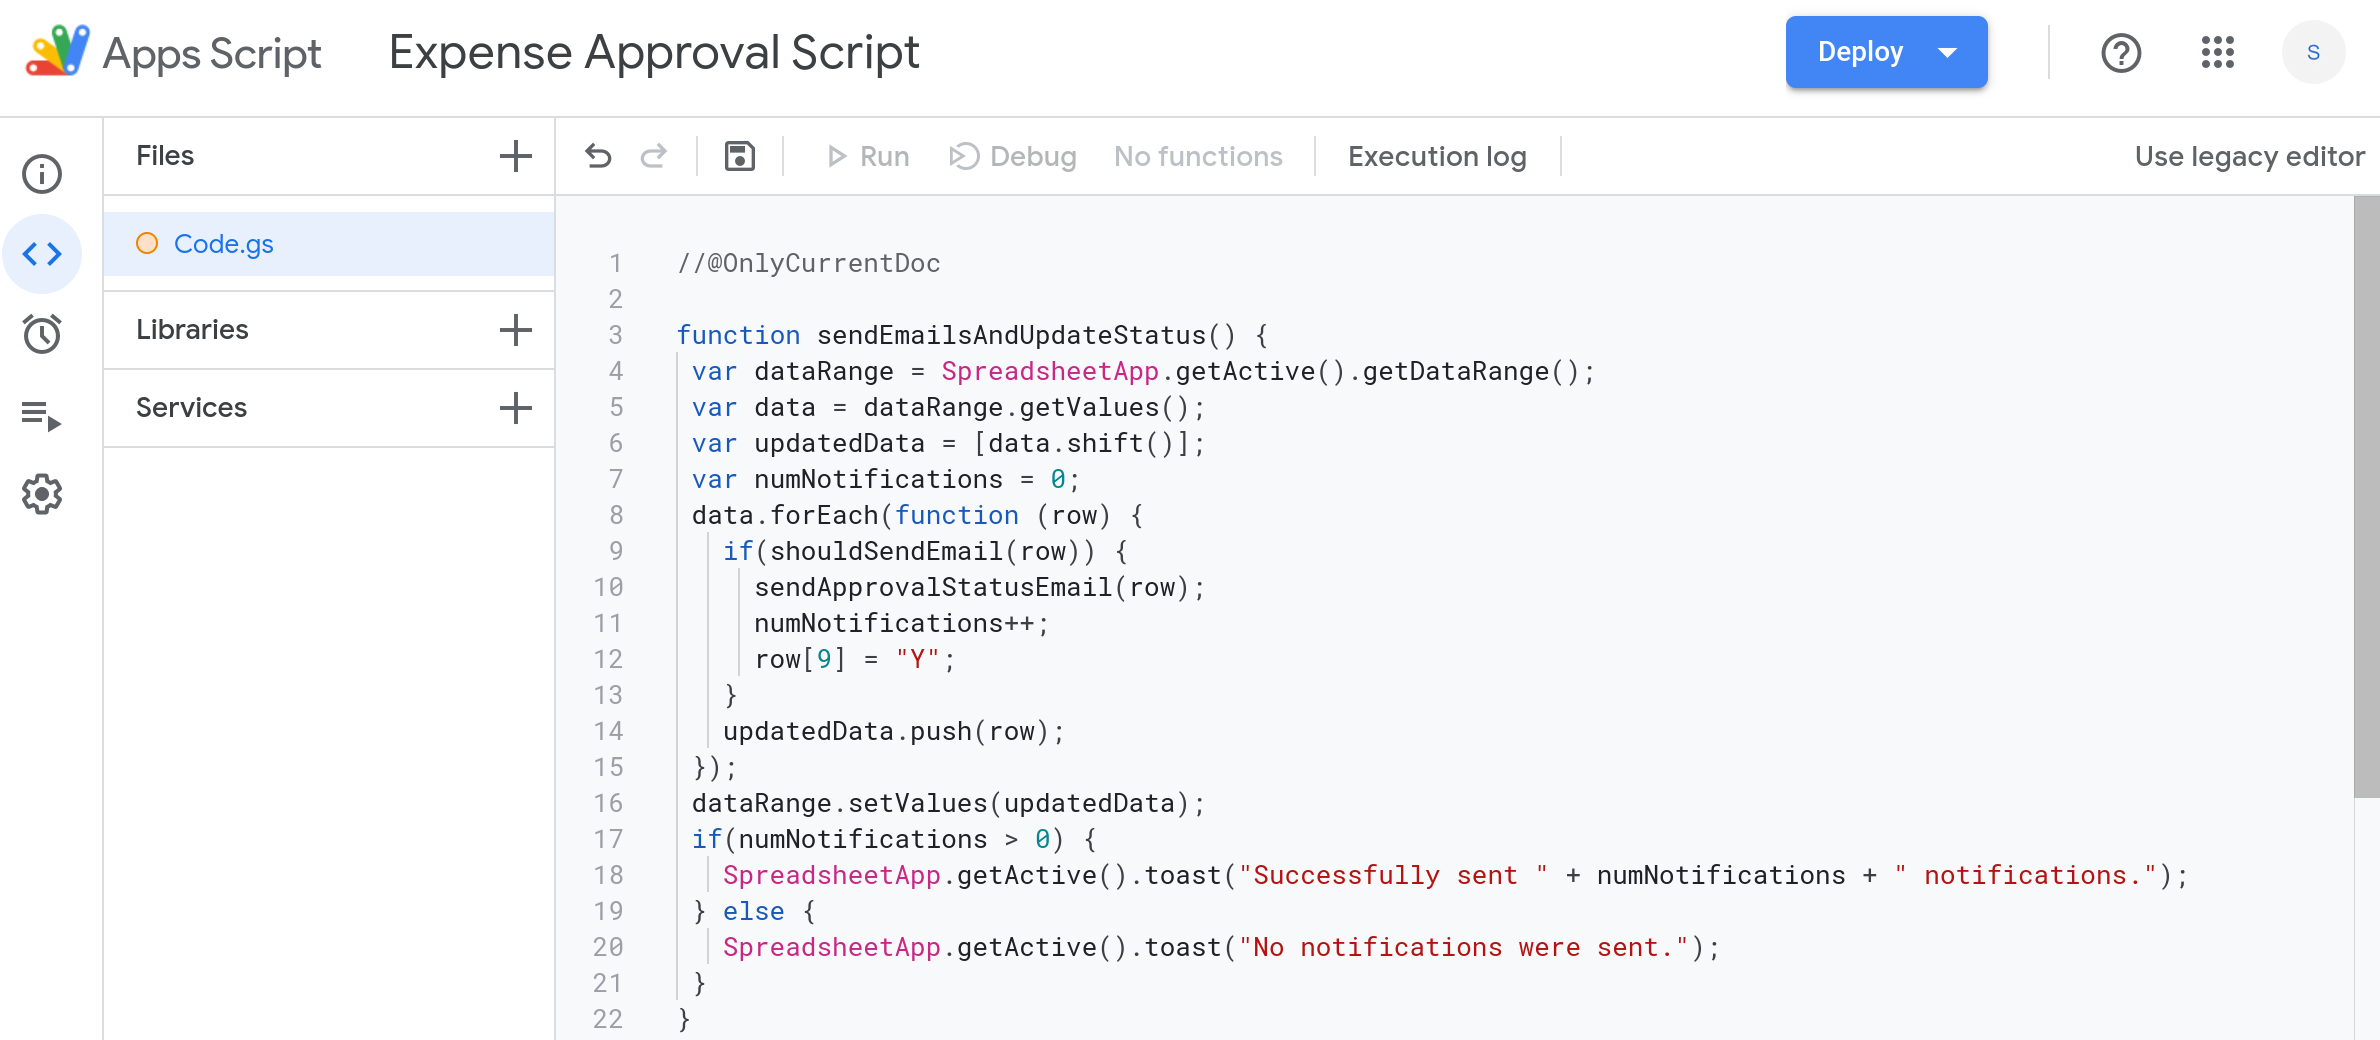
I've added comments to the code so you can follow along and understand how it works. At a high-level, the code uses three functions.
sendEmailsAndUpdateStatus(): This is the main function in the code. This function loads all of the rows in the spreadsheet and for each row, it checks if email notifications should be sent using theshouldSendEmail(row)function. If yes, then it usessendApprovalStatusEmail(row)function to send the email.shouldSendEmail(row): Checks if email notifications should be sent for a given row. It returnstrueif a notification should be sent andfalseotherwise.sendApprovalStatusEmail(row): This function sends the email notification based on the data in a given row.
//@OnlyCurrentDoc

function sendEmailsAndUpdateStatus() {
 //Get the rows in the spreadsheet
 var dataRange = SpreadsheetApp.getActive().getDataRange();
 var data = dataRange.getValues();

 //Remove the header row and add it to a new array.
 //We will write this array back to the spreadsheet at the end.
 var updatedData = [data.shift()];

 //The variable numNotification will track if notifications were sent
 var numNotifications = 0;

 //Process each row using a forEach loop
 data.forEach(function (row) {
   //Check if email notifications should be sent and send them.
   //If the notification is sent, increment numNotifications and also
   //update the "Email sent" column to "Y".
   if(shouldSendEmail(row)) {
     sendApprovalStatusEmail(row);
     numNotifications++;
     row[9] = "Y";
   }

   //Add this row to the new array that we created above
   updatedData.push(row);
 });

 //Write the new array to the spreadsheet. This will update the
 //"Email sent" columns in the spreadsheet.
 dataRange.setValues(updatedData);

 //Display a Toast notification to let the user know if notifications
 //were sent.
 if(numNotifications > 0) {
   SpreadsheetApp.getActive().toast("Successfully sent " + numNotifications + " notifications.");
 } else {
   SpreadsheetApp.getActive().toast("No notifications were sent.");
 }
}

function shouldSendEmail(row) {
 //Don't send email unless the expense report has been processed
 if(row[7] != "Approved" && row[7] != "Rejected" && row[7] != "Have questions")
   return false;
  //Don't send email if email address is empty
 if(row[6] === "")
   return false;
  //Don't send email if already sent
 if(row[9] === "Y")
   return false;
  return true;
}

function sendApprovalStatusEmail(row) {
 //Create the body of the email based on the contents in the row.
 var emailBody = `
EXPENSE REPORT: ${row[7]}
-----------------------------------------------------------------
Note: ${row[8] === "" ? "N/A" : row[8]}
-----------------------------------------------------------------
Department: ${row[1]}
Amount: ${row[2]}
Reason: ${row[4]}
Date: ${(row[3].getMonth() + 1) + "/" + row[3].getDate() + "/" + row[3].getFullYear() }
-----------------------------------------------------------------
 Please contact expensereports@example.com if you have any questions about this email.
`;

 //Create the email message object by setting the to, subject,
 //body, replyTo and name properties.
 var message = {
   to: row[6],
   subject: "[Expense report " + row[7] + "]: " + row[4],
   body: emailBody,
   replyTo: "expensereports@example.com",
   name: "Expense Reports"
 }

 //Send the email notification using the MailApp.sendEmail() API.
 MailApp.sendEmail(message);
}
When you are done, your script editor should have the above code in it:
Step 5.3 — Test your Apps Script by manually running your script from the Apps Script code editor
The next step is to run your script to test if it works correctly. To test your script, please follow the following steps:
Set the approval status for an expense entry.
Ensure that the "Email sent" column is empty. If it is set to "Y", it means that the script has already sent a notification for that expense report and a duplicate notification will not be sent.
Then, switch to the script editor and run the
sendEmailsAndUpdateStatus()function.If this is the first time you are running this function, you will be asked to authorize your script to give it permissions to send emails on your behalf.
Once you authorize it, the script will run and the person who submitted the expense report will receive an email notification.
The script will also set the "Email sent" column to "Y" after sending the email notification. This will ensure that future runs of the script will NOT send email notifications for the same expense report.
Step 6 — Create a clickable button in the spreadsheet to send out notifications
The final step is to make it easy for the person approving expenses to send out email notifications. Having to open the Apps Script editor to run the script l can be cumbersome. We can simplify this by making it possible to run the script by clicking a drawing or an image in the Google Sheets spreadsheet. Please see the tutorial on Clickable buttons in Google Sheets for more information on this feature.
Step 6.1 — Insert a drawing in the Google Sheet that looks like a button
We will insert a Google Drawing and style it to look like a clickable button. I made the button noticeable by using a red background color.
The video below will demonstrate how to create a clickable button in Google Sheets using a Google Drawing.
Note
You can also insert an image of a button instead of a Google Drawing.
Step 6.2 — Link the drawing to the sendEmailsAndUpdateStatus() function
The final step is to link the button you created to the Apps Script function sendEmailsAndUpdateStatus() that will send out email notifications.
First click on the button.
Then select the three dots menu on the button.
Select the Assign script menu item and enter the name of the function to run in the dialog.
In step 3, please only enter the name of the function. Please do not include the parentheses.
Correct:
sendEmailsAndUpdateStatusWrong:
sendEmailsAndUpdateStatus()
Step 6.3 — Test your shiny new expense approval workflow
It's time to do an end-to-end test to confirm that everything works nicely together. Submit a new test expense entry using the Google Form and then test various scenarios to confirm that there are no bugs in your code or edge cases that we haven't considered.
The video below demonstrates how the expense approval process works.
Conclusion
In this tutorial, I showed you how easy it is to build an approval workflow using Google Forms, Google Sheets and a few lines of Apps Script code.
While we built an expense approval workflow in this tutorial, you can easily tweak it to build other kinds of workflows. For example, you can build a vacation approval workflow or an invoice approval workflow, etc. The basic logic and steps to build these other applications are the same.
Thanks for reading!
Stay up to date
I'd appreciate any feedback you can give me regarding this post.
Was it useful? Are there any errors or was something confusing? Would you like me to write a post about a related topic? Any other feedback is also welcome. Thank you so much!