Enable autocomplete for custom functions in Google Sheets using JSDoc
In this tutorial, I will show you how to document your custom functions in Google Sheets to enable autocomplete when you use them in spreadsheet formulas.
Prerequisites
This tutorial assumes you are familiar with coding in Google Sheets using Apps Script and that you're interested in creating custom functions in Google Sheets.
What do I mean by enabling autocomplete for custom functions?
When you begin typing the name of a function in your Google Sheets spreadsheet, you'll notice that an autocomplete dialog appears to help you quickly select the right function.
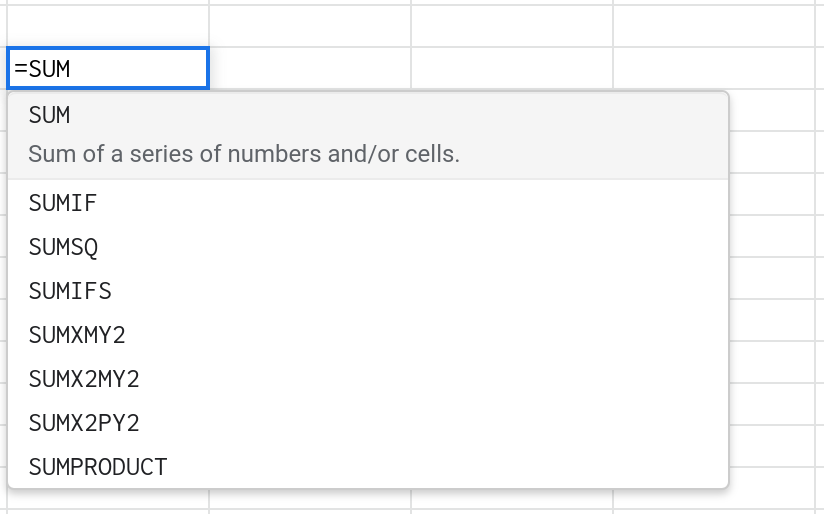
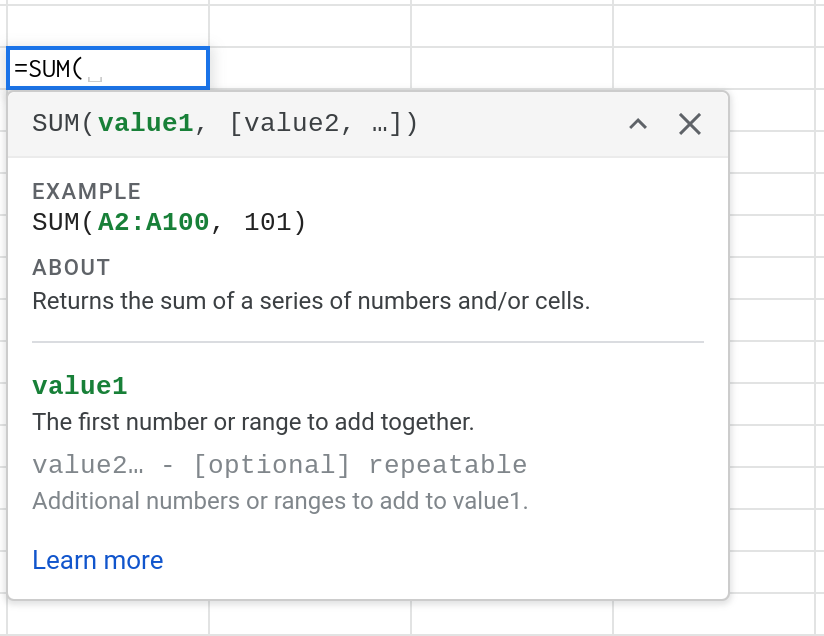
You can also enable this functionality for custom functions that you create. In addition, you can also specify some helpful documentation for your custom function that will be displayed when users select your custom function. Below is an example of the help content for the =SUM() function.
Enable autocomplete for custom functions by adding JSDoc comments
Apps Script is based on ECMAScript, which is what the JavaScript programming language is also based on. In JavaScript, JSDoc enables developers to generate documentation for their functions by adding comments using a specific syntax. Apps Script supports a subset of the JSDoc syntax, which we'll use to both document the functions we write and also enable autocomplete for them.
Here is an example of a function with JSDoc comments describing what it does, what parameters it accepts and what value it returns.
The part between /** and */ is the JSDoc comment.
/**
 * Assigns a letter grade given a test score.
 *
 * @param {number} testScore The student's score on the test.
 * @return The letter grade corresponding to the test score.
 * @customfunction
 */
function CALCULATEGRADE(testScore) {
  if(testScore >= 90)
    return "A";
  else if(testScore >= 80)
    return "B"
  else if(testScore >= 60)
    return "C"
  else if(testScore >= 50)
    return "D"
  else return "F";
}
Once you add the JSDoc comment, Google Sheets will begin displaying your function in the autocomplete widget that appears while entering a formula.
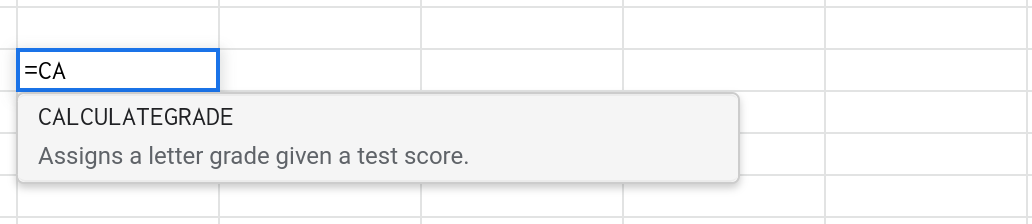
The information you provide in the comment will also be used to display documentation to help users understand how to use your function.
How to write JSDoc comments for custom functions in Google Sheets?
A typical JSDoc comment for a custom function in Apps Script contains information describing (1) what the function does, (2) what its input parameters are, and (3) what output it returns. In addition, you must include a "@customfunction" tag in the comment to tell Apps Script that you're documenting a custom function. You can have functions in your Apps Script code that are not meant to be used as custom functions in spreadsheet formulas. The @customfunction tag (which you'll learn about below), is what tells Apps Script that a specific function is meant to be used within spreadsheet formulas.
Structure of a JSDoc comment for a custom function in Google Sheets
The JSDoc comment should be added right before the function's definition (i.e., its code).
//JSDoc comment should be added here.
function CALCULATEGRADE(testScore) {
}
The comment must begin with a /** and end with a */. The comment can span multiple lines. The first line of the comment should only contain /** and the last line should only contain */.
/**
  JSDoc comment should be added here.
*/
function CALCULATEGRADE(testScore) {
}
It is a good practice to add an asterix (*) to every other line in the comment and align these vertically. This is not only aesthetically pleasing but it also improved the readability of the comment. Notice that the * are all vertically aligned.
/**
 * JSDoc comment should be added here.
 */
function CALCULATEGRADE(testScore) {
}
Within the JSDoc comment, you use tags to document the input parameters your function supports and the output value that it returns. A tag is a word that begins with the @ symbol. You can also provide a description of what your function does.
A typical JSDoc comment for a custom function contains the following:
A description of what the function does.
A list of input parameters that the function accepts (one parameter per line).
A description of the output returned by the function.
A
@customfunctiontag that tells Apps Script that you're documenting a custom function that is meant to be used within formulas in the Google Sheets spreadsheet.
I'll describe each of the above in reverse order, starting with the @customfunction tag.
The @customfunction tag
Use the @customfunction tag to let Apps Script know that this function is meant to be a custom function. This tag is entered on a separate line and it is usually the last line of the JSDoc comment (i.e., the line before the "*/" that ends the comment).
/**
 * @customfunction
 */
function CALCULATEGRADE(testScore) {
}
Note
If you want to enable autocomplete for your custom function, @customfunction is the only required tag but the other tags that are described below are highly encouraged.
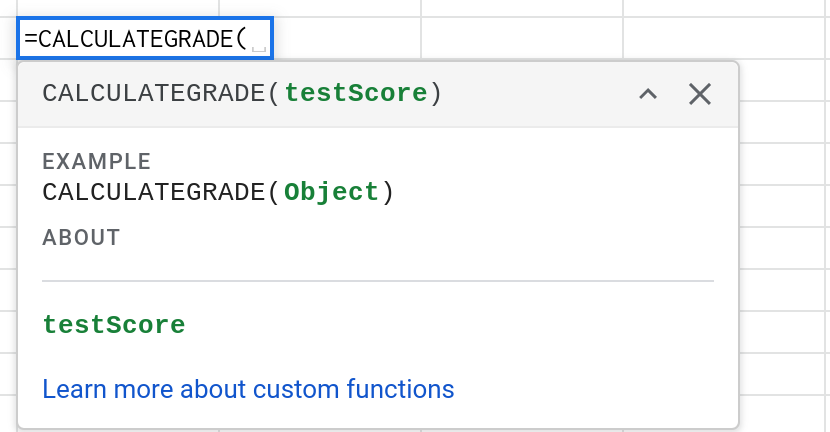
If you only specify the @customfunction tag, the help widget will surface some auto-generated documentation but it will not be very useful. For example, the "ABOUT" section will be empty. Also, all parameters will be documented as having the type "Object" you haven't documented their types explicitly.
/**
 * @customfunction
 */
function CALCULATEGRADE(testScore) {
}
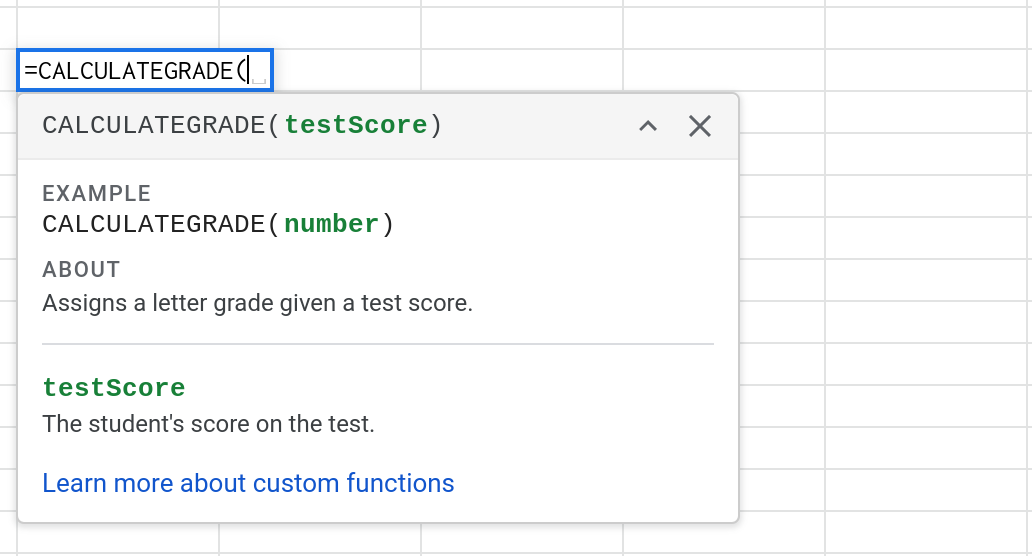
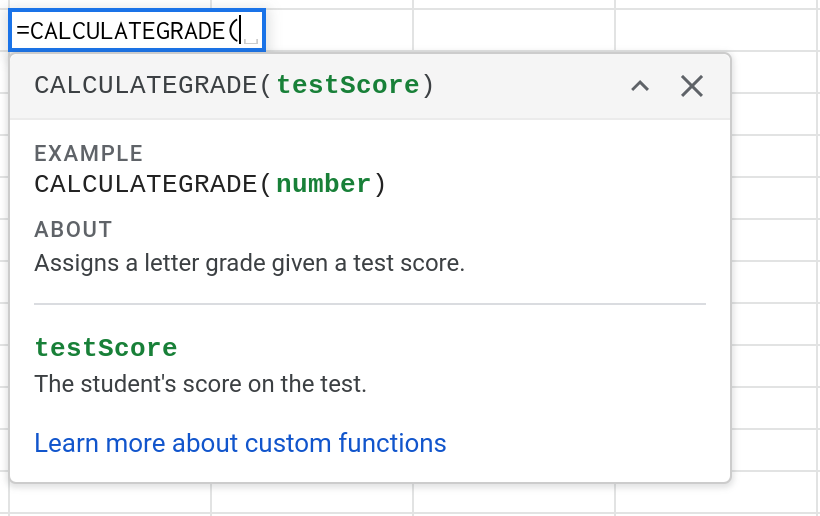
Once you specify additional tags that are described later in this tutorial, the help documentation becomes richer and more useful. The "ABOUT" section describes what the function does and it becomes clear that the function expects a number (the test score) as input.
The @return tag
The @return tag is used to describe the value that the custom function returns. It is usually entered on a separate line right before the @customfunction tag.
/**
 * @return The letter grade corresponding to the test score.
 * @customfunction
 */
function CALCULATEGRADE(testScore) {
}
To document the return value, you need to provide a sentence that describes it. Apps Script does not display this information in the help widget but documenting the return value is still a best practice to help you (and others) understand what your function does when you read it in the future.
@return A sentence describing the value that the function returns.The @param tag
Use the @param tag to document the input parameters (also known as arguments) that your function concepts. The function CALCULATEGRADE(testScore) only accepts one parameter called testScore.
Note
If your function does not accept any input parameters, you do NOT need to specify this tag.
/**
 * @param {number} testScore The student's score on the test.
 * @return The letter grade corresponding to the test score.
 * @customfunction
 */
function CALCULATEGRADE(testScore) {
}
To document a parameter, you need to specify its value, its name and provide a description.
@param {number} testScore The student's score on the test.Tag | Type of value (number, string, date, etc.) | Name of the parameter |
|
|---|---|---|---|
@param | {number} | testScore |
|
Note
You must specify the four parts in the correct order: Start with the @param tag, followed by the parameter's type, its name and finally its description.
If your function accepts multiple parameters, document each one on a separate line.
/**
 * @param {number} length The length of a rectangle.
 * @param {number} width The width of a rectangle.
 * @return The area of a rectangle.
 * @customfunction
 */
function AREARECTANGLE(length, width) {
  return length * width;
}
Additional descriptive information
You can also provide additional information (beyond tags) to help users understand what your function does and how to use it. This information will be displayed under an "ABOUT" section in the help widget. If you choose to provide additional information, this should be placed at the very top of the JSDoc comment (right after the line containing "/**").
In the JSDoc comment below, the line "Assigns a letter grade given a test score." is displayed under the "ABOUT" section.
/**
 * Assigns a letter grade given a test score.
 * @param {number} testScore The student's score on the test.
 * @return The letter grade corresponding to the test score.
 * @customfunction
 */
function CALCULATEGRADE(testScore) {
}
That's it. By adding a few lines of comments to your custom functions, you can enable autocomplete and in-line help when you use them in Google Sheets.
Conclusion
In this tutorial you learned how to enable autocomplete for your custom functions in Google Sheets. In addition to the benefits of autocomplete, well documented code has other benefits such as making it easy for others to understand what your code does. In fact, you yourself may need to read your comments in the future to understand how the code you wrote 2 years ago works.
Hope you found this tutorial helpful. Thanks for reading!
DISCLAIMER: This content is provided for educational purposes only. All code, templates, and information should be thoroughly reviewed and tested before use. Use at your own risk. Full Terms of Service apply.
Thanks for your feedback!
Your input helps improve the content for everyone.
