Mail Merge in Google Sheets
In this tutorial, I'll teach you how to send personalized emails from Google Sheets using Mail Merge.
Goal
You have a list of users and information about them in a Google Sheet. You want to send each of them a personalized email using the information you have about them.
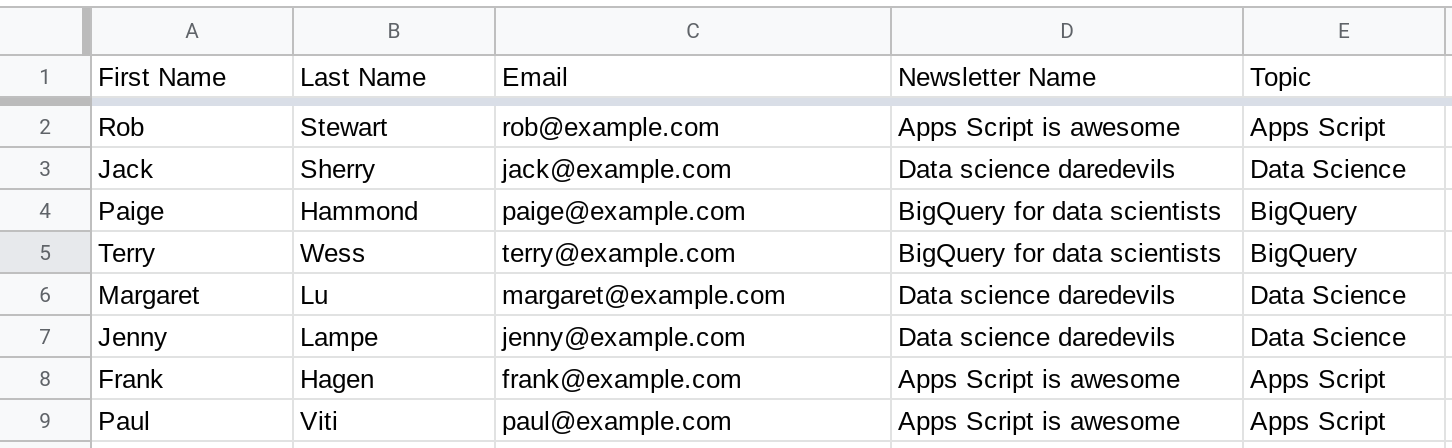
For example, the sheet below tells us which newsletter users have signed up for. We want to send each user a confirmation email to let them know that their subscription was successful and that they'll begin receiving their newsletter shortly.
A generic email might look like this:
Hi there,
Thanks for subscribing! You'll begin receiving your newsletter shortly.
Cheers,
Jason
The above email lacks context (which newsletter etc.) and users might think it is spam. Wouldn't it be better if the email were personalized instead? The email below provides a lot more context and also addresses the recipient by name. It's so much better!
Hi Rob,
Thank you for subscribing to the Apps Script is awesome newsletter! We'll send you the latest news about Apps Script every week on Monday morning.
Cheers,
Jason
How does a Mail Merge work?
A Mail Merge involves using data from a spreadsheet or a database to create personalized emails or documents. To create a Mail Merge, you need a template that contains placeholders and a spreadsheet containing values to insert into the placeholders.
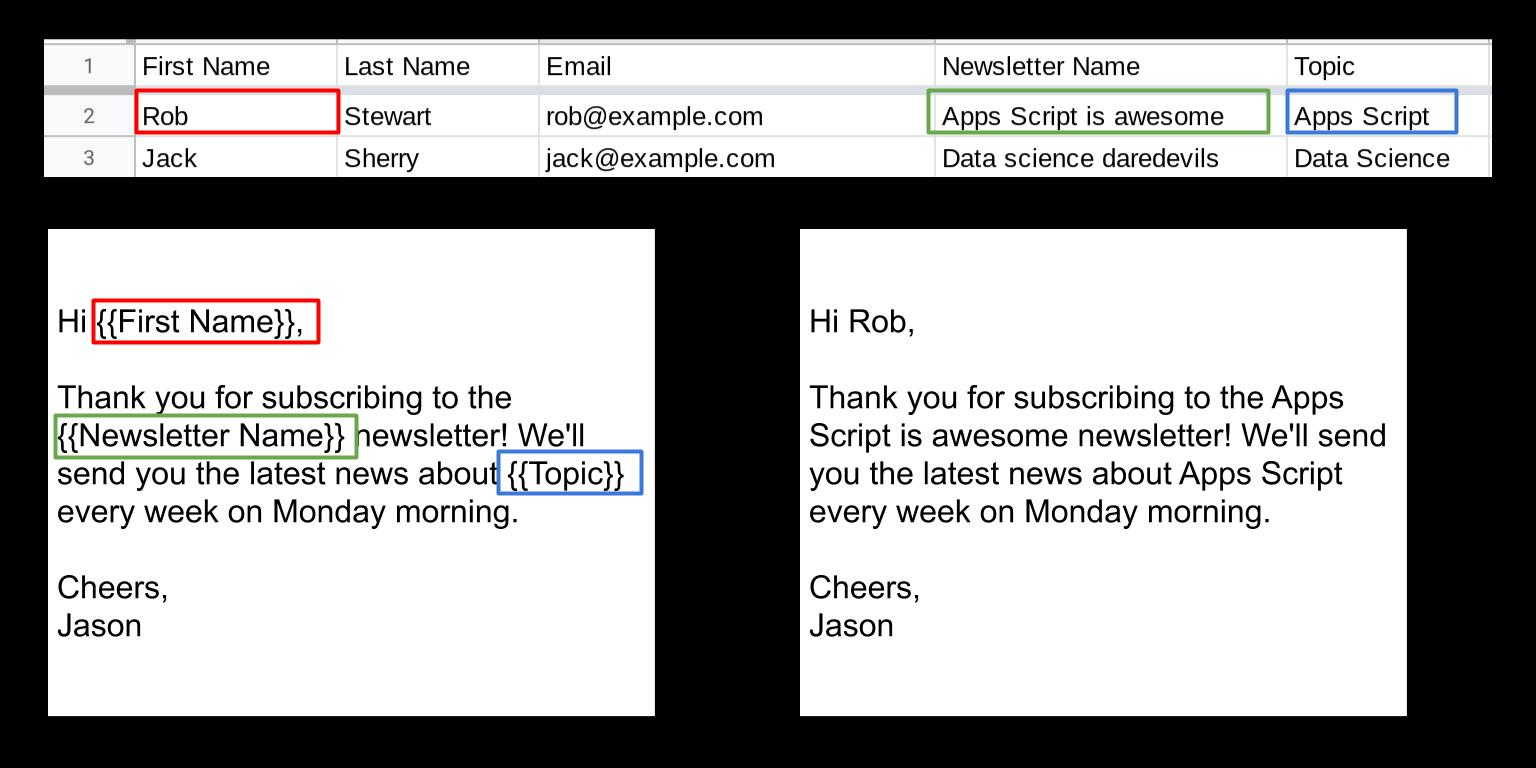
The graphic below shows you how a Mail Merge works. The values from the spreadsheet are "merged with" (ie, inserted into the placeholders in) an email template to create a personalized email.
Now, let's create a Mail Merge using Google Sheets and Apps Script!
Prerequisites
This tutorial assumes that:
You're familiar with Google Sheets.
You know the basics of Apps Script and basic coding concepts. If you're new to coding or Apps Script, I've written a series of posts to teach you the basics of coding using Apps Script.
You've read the tutorial on sending an email for each row in a Google Sheet.
This tutorial is divided into four sectionsCreate a sheet called Data containing email addresses.
Create a sheet called Templates that contains the subject and body of the email message.
Create an Apps Script to read data from your sheet, perform a Mail Merge and send out emails.
Run your script to send emails.
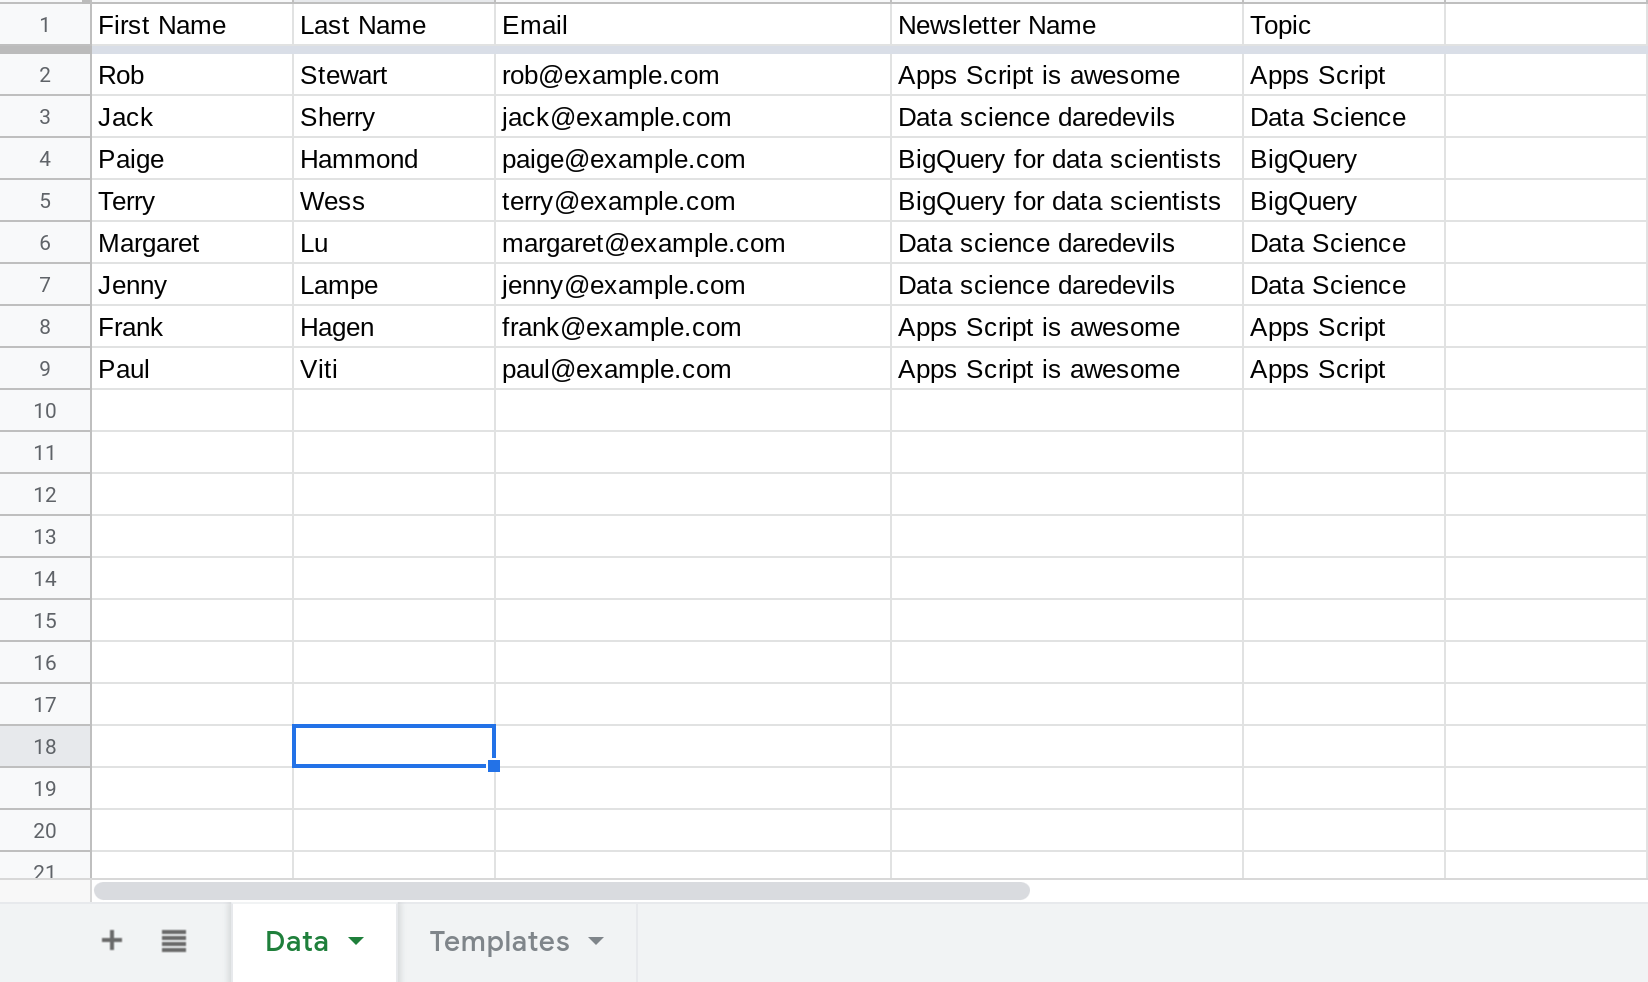
Section 1: Create a sheet called Data containing information to personalize the emailCreate a sheet called Data that contains the necessary information to populate the placeholders in the email template.
Ensure that you specify headers for each column since you'll be using these values as placeholders in the email template.
Section 2: Create a sheet called Templates containing the subject and body of the email messageCreate a new sheet called Templates.
Enter the email subject and body in the sheet. Enter the subject in cell A2 and the body in cell A5.
Use placeholders to specify where the information from the Data sheet should be inserted. The format for a placeholder is ${<HEADER NAME>}} where <HEADER NAME> is the header of the column whose value should be inserted. For example, use {{First Name}} to insert the user's first name.
You can use placeholders within the subject and body of the email.

Section 3: Create an Apps Script to read data from your sheet, perform a Mail Merge and send out emails
Create a sheet called Data containing email addresses.
Create a sheet called Templates that contains the subject and body of the email message.
Create an Apps Script to read data from your sheet, perform a Mail Merge and send out emails.
Run your script to send emails.
Create a sheet called Data that contains the necessary information to populate the placeholders in the email template.
Ensure that you specify headers for each column since you'll be using these values as placeholders in the email template.
Section 2: Create a sheet called Templates containing the subject and body of the email messageCreate a new sheet called Templates.
Enter the email subject and body in the sheet. Enter the subject in cell A2 and the body in cell A5.
Use placeholders to specify where the information from the Data sheet should be inserted. The format for a placeholder is ${<HEADER NAME>}} where <HEADER NAME> is the header of the column whose value should be inserted. For example, use {{First Name}} to insert the user's first name.
You can use placeholders within the subject and body of the email.
Section 3: Create an Apps Script to read data from your sheet, perform a Mail Merge and send out emails
Create a new sheet called Templates.
Enter the email subject and body in the sheet. Enter the subject in cell A2 and the body in cell A5.
Use placeholders to specify where the information from the Data sheet should be inserted. The format for a placeholder is ${<HEADER NAME>}} where <HEADER NAME> is the header of the column whose value should be inserted. For example, use {{First Name}} to insert the user's first name.
You can use placeholders within the subject and body of the email.
The full code is below. It is a bit lengthy but don't worry, I'll explain how it works. The script consists of four functions:
getData(): Returns the contents of a sheet as a two-dimensional array.renderTemplate(): Takes a template and an object as input and replaces the placeholders in the template with values from the object.rowsToObjects(): Converts an array of rows into an array of objects. Each row becomes an object with the column headers as properties.sendEmails(): This is the main function and it uses all of the other functions to create and send personalized emails.
Full code
Read the code below and try to understand how it works. Please also feel free to copy paste it into the Apps Script editor and play around with it. That's the best way to learn.
/**
 * Returns a rectangular grid of values in a given sheet.
 * @param {string} sheetName The name of the sheet object that contains the data to be processed
 * @return {object[][]} A two-dimensional array of values in the sheet.
 */
function getData(sheetName) {
  var data = SpreadsheetApp.getActive().getSheetByName(sheetName).getDataRange().getValues();
  return data;
}

/**
 * Renders a template with values from an object.
 * @param {string} template The template to render.
 * @param{object} data The object containing data to render the template.
 * @return {string} The rendered template.
 */
function renderTemplate(template, data) {
  var output = template;
  var params = template.match(/\{\{(.*?)\}\}/g);
  params.forEach(function (param) {
    var propertyName = param.slice(2,-2); //Remove the {{ and the }}
    output = output.replace(param, data[propertyName] || "");
  });
  return output;
}

/**
 * Converts a grid of values into an array of objects.
 * @param {object[][]} rows An array of rows in the grid.
 * @return {object[]} An array of objects (each row became an object).
 */
function rowsToObjects(rows) {
  var headers = rows.shift();
  var data = [];
  rows.forEach(function (row) {
    var object  = {};
    row.forEach(function (value, index) {
      object[headers[index]] = value;
    });
    data.push(object);
  });
  return data;
}

/**
 * Sends an email for each row.
 */
function sendEmails() {
  var templateData = getData("Templates");
  var emailSubjectTemplate = templateData[1][0]; //Cell A2
  var emailBodyTemplate = templateData[4][0]; //Cell A5
  var emailData = getData("Data");
  emailData = rowsToObjects(emailData);
  emailData.forEach(function (rowObject) {
    var subject = renderTemplate(emailSubjectTemplate, rowObject);
    var body = renderTemplate(emailBodyTemplate, rowObject);
    MailApp.sendEmail(rowObject["Email"], subject, body);
  });
}
How does the code work? What does it do?
The best place to start understanding the code is the sendEmails() function since that is where the action begins.
The first thing the sendEmails() function does is it gets the templates from the Templates sheet.
var templateData = getData("Templates");
var emailSubjectTemplate = templateData[1][0]; //Cell A2
var emailBodyTemplate = templateData[4][0]; //Cell A5
Then it gets all of the rows in the Data sheet and converts these rows into an array of objects. Each row becomes an object.
var emailData = getData("Data");
emailData = rowsToObjects(emailData);
The output of getData("Data") is the following two-dimensional array:
[
[
"First Name",
"Last Name",
"Email",
"Newsletter Name",
"Topic"
],
[
"Rob",
"Stewart",
"rob@example.com",
"Apps Script is awesome",
"Apps Script"
],
[
"Jack",
"Sherry",
"jack@example.com",
"Data science daredevils",
"Data Science"
],
[
"Paige",
"Hammond",
"paige@example.com",
"BigQuery for data scientists",
"BigQuery"
],
[
"Terry",
"Wess",
"terry@example.com",
"BigQuery for data scientists",
"BigQuery"
],
[
"Margaret",
"Lu",
"margaret@example.com",
"Data science daredevils",
"Data Science"
],
[
"Jenny",
"Lampe",
"jenny@example.com",
"Data science daredevils",
"Data Science"
],
[
"Frank",
"Hagen",
"frank@example.com",
"Apps Script is awesome",
"Apps Script"
],
[
"Paul",
"Viti",
"paul@example.com",
"Apps Script is awesome",
"Apps Script"
]
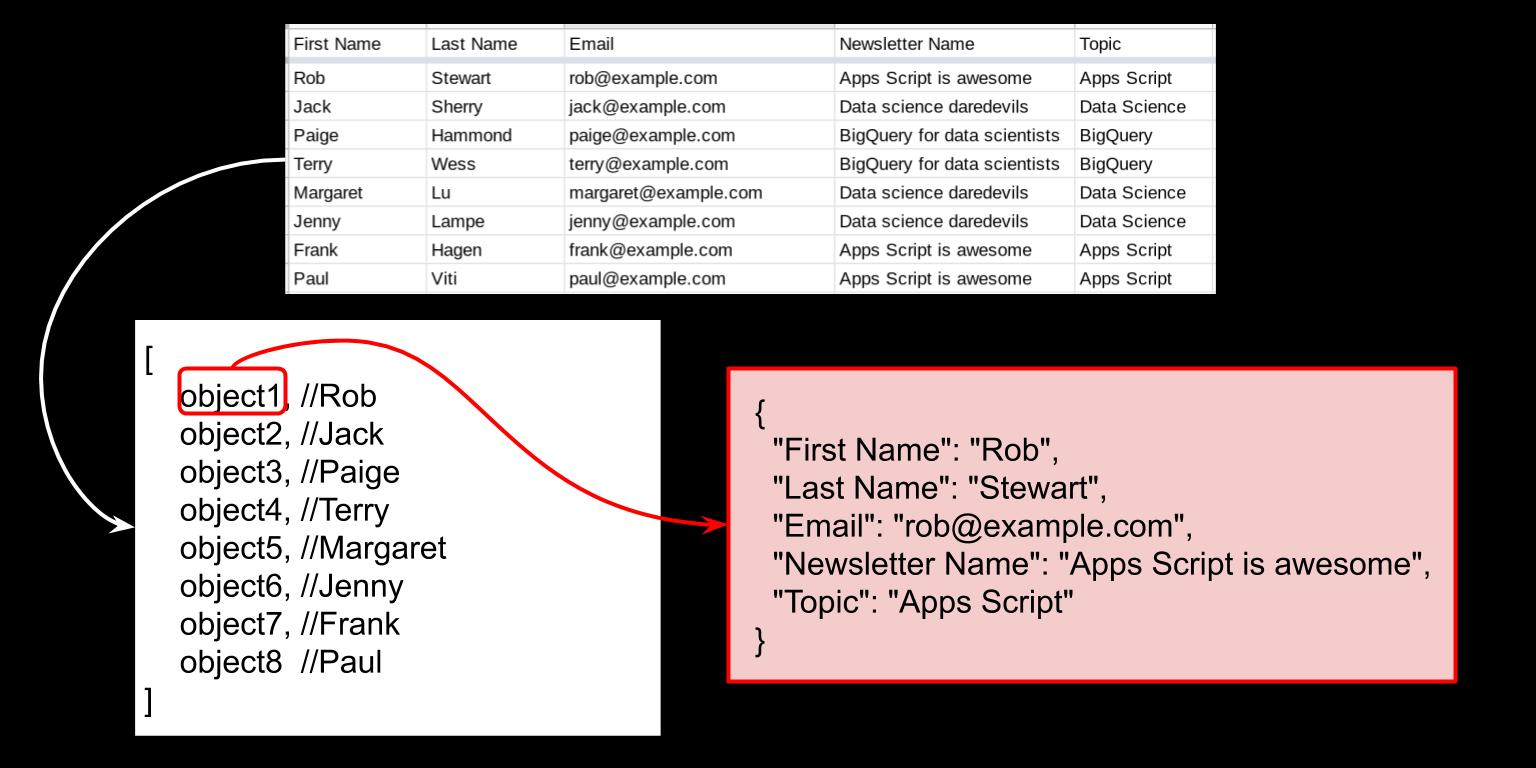
]The function rowsToObjects(emailData) converts the above two-dimensional array into an array of objects.
[
  {
    "First Name": "Rob",
    "Last Name": "Stewart",
    "Email": "rob@example.com",
    "Newsletter Name": "Apps Script is awesome",
    "Topic": "Apps Script"
  },
  {
    "First Name": "Jack",
    "Last Name": "Sherry",
    "Email": "jack@example.com",
    "Newsletter Name": "Data science daredevils",
    "Topic": "Data Science"
  },
  {
    "First Name": "Paige",
    "Last Name": "Hammond",
    "Email": "paige@example.com",
    "Newsletter Name": "BigQuery for data scientists",
    "Topic": "BigQuery"
  },
  {
    "First Name": "Terry",
    "Last Name": "Wess",
    "Email": "terry@example.com",
    "Newsletter Name": "BigQuery for data scientists",
    "Topic": "BigQuery"
  },
  {
    "First Name": "Margaret",
    "Last Name": "Lu",
    "Email": "margaret@example.com",
    "Newsletter Name": "Data science daredevils",
    "Topic": "Data Science"
  },
  {
    "First Name": "Jenny",
    "Last Name": "Lampe",
    "Email": "jenny@example.com",
    "Newsletter Name": "Data science daredevils",
    "Topic": "Data Science"
  },
  {
    "First Name": "Frank",
    "Last Name": "Hagen",
    "Email": "frank@example.com",
    "Newsletter Name": "Apps Script is awesome",
    "Topic": "Apps Script"
  },
  {
    "First Name": "Paul",
    "Last Name": "Viti",
    "Email": "paul@example.com",
    "Newsletter Name": "Apps Script is awesome",
    "Topic": "Apps Script"
  }
]
Why are we converting rows into objects? It's because the renderTemplate() function uses values from these objects to populate the placeholders in the template.
The final step is to loop through each object in emailData, populate the subject and body template with values from the object and send out emails.
emailData.forEach(function (rowObject) {
  var subject = renderTemplate(emailSubjectTemplate, rowObject);
  var body = renderTemplate(emailBodyTemplate, rowObject);
  MailApp.sendEmail(rowObject["Email"], subject, body);
});
Understanding how the rowsToObjects() function works
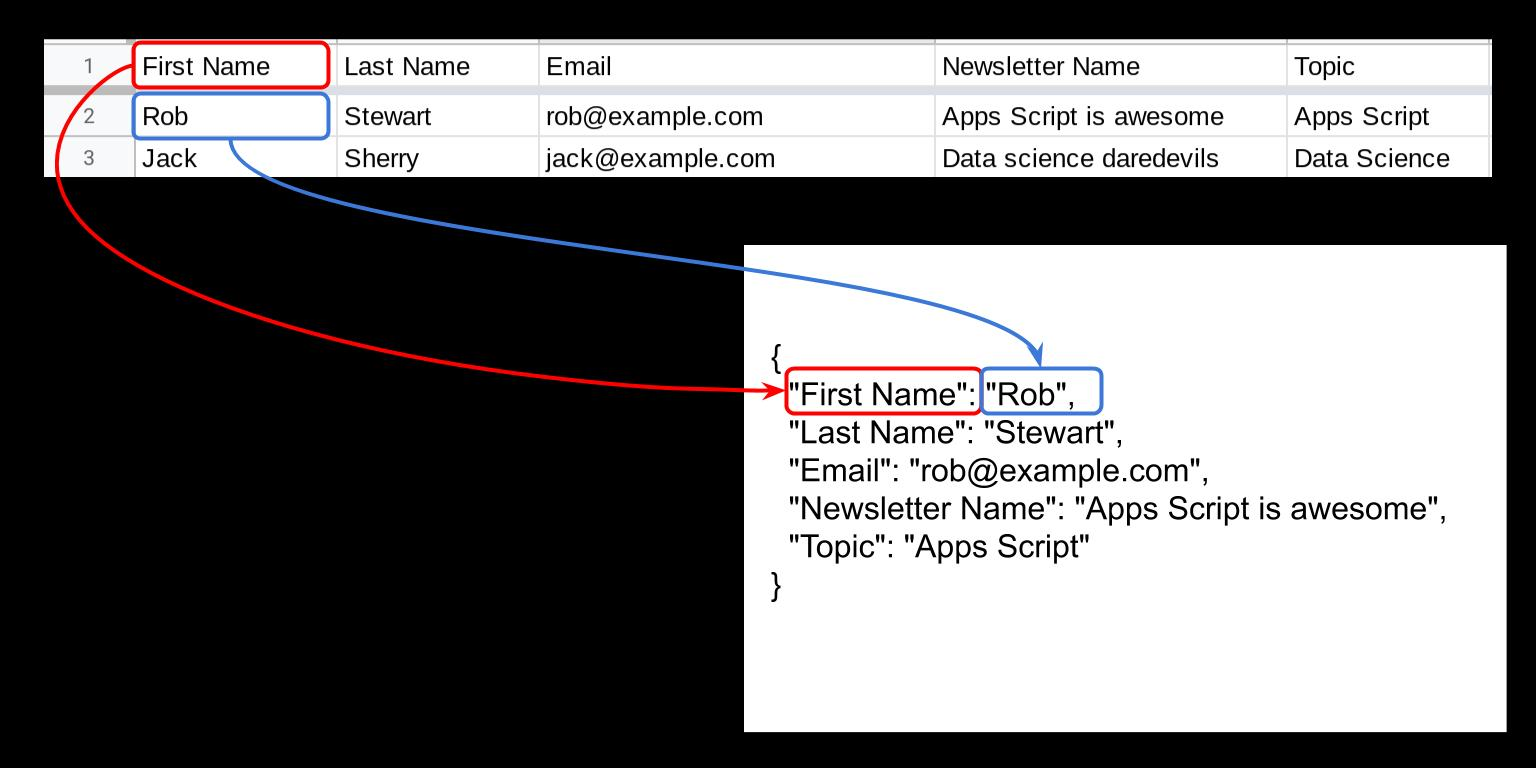
The rowsToObjects() function converts the rows in a sheet to an array of objects. Each row in the sheet, with the exception of the header row, gets converted to an object.
The column names in the header row are used as property names when creating the object.
Here is the code for the function rowsToObjects.
function rowsToObjects(rows) {
  var headers = rows.shift();
  var data = [];
  rows.forEach(function (row) {
    var object  = {};
    row.forEach(function (value, index) {
      object[headers[index]] = value;
    });
    data.push(object);
  });
  return data;
}
The first step is to remove the header row. These values will be used as property names. The shift() array function removes the first item in the array and returns the item.
var headers = rows.shift();Then each row is converted into an object. The object is then added to an array called data.
rows.forEach(function (row) {
  var object  = {};
  row.forEach(function (value, index) {
    object[headers[index]] = value; //Column names are used as the key
  });
  data.push(object);
});
Finally the array data is returned.
Understanding how the renderTemplate() function works
The function takes two parameters as input: the template to render and an object containing values to populate the placeholders in the template. The function returns the rendered template.
What does "rendering a template" mean?
Rendering is the process of converting a template into an object (such as an email or a document etc.) that can be used. In this tutorial, the renderTemplate() function replaces all the placeholders in the template with values.
function renderTemplate(template, data) {
  var output = template;
  var params = template.match(/\{\{(.*?)\}\}/g);
  params.forEach(function (param) {
    var propertyName = param.slice(2,-2); //Remove the {{ and the }}
    output = output.replace(param, data[propertyName] || "");
  });
  return output;
}
The string /\{\{(.*?)\}\}/g is called a regular expression. A regular expression is like a pattern and it is used to find all the locations in a piece of text where the pattern occurs. Here, the regular expression is used to find all occurrences of the pattern {{<some string>}} in the template. The code template.match(/\{\{(.*?)\}\}/g) returns these occurrences as an array.
Then, for each occurrence, we replace the placeholder with the corresponding value from the data object.
Here is an example:
Consider the email subject template below.
var emailSubjectTemplate = "{{First Name}}, thank you for subscribing to {{Newsletter Name}}";The match() method of the string object uses the regular expression to find all occurrences of the pattern {{<some string>}} in the template.
var params = emailSubjectTemplate.match(/\{\{(.*?)\}\}/g);The params variable will contain an array of these placeholder values.
["{{First Name}}", "{{Newsletter Name}}"]Then, each placeholder is replaced with the actual value to create the email subject.
params.forEach(function (param) {
var propertyName = param.slice(2,-2); //Remove the {{ and the }}
output = output.replace(param, data[propertyName] || "");
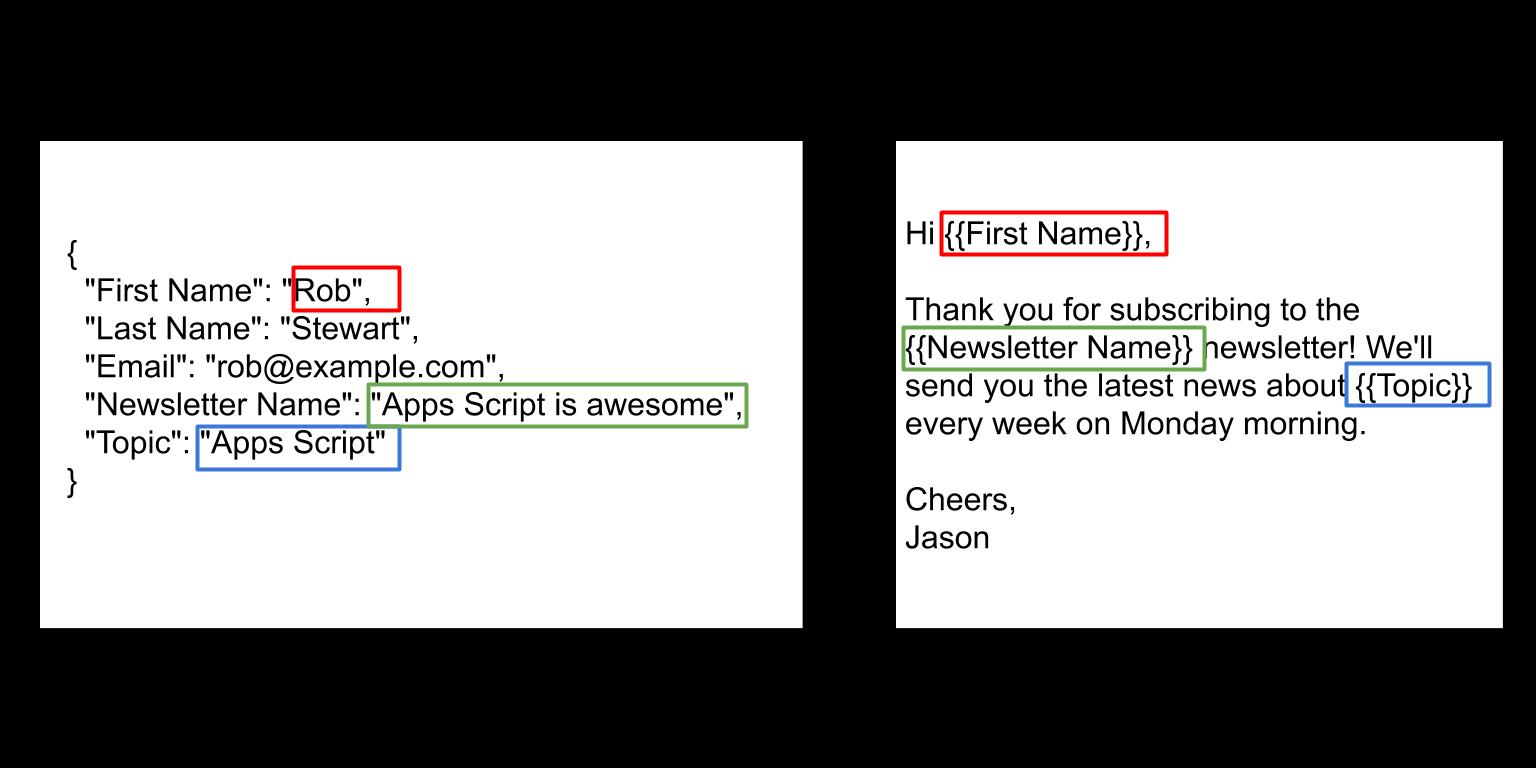
});Let's say the object data contains the following information about Rob.
The contents of data will be:
  {
    "First Name": "Rob",
    "Last Name": "Stewart",
    "Email": "rob@example.com",
    "Newsletter Name": "Apps Script is awesome",
    "Topic": "Apps Script"
  }
The renderTemplate() function will then render the subject template.
{{First Name}}, thank you for subscribing to {{Newsletter Name}}The above template will get converted to the subject line below.
Rob, thank you for subscribing to Apps Script is awesomeNotice that the placeholders {{First Name}} and {{Newsletter Name}} were replaced by the values "Rob" and "Apps Script is awesome" from the data object.
Section 4: Run your script to send emails
To run your script, choose the sendEmails function from the drop down menu and click the run button.
You'll be asked to authorize the script. Once you authorize it, your script will run and emails will be sent. Here is a screenshot of an email that was sent when I ran the script.

Future work
A Mail Merge is a very powerful concept. There are so many ways for you to apply the underlying concept of merging the data in a sheet with a template in order to personalize content.
For example, you could:
Create invoices using a template in Google Docs and data in Google Sheets.
Create printable address labels to mail holiday cards to your friends and relatives.
Create personalized quizzes for your students using a template in Google Docs and a question library in Google Sheets.
Summary
In this tutorial you learned how to send personalized emails using Mail Merge and Google Sheets.
A Mail Merge involves using data from a spreadsheet or a database to create personalized emails or documents.
To set up a Mail Merge in Google Sheets, you need a spreadsheet containing information and templates that will be populated using this information.
You learned how to write an apps script to read information from the sheet, populate templates using this information and send out emails.
Thanks for reading.
DISCLAIMER: This content is provided for educational purposes only. All code, templates, and information should be thoroughly reviewed and tested before use. Use at your own risk. Full Terms of Service apply.
Thanks for your feedback!
Your input helps improve the content for everyone.
