Send HTML email from Google Sheets
In this tutorial, I'll show you how to send HTML email from Google Sheets using Apps Script. I'll also show you how to create the HTML email template using Gmail and Google Docs.
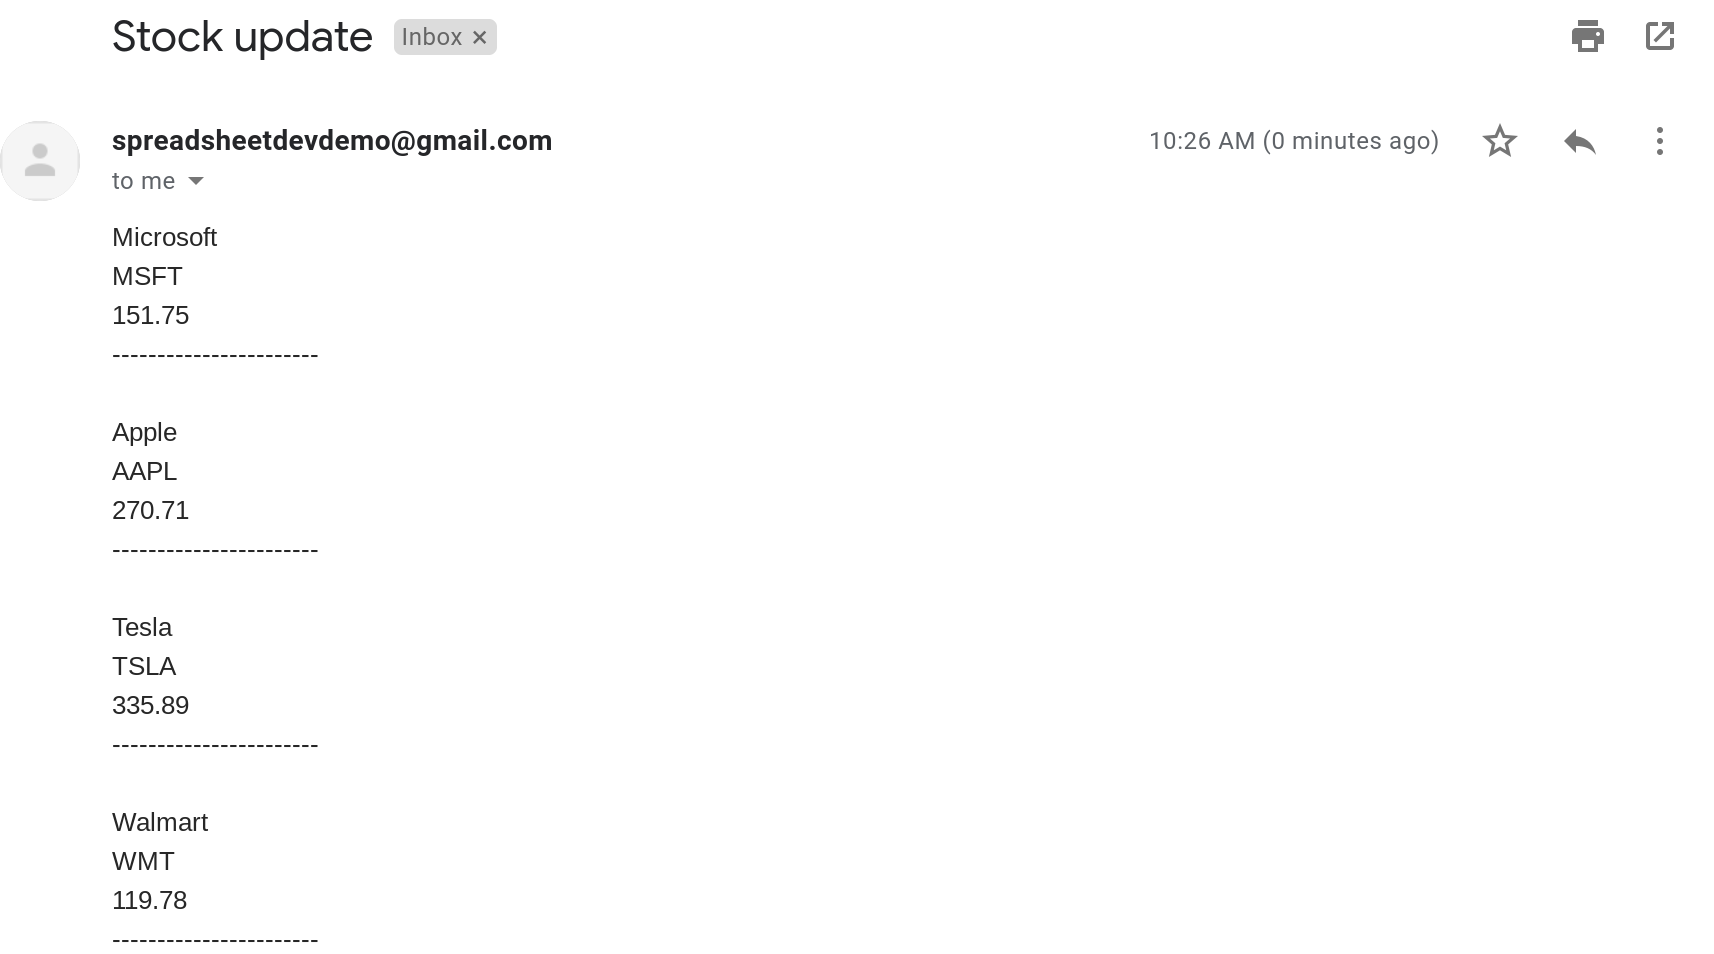
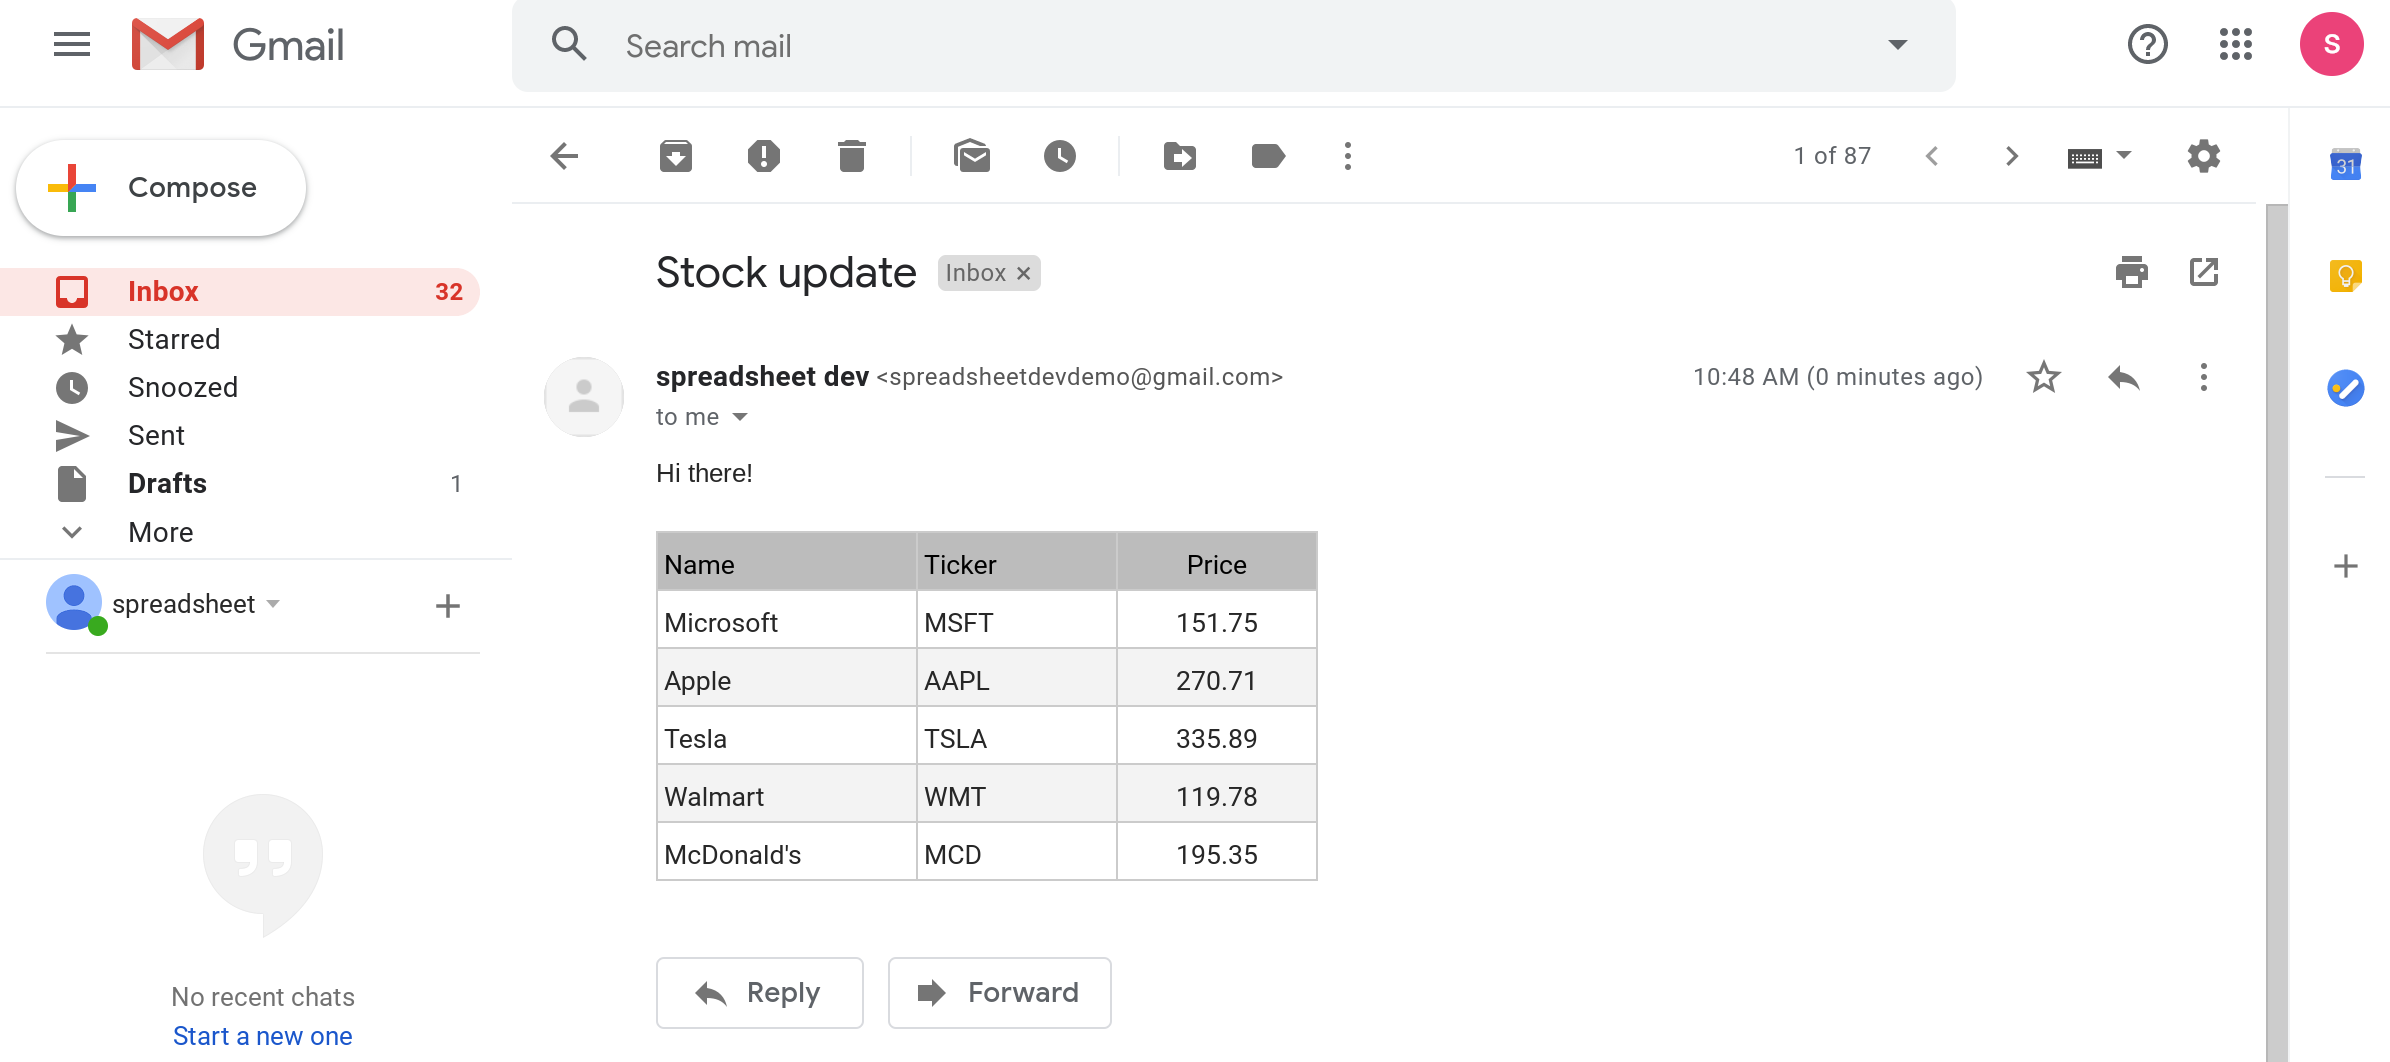
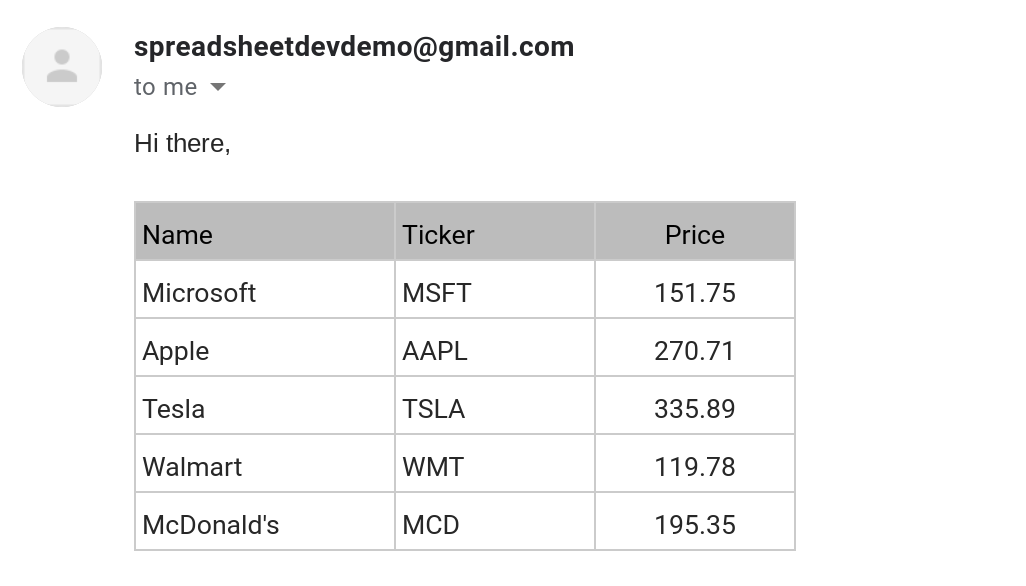
In a previous tutorial, I described how to build a Stock Watcher application to track the prices of stocks. The Stock Watcher app sends an email every morning with updated prices for the stocks that you are tracking. That email looks like this:
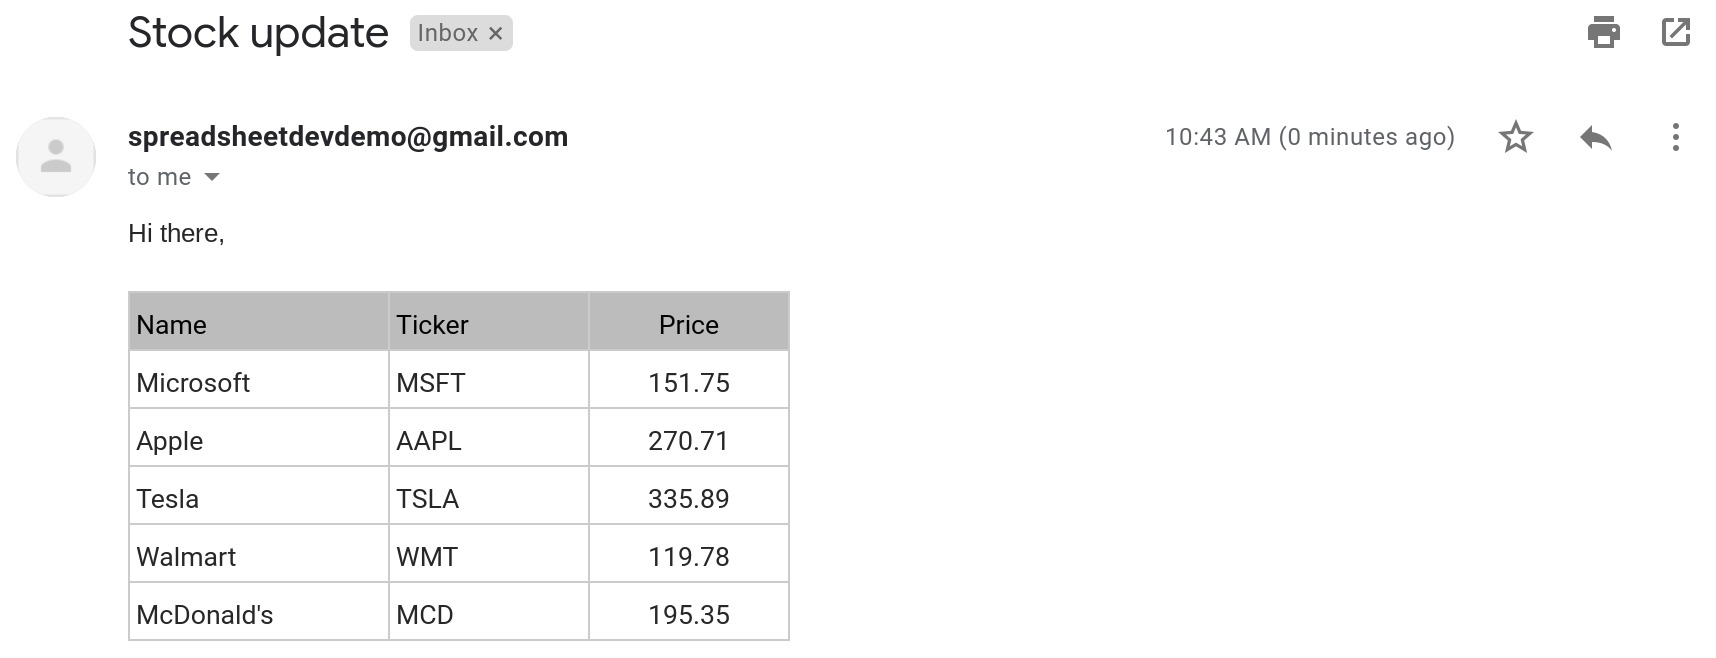
This tutorial will teach you how to make that email look really nice by using HTML. Isn't the email below a lot better? The tabular structure and HTML formatting also make it easier to read the information in the email.
Prerequisites
In this tutorial, I assume that:
You're familiar with the basics of Google Sheets, Apps Script and other basic coding concepts.
You're familiar with HTML and CSS.
You've completed the previous tutorial on "Sending email from Google Sheets based on a schedule".
If you're new to coding or Apps Script, I've written a series of introductory tutorials on learning to code using Google Sheets and Apps Script.
This tutorial is divided into two sectionsSection 1: Create the HTML email template.
Section 2: Create an apps script to send HTML emails using the template.
Section 1: Create the HTML email template
Section 1: Create the HTML email template.
Section 2: Create an apps script to send HTML emails using the template.
In order to send HTML email, we first need to create an email template using HTML. I'll show you how to create one using Google Sheets, Docs & Gmail.
There are 3 steps
Use Gmail to create an email that looks like the one that you want to send using Apps Script.
Send this email to yourself and use Gmail to get the HTML code for this email.
Create an HTML template by using this code.
Use Gmail to create an email that looks like the one that you want to send using Apps Script
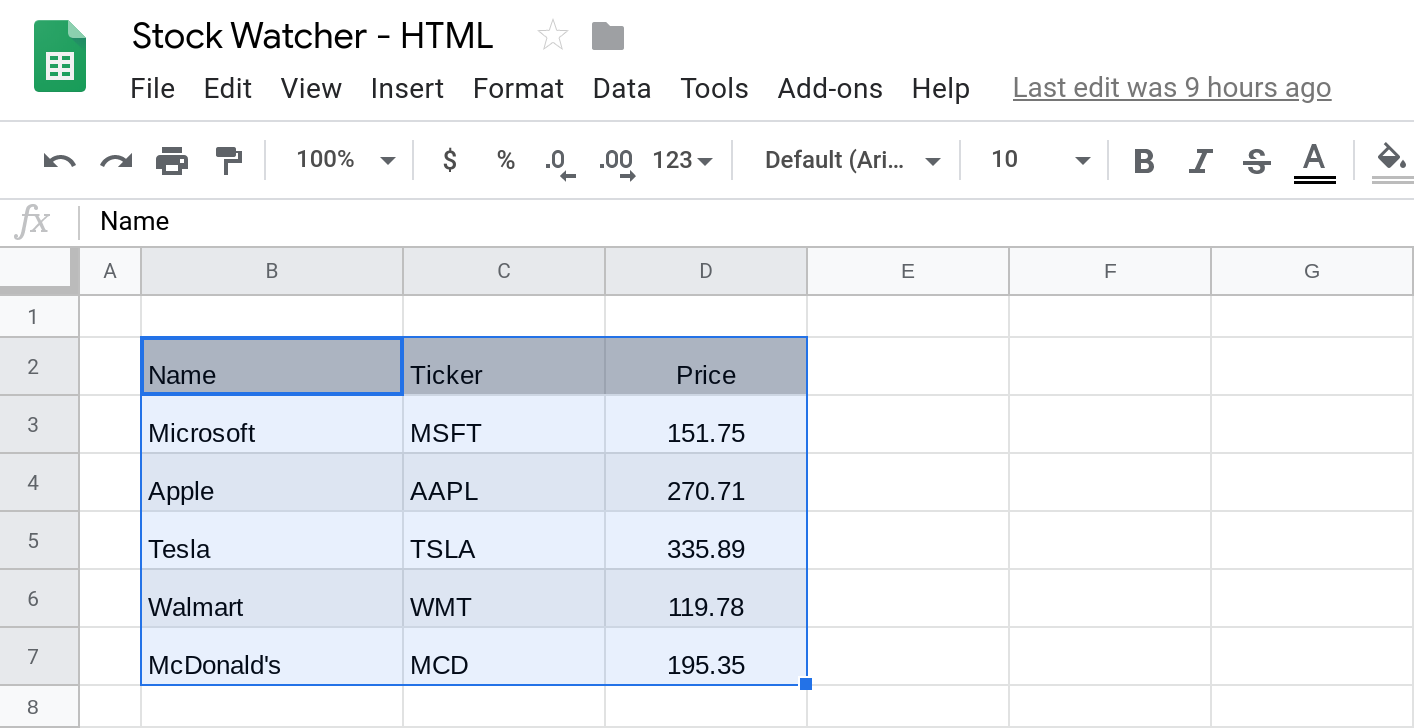
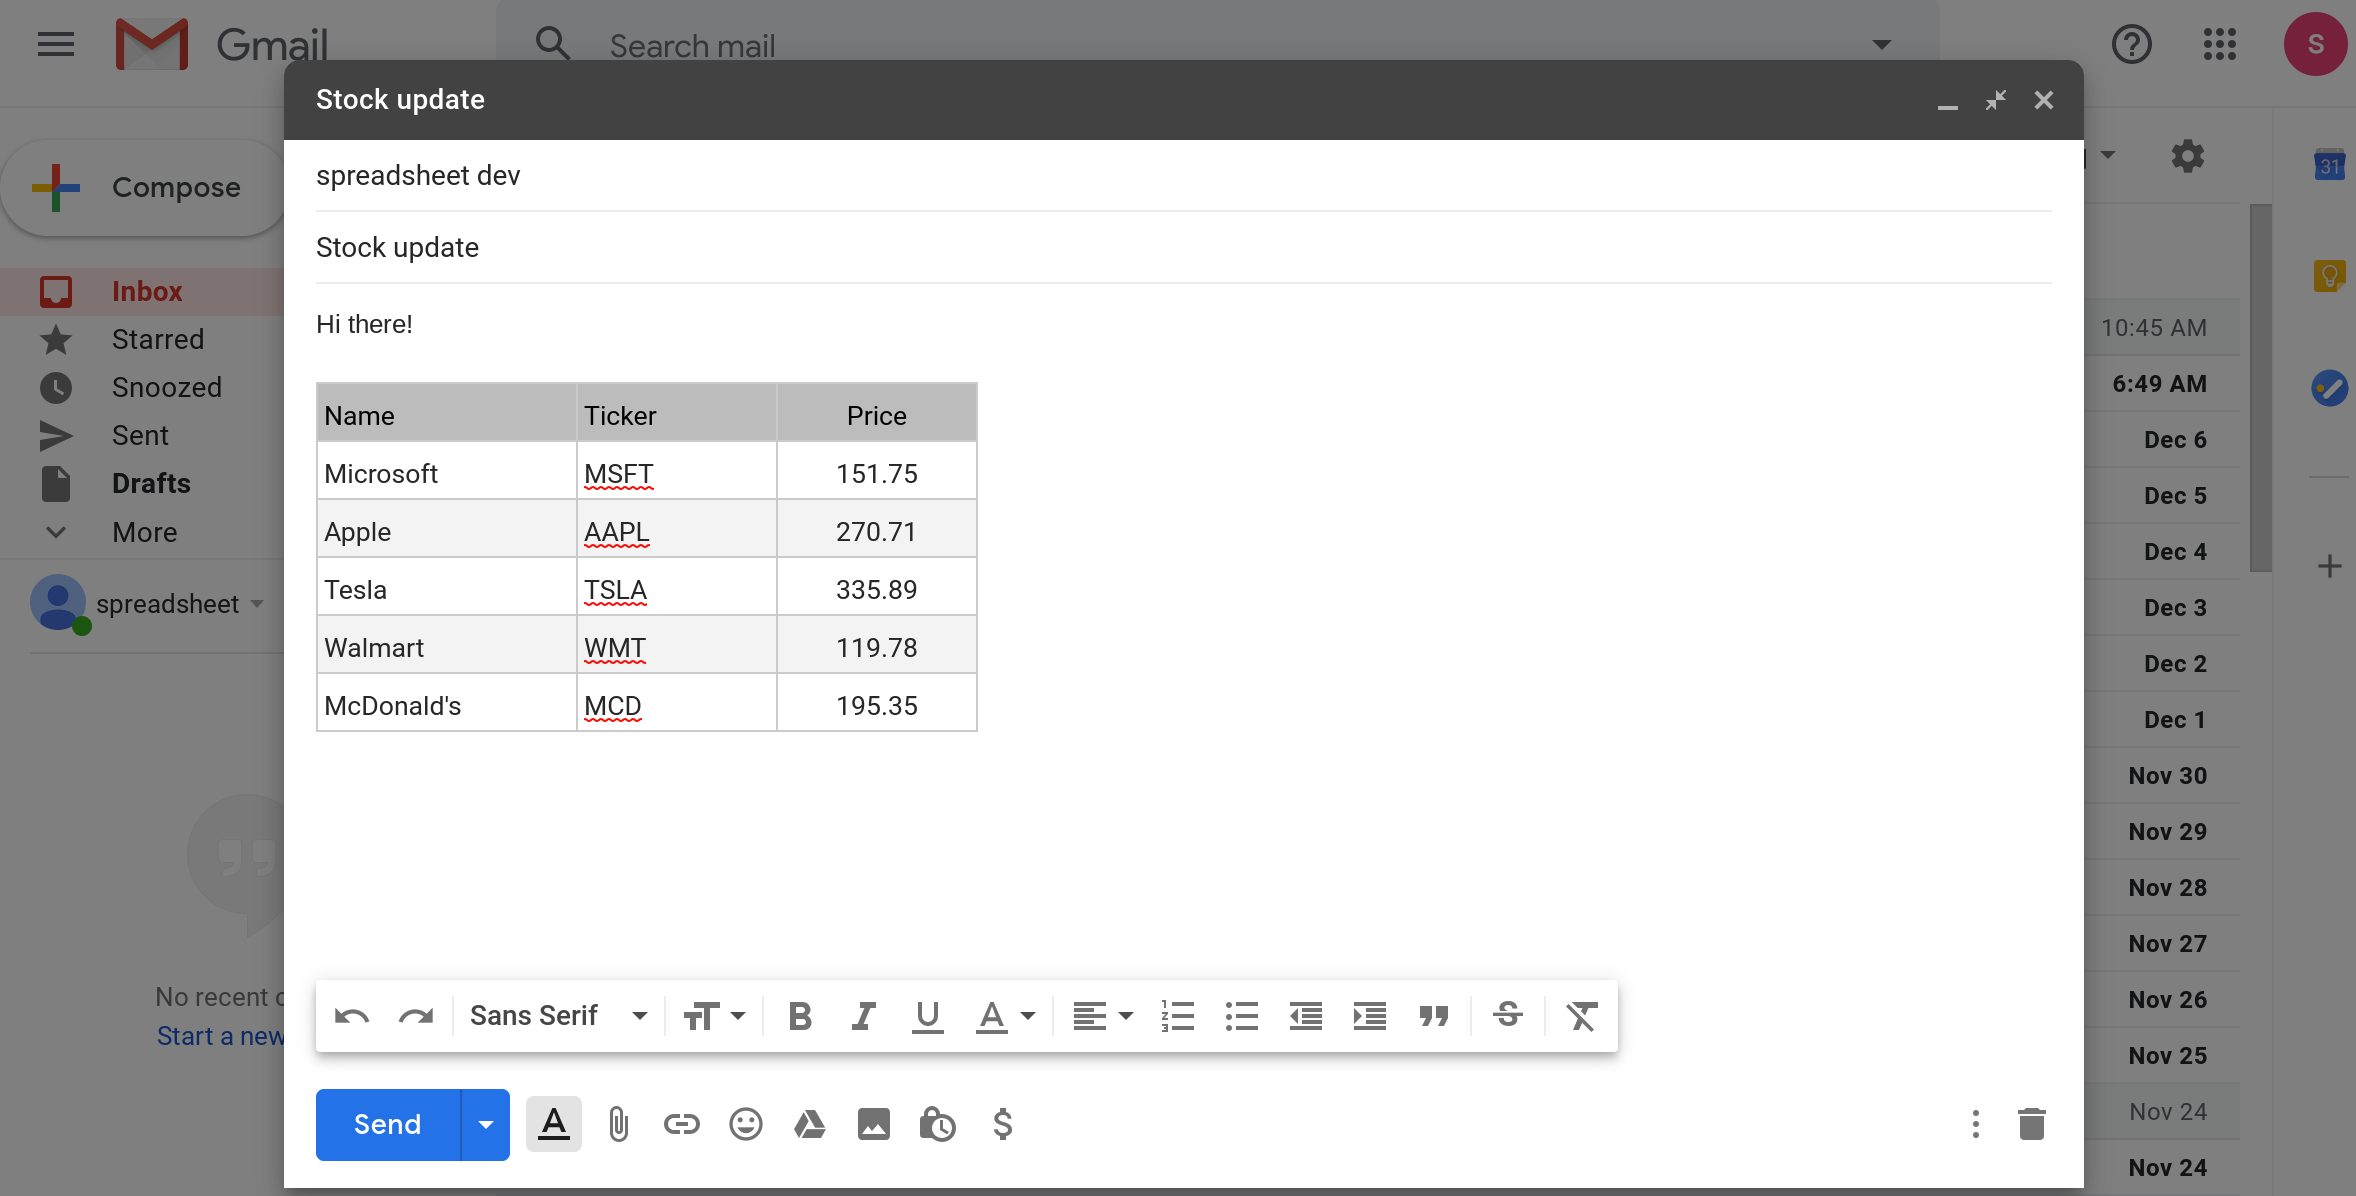
First, begin composing an email in Gmail. Then, copy paste the table containing stock information from the sheet into the email body.
Send this email to yourself and use Gmail to get the HTML code for this email
Send the email to yourself and confirm that it looks OK.
Creating HTML email templates that work across a variety of email clients such as Gmail, Outlook and Hotmail etc. can be challenging. In this post I am going to assume that the vast majority of email recipients are Gmail users. If that isn't true, you might want to test sending the above email to a few non-Gmail recipients to confirm that the email looks OK in their email clients.
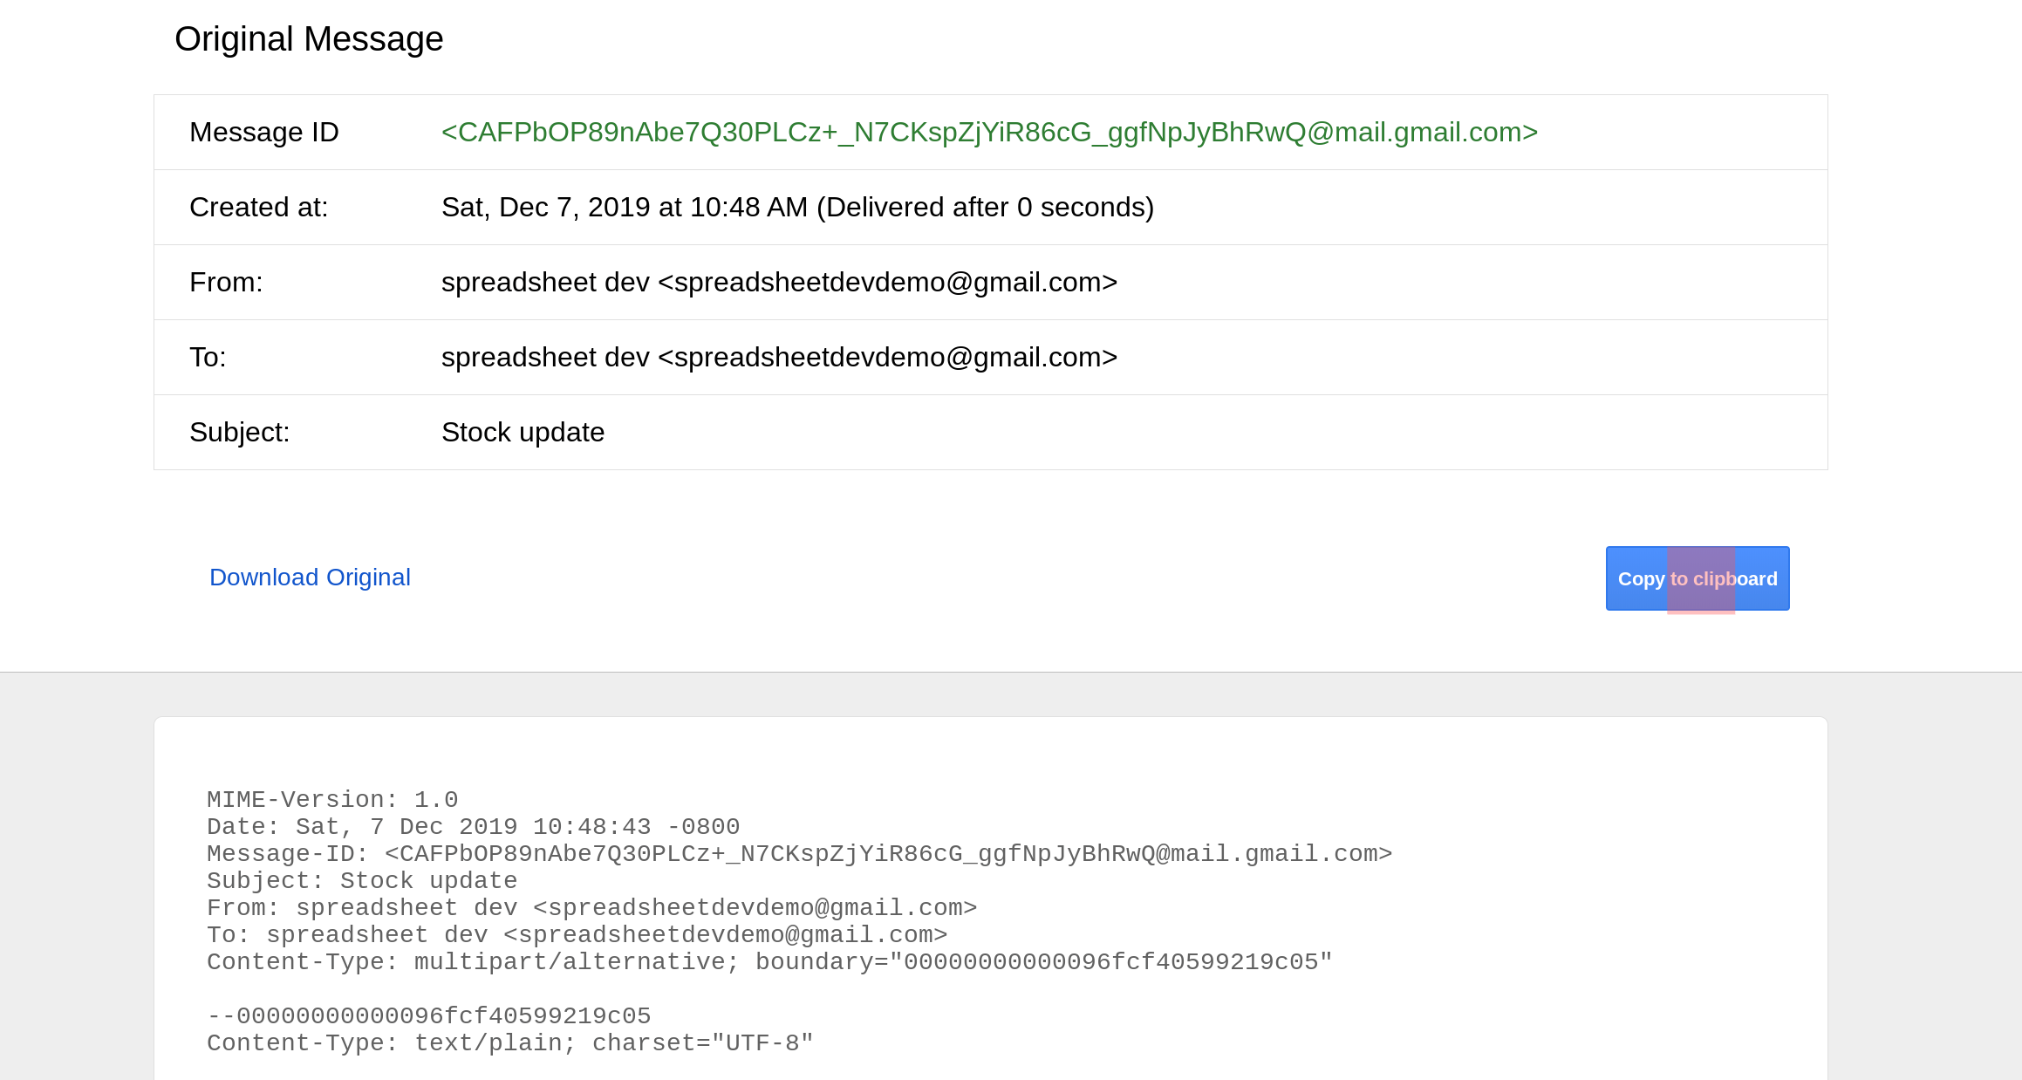
From the three-dot menu in Gmail, select Show original.
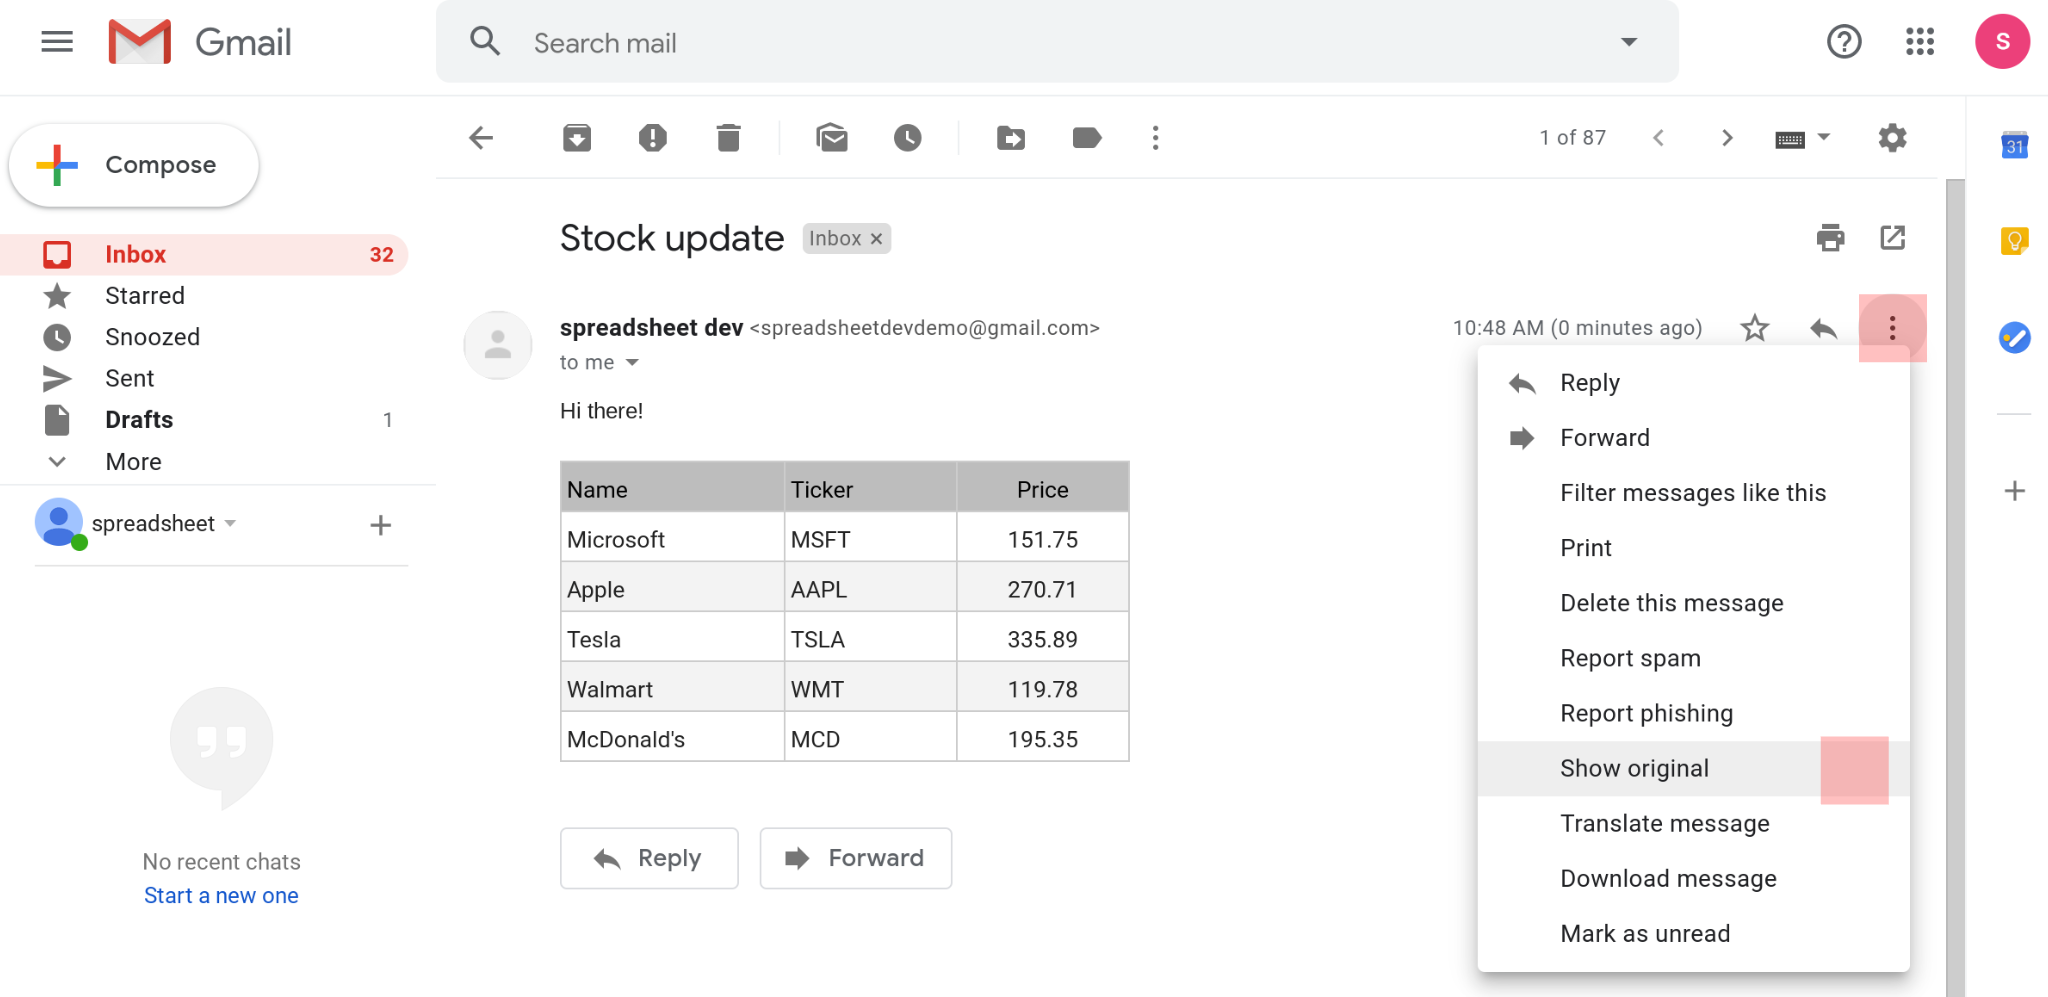
Click Copy to clipboard to copy the contents of the message and paste it into a Google Doc.
★ Did you know
Here is a quick way to create a new Google Doc. Open the URL https://docs.new on your browser and it will create a new Google Doc for you.
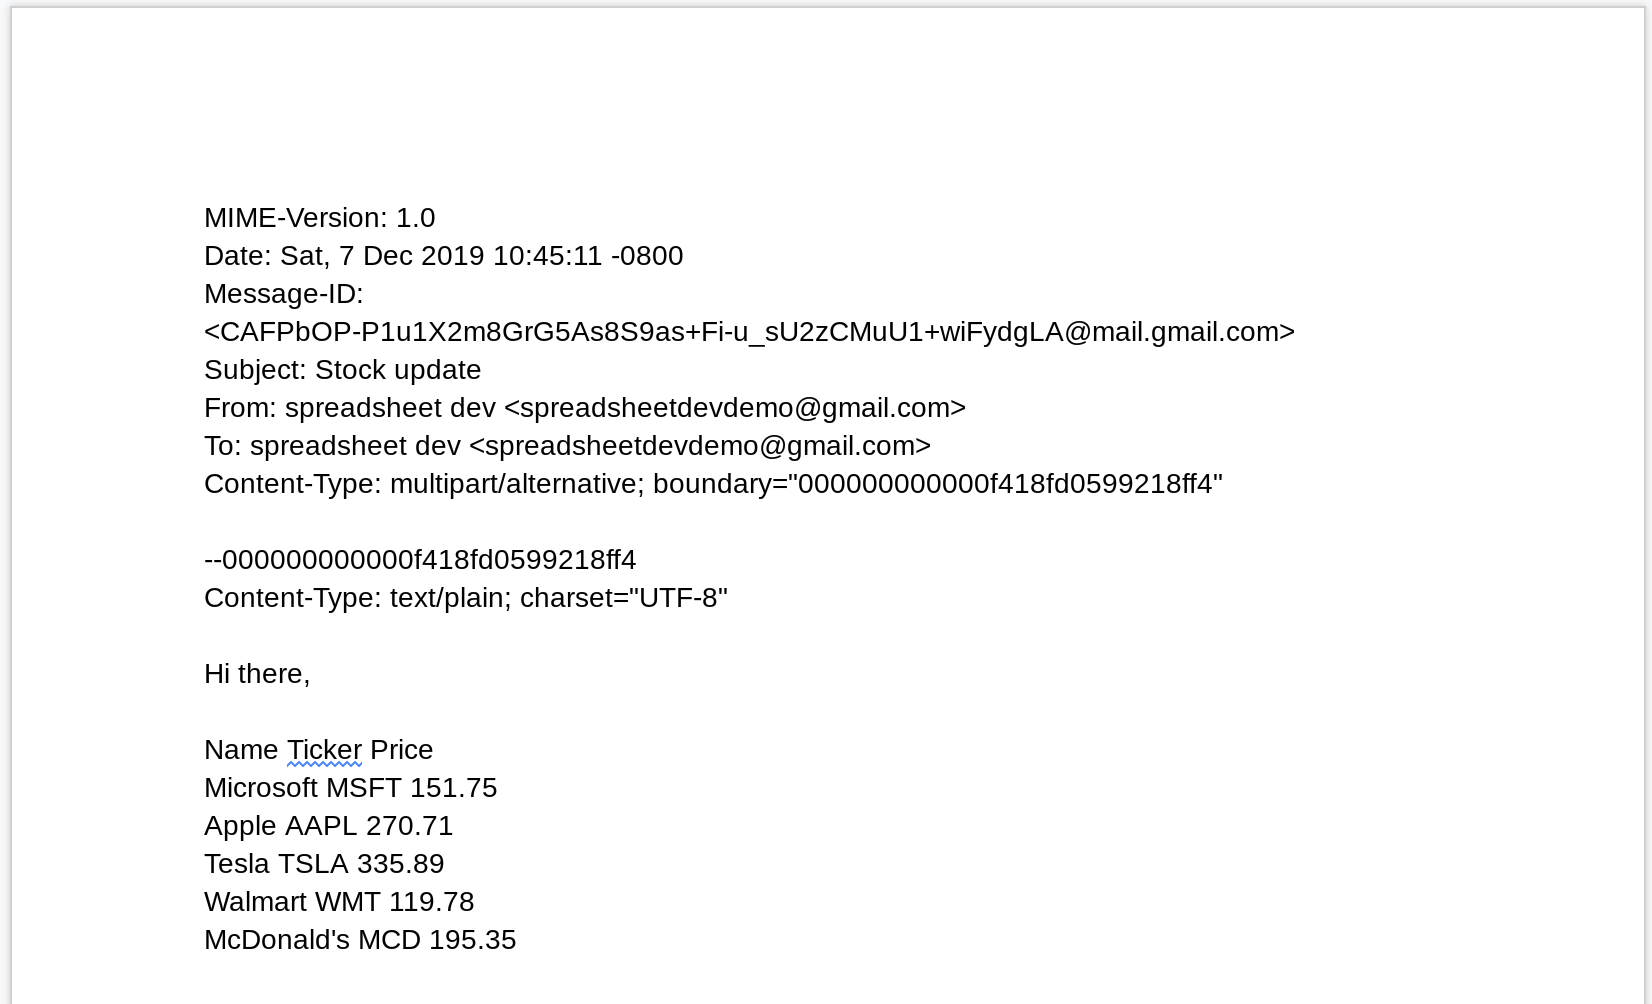
At the end of this step, you should have a Google Doc containing the detailed email message, including its text and HTML content.
Next, we need to delete all the unnecessary content from the doc so you only have the HTML code left.
Search for Content-Type: text/html; in the doc. You'll see the HTML code for the email right below where this text appears in the doc.
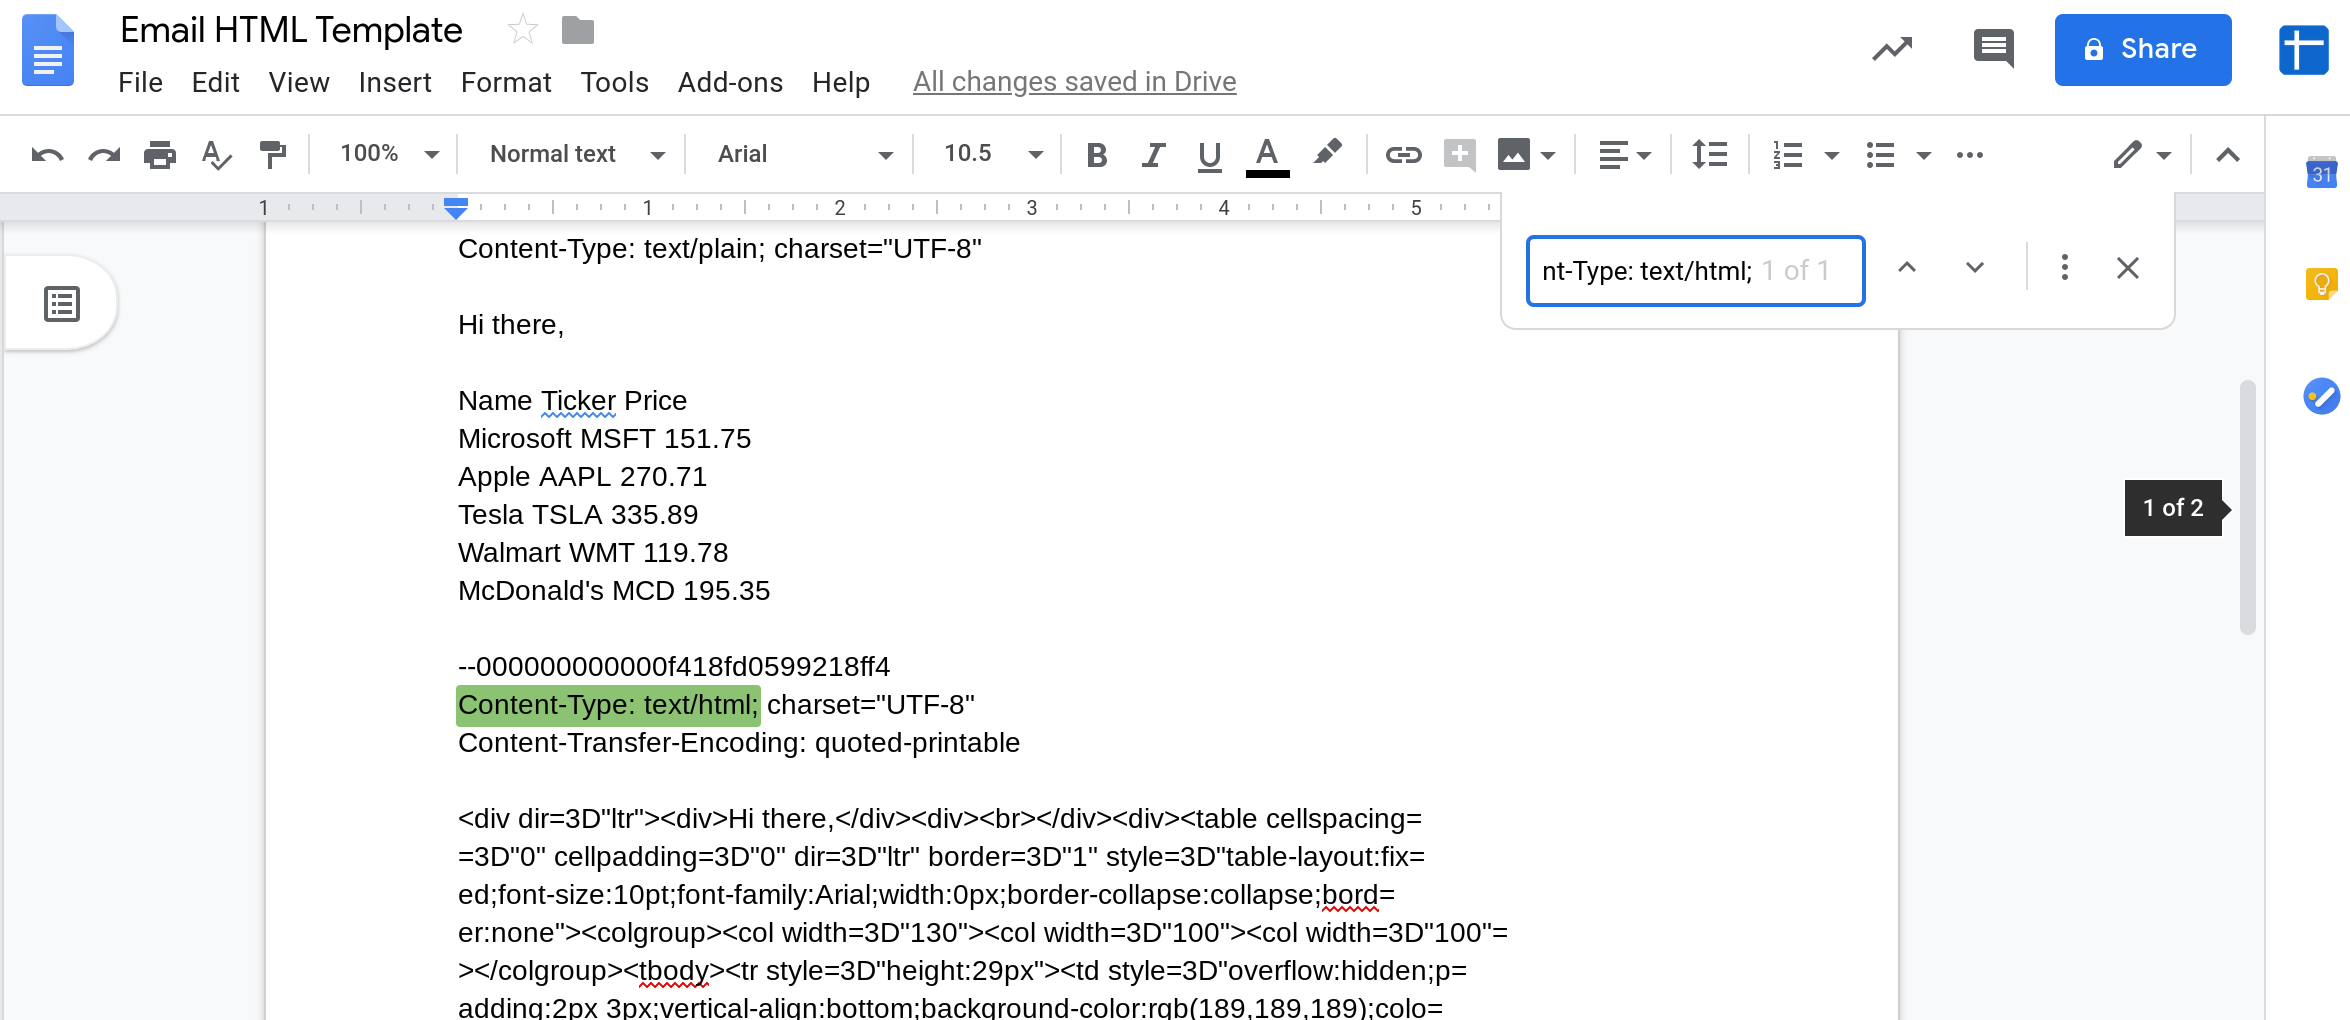
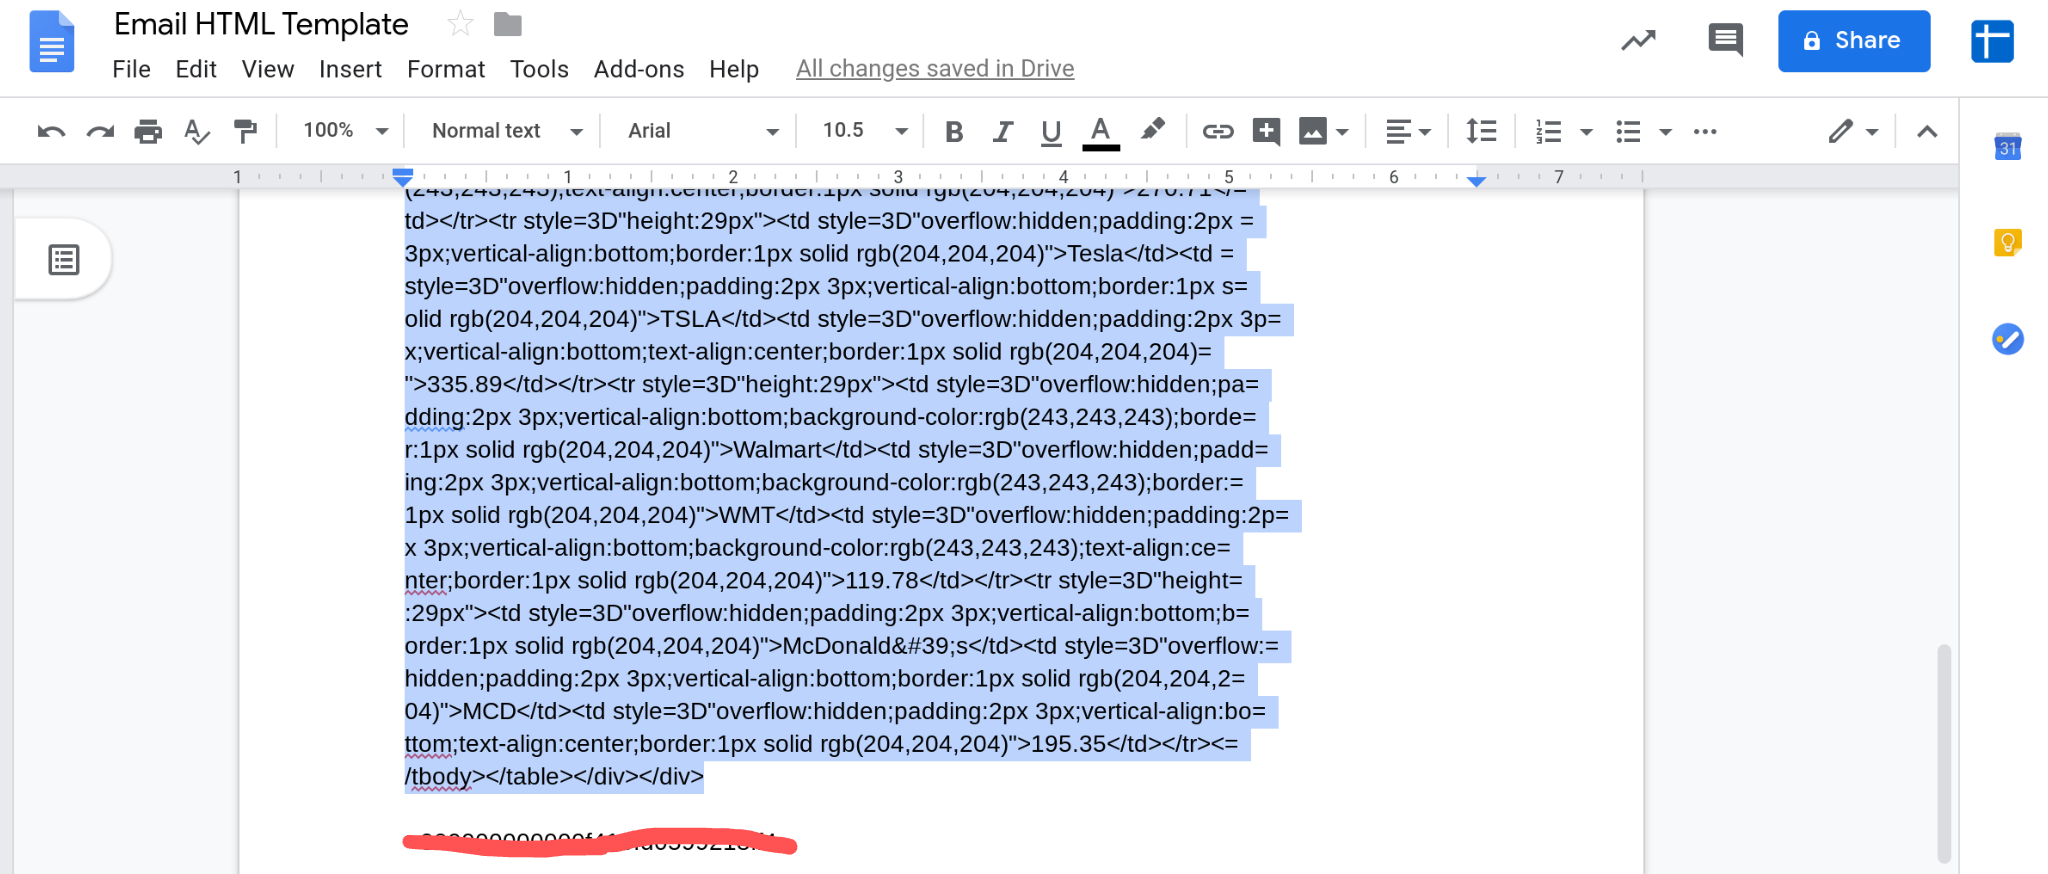
Delete everything else in the document except this HTML. I've highlighted the HTML code in the screenshots below to help you locate it in your document.
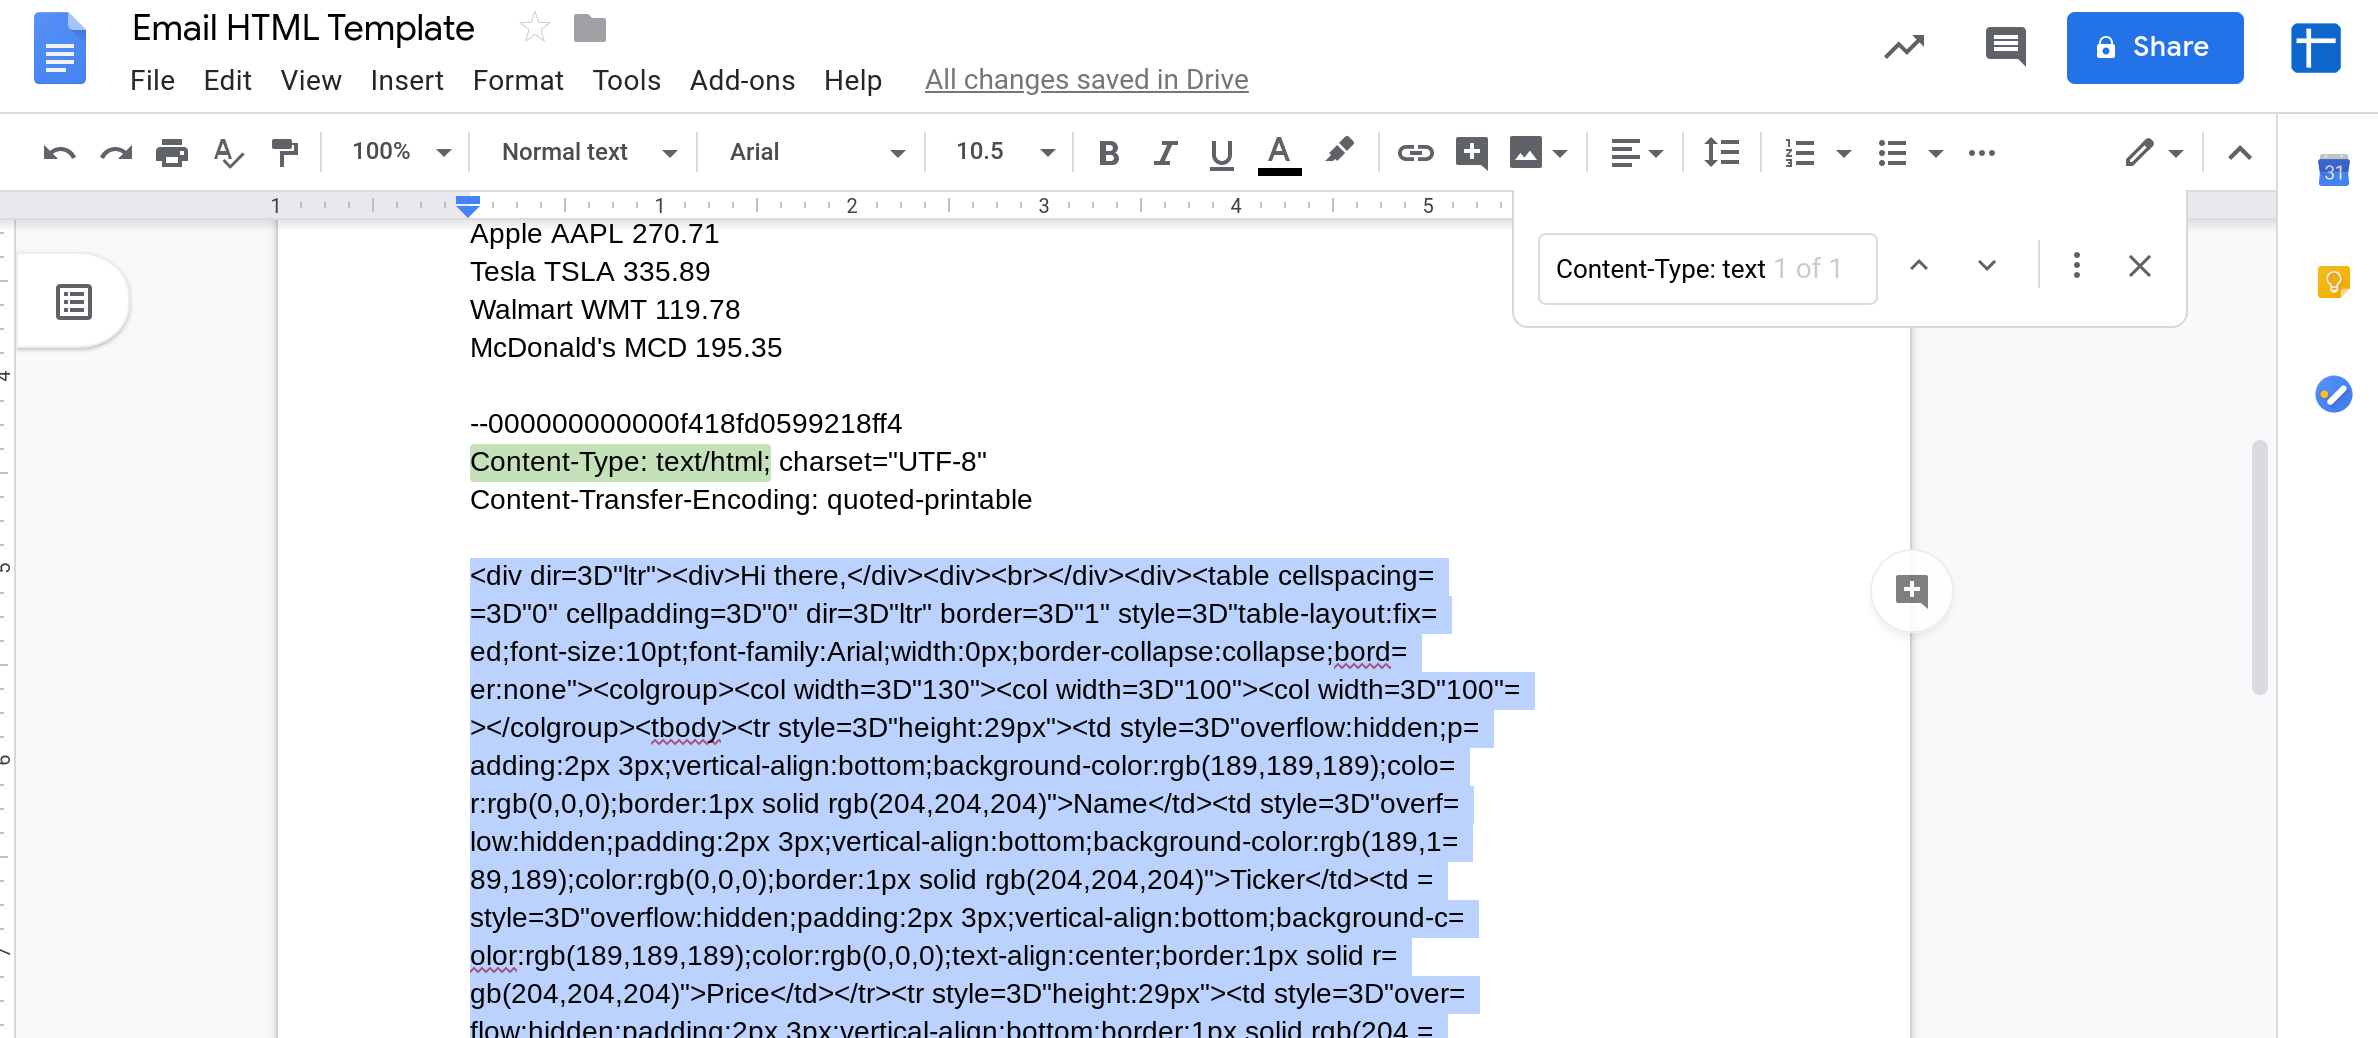
You also need to delete a line at the very end (after the HTML section ends).
The code Content-Transfer-Encoding: quoted-printable right before the HTML tells the email client that the HTML content has been encoded. As the code suggests, the encoding system used is "quoted-printable", which is commonly used to encode emails. The HTML content should therefore be decoded before it is used.
When you're done, your document should only contain the encoded HTML code for the email that you sent yourself.
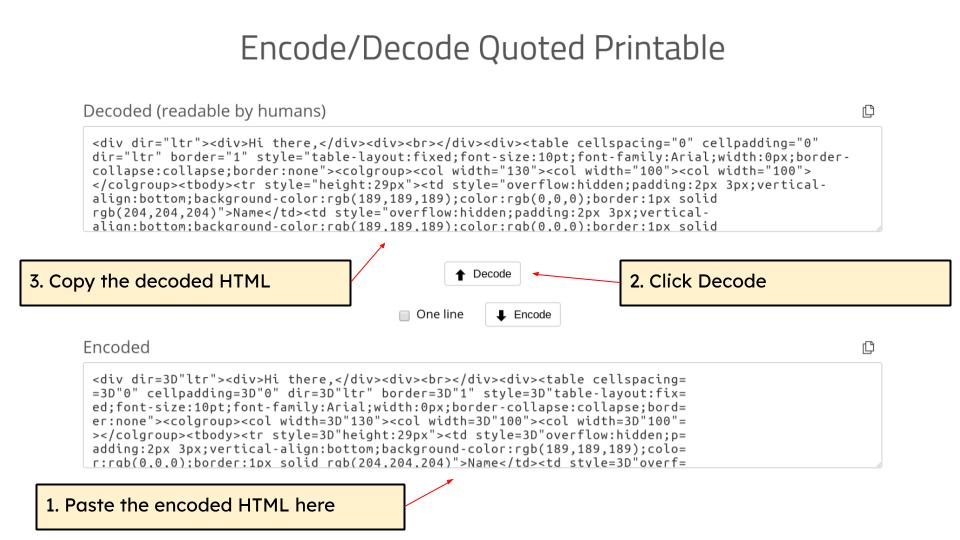
The next step is to decode the HTML using a quoted-printable decoder like the one here: https://www.webatic.com/quoted-printable-convertor.
Open the URL https://www.webatic.com/quoted-printable-convertor in your web browser and paste the encoded HTML into the "Encoded" box on the page.
Click the Decode button.
Copy the decoded HTML from the "Decoded" box and replace the encoded HTML in the Google Doc with this decoded HTML.
Note: you need to paste the encoded code in the box below (not the box above).
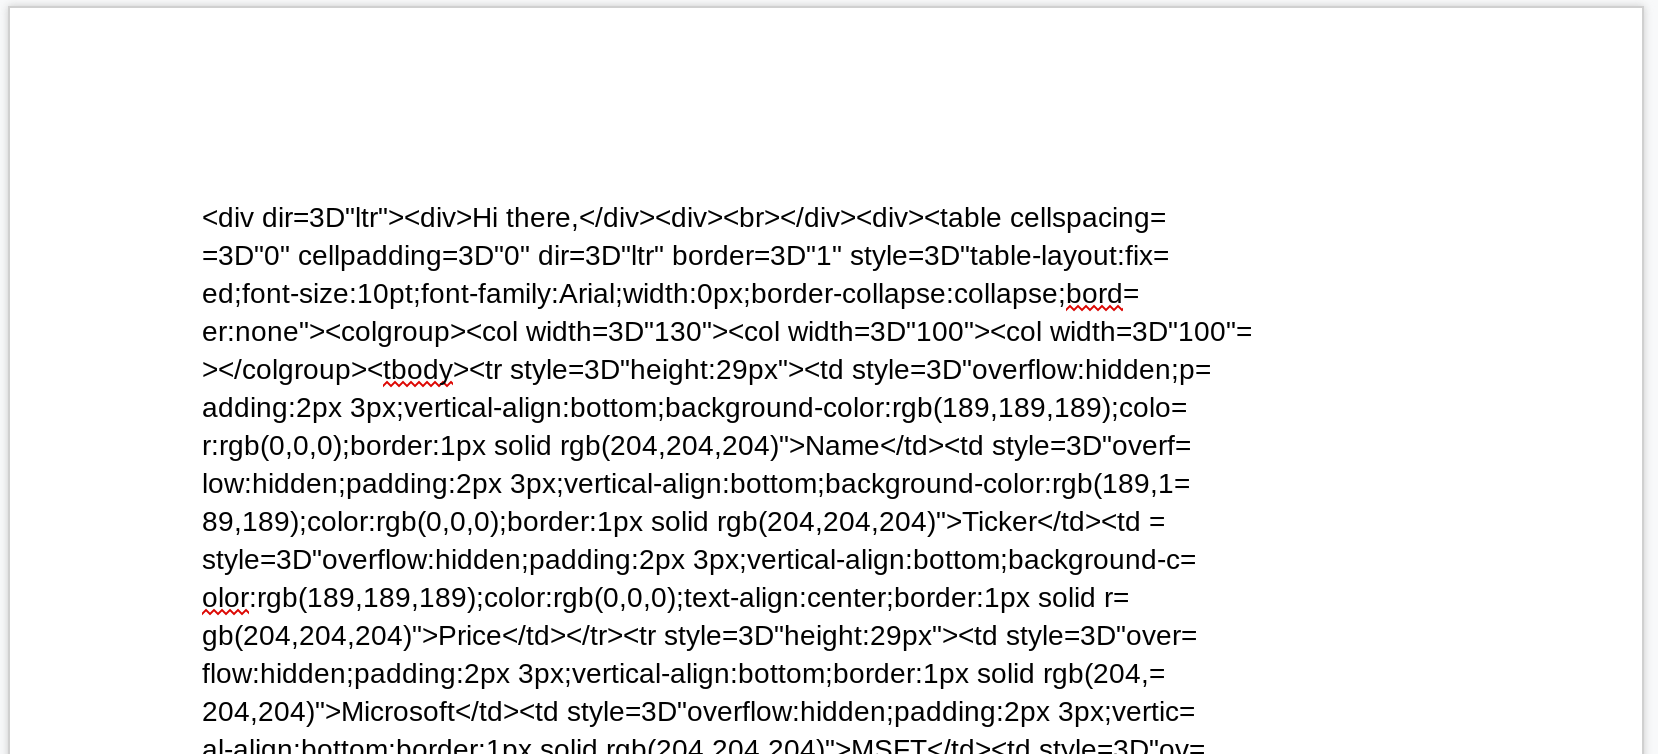
When you're done replacing the encoded HTML with the decoded HTML, your doc should look like this:
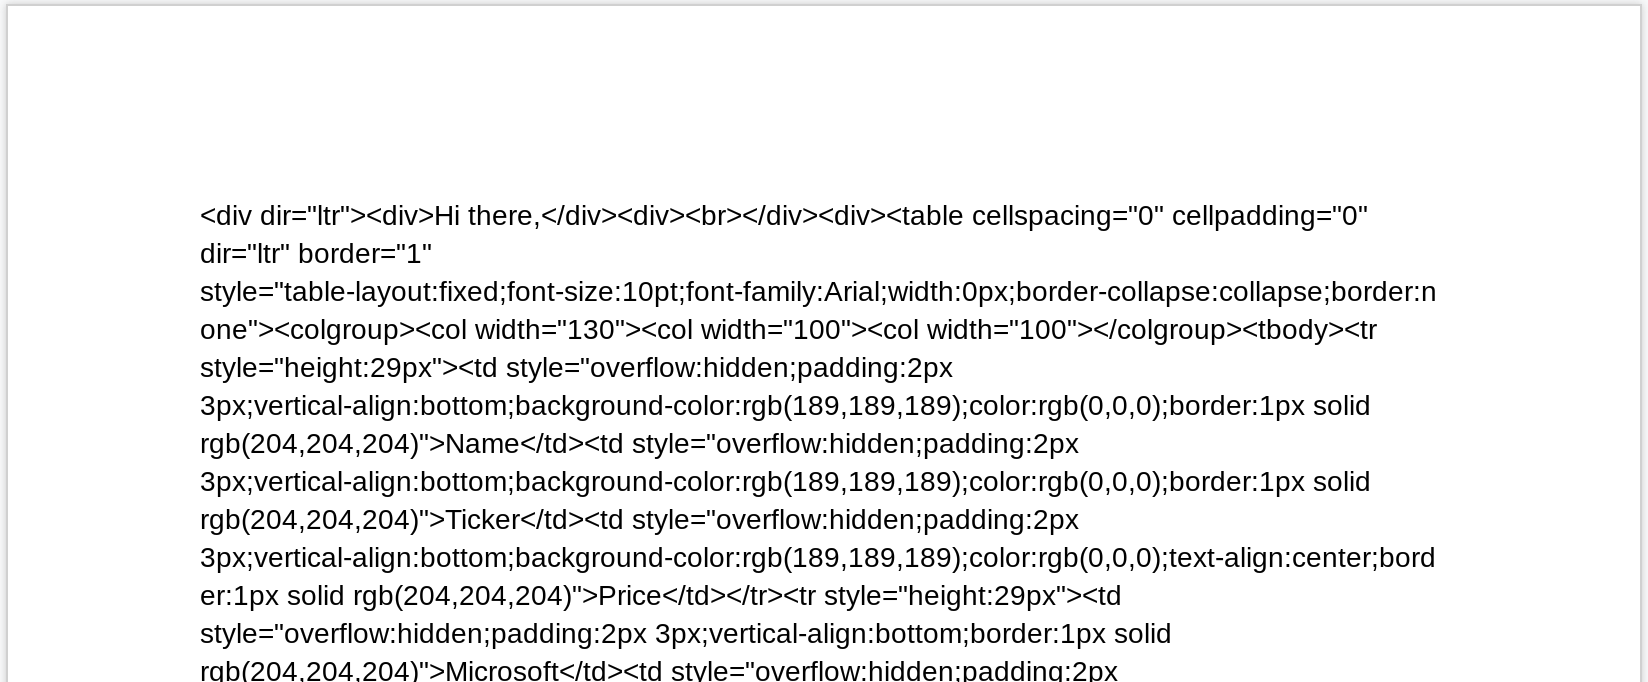
It can be hard to follow the structure of the decoded HTML so I recommend "prettifying" it using an HTML prettifier like the one at: https://www.browserling.com/tools/html-prettify. Once you prettify it, the HTML structure will be a lot easier to follow.
<div dir="ltr">
<div>Hi there,</div>
<div>
<br>
</div>
<div>
<table cellspacing="0" cellpadding="0" dir="ltr" border="1" style="table-layout:fixed;font-size:10pt;font-family:Arial;width:0px;border-collapse:collapse;border:none">
<colgroup>
<col width="130">
<col width="100">
<col width="100">
</colgroup>
<tbody>
<tr style="height:29px">
<td style="overflow:hidden;padding:2px 3px;vertical-align:bottom;background-color:rgb(189,189,189);color:rgb(0,0,0);border:1px solid rgb(204,204,204)">Name</td>
<td style="overflow:hidden;padding:2px 3px;vertical-align:bottom;background-color:rgb(189,189,189);color:rgb(0,0,0);border:1px solid rgb(204,204,204)">Ticker</td>
<td style="overflow:hidden;padding:2px 3px;vertical-align:bottom;background-color:rgb(189,189,189);color:rgb(0,0,0);text-align:center;border:1px solid rgb(204,204,204)">Price</td>
</tr>
<tr style="height:29px">
<td style="overflow:hidden;padding:2px 3px;vertical-align:bottom;border:1px solid rgb(204,204,204)">Microsoft</td>
<td style="overflow:hidden;padding:2px 3px;vertical-align:bottom;border:1px solid rgb(204,204,204)">MSFT</td>
<td style="overflow:hidden;padding:2px 3px;vertical-align:bottom;text-align:center;border:1px solid rgb(204,204,204)">151.75</td>
</tr>
<tr style="height:29px">
<td style="overflow:hidden;padding:2px 3px;vertical-align:bottom;background-color:rgb(243,243,243);border:1px solid rgb(204,204,204)">Apple</td>
<td style="overflow:hidden;padding:2px 3px;vertical-align:bottom;background-color:rgb(243,243,243);border:1px solid rgb(204,204,204)">AAPL</td>
<td style="overflow:hidden;padding:2px 3px;vertical-align:bottom;background-color:rgb(243,243,243);text-align:center;border:1px solid rgb(204,204,204)">270.71</td>
</tr>
<tr style="height:29px">
<td style="overflow:hidden;padding:2px 3px;vertical-align:bottom;border:1px solid rgb(204,204,204)">Tesla</td>
<td style="overflow:hidden;padding:2px 3px;vertical-align:bottom;border:1px solid rgb(204,204,204)">TSLA</td>
<td style="overflow:hidden;padding:2px 3px;vertical-align:bottom;text-align:center;border:1px solid rgb(204,204,204)">335.89</td>
</tr>
<tr style="height:29px">
<td style="overflow:hidden;padding:2px 3px;vertical-align:bottom;background-color:rgb(243,243,243);border:1px solid rgb(204,204,204)">Walmart</td>
<td style="overflow:hidden;padding:2px 3px;vertical-align:bottom;background-color:rgb(243,243,243);border:1px solid rgb(204,204,204)">WMT</td>
<td style="overflow:hidden;padding:2px 3px;vertical-align:bottom;background-color:rgb(243,243,243);text-align:center;border:1px solid rgb(204,204,204)">119.78</td>
</tr>
<tr style="height:29px">
<td style="overflow:hidden;padding:2px 3px;vertical-align:bottom;border:1px solid rgb(204,204,204)">McDonald's</td>
<td style="overflow:hidden;padding:2px 3px;vertical-align:bottom;border:1px solid rgb(204,204,204)">MCD</td>
<td style="overflow:hidden;padding:2px 3px;vertical-align:bottom;text-align:center;border:1px solid rgb(204,204,204)">195.35</td>
</tr>
</tbody>
</table>
</div>
</div>That's it. You now have the HTML code you need to create the template.
Create an HTML template using the HTML code
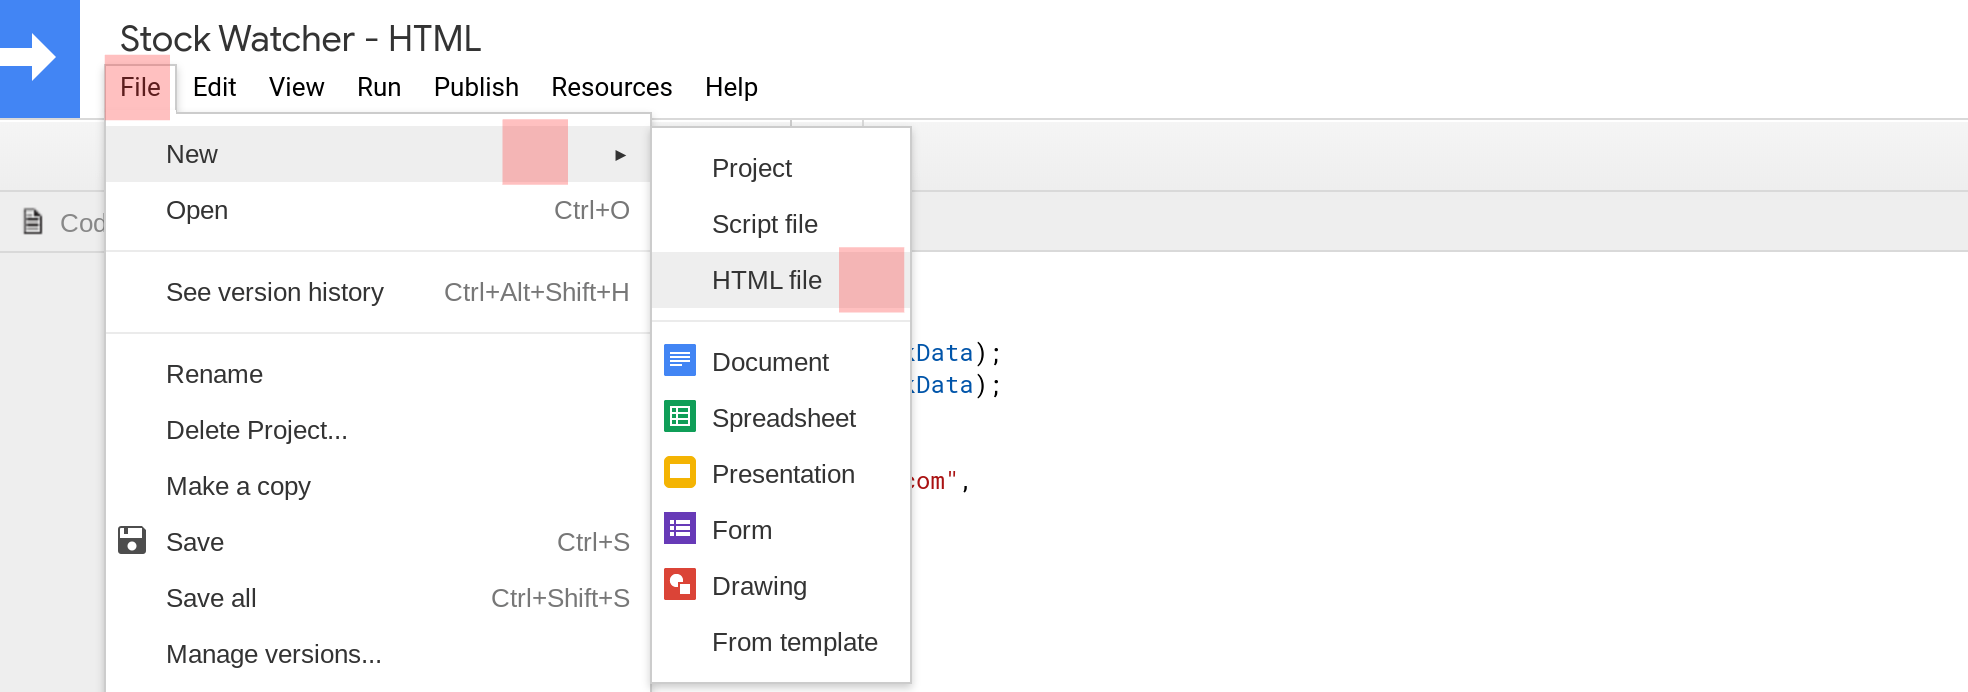
Create a new HTML file called Template.html in the Apps Script editor. Select File → New → HTML file.
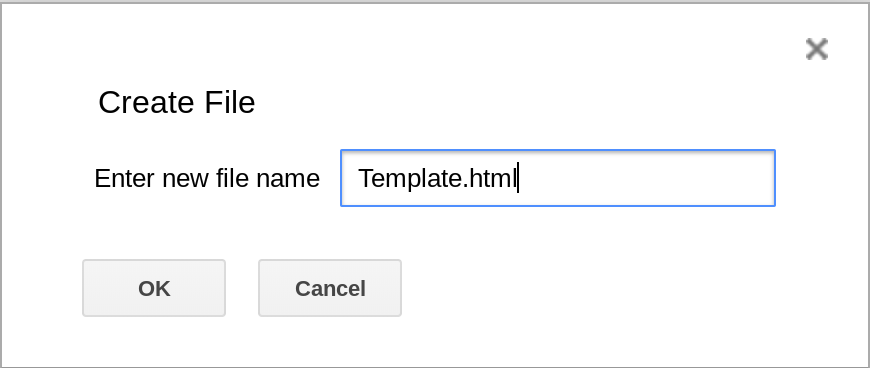
Enter Template.html as the file name.
An HTML file will be created with some default content populated in it.
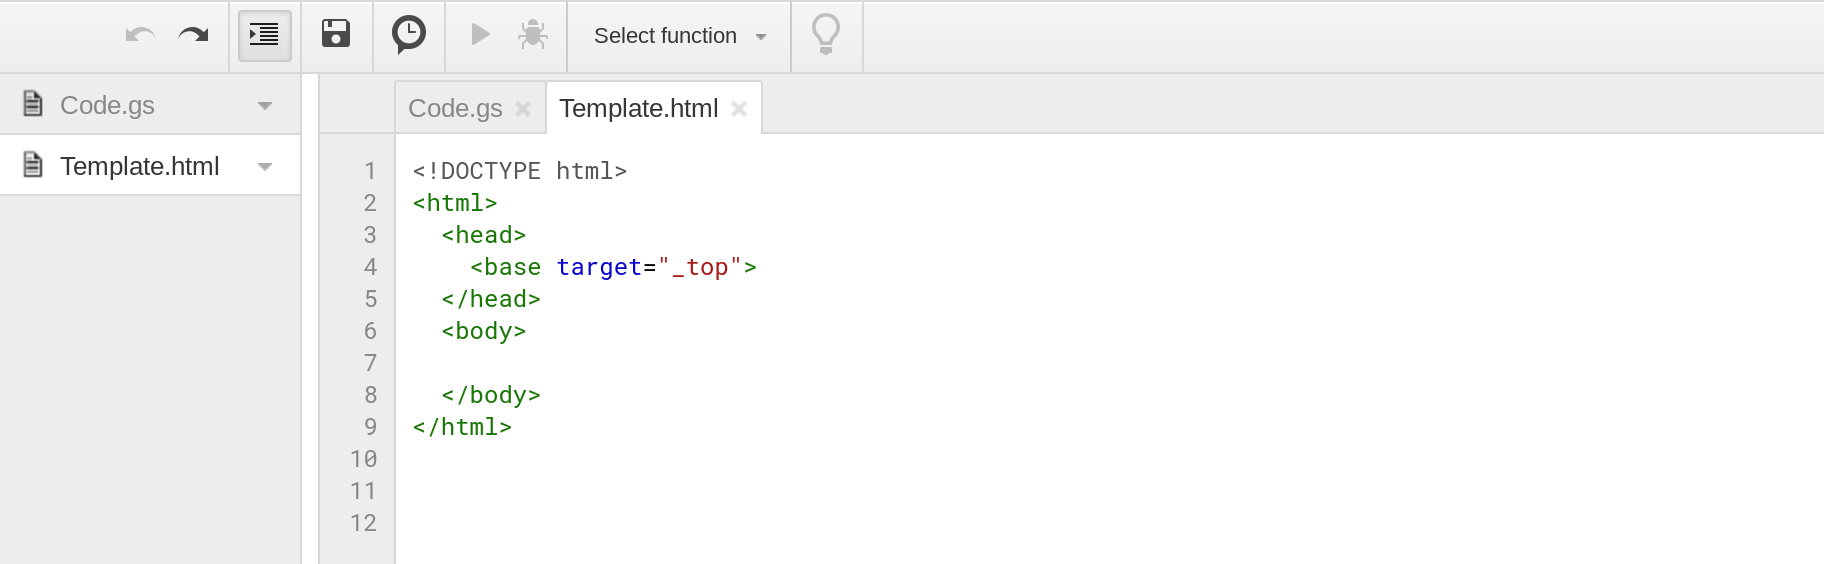
Replace the default content with the HTML code from the previous step and save the file.
You're done creating the HTML template. The next step is to use Apps Script to send HTML emails using the template that you just created.
Section 2: Use Apps Script send HTML emails using the template
Instead of starting from scratch, we will modify the script from the previous tutorial. Here is the script that we will modify (please see the other tutorial for an explanation of what this code does):
⚠ Please replace the email address youremail@example.com in the code snippet below with your email address.
function sendEmail() {
var stockData = getData();
var body = getEmailText(stockData);
MailApp.sendEmail({
to: "youremail@example.com",
subject: "Stock update",
body: body
});
}
function getEmailText(stockData) {
var text = "";
stockData.forEach(function(stock) {
text = text + stock.name + "\n" + stock.ticker + "\n" + stock.price + "\n-----------------------\n\n";
});
return text;
}
/**
* @OnlyCurrentDoc
*/
function getData() {
var values = SpreadsheetApp.getActive().getSheetByName("Data").getRange("Stocks").getValues();
values.shift(); //remove headers
var stocks = [];
values.forEach(function(value) {
var stock = {};
stock.name = value[0];
stock.ticker = value[1];
stock.price = value[2];
stocks.push(stock);
})
//Logger.log(JSON.stringify(stocks));
return stocks;
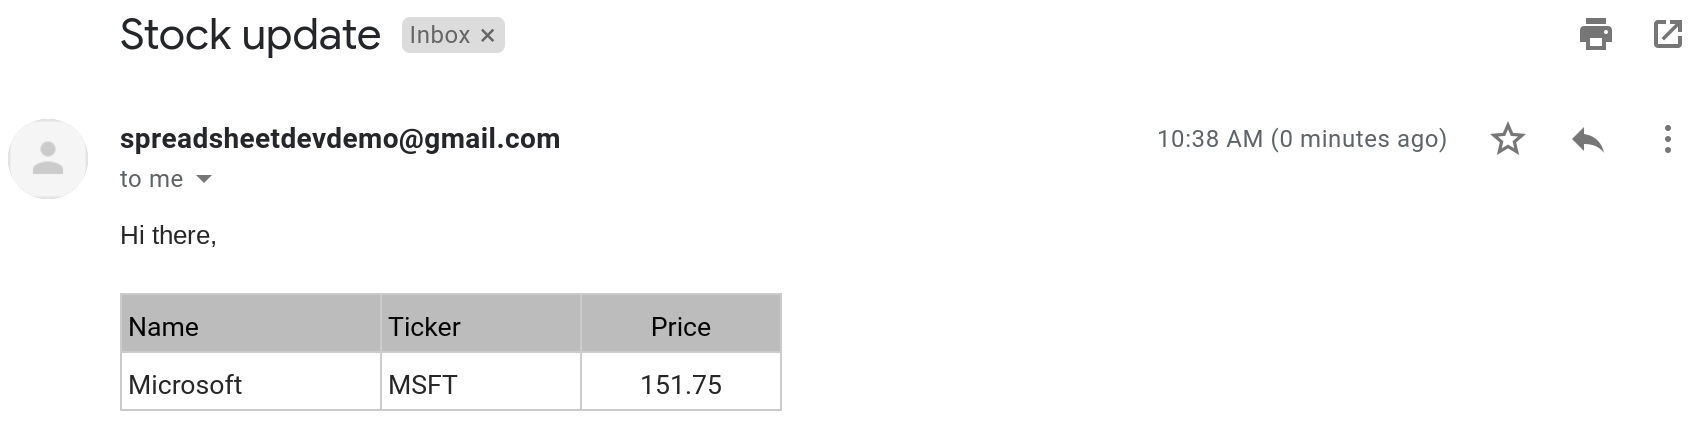
}The above script sends out emails that look like this:

Sending out an HTML email is pretty easy.
First, create a new function called getEmailHtml(stockData) that takes stock prices as input and returns the HTML body to use in the email message.
The function getEmailHtml(stockData) creates an HTML template using the Template.html file and returns its content. Please note that htmlTemplate is an object.
function getEmailHtml(stockData) {
  var htmlTemplate = HtmlService.createTemplateFromFile("Template.html");
  var htmlBody = htmlTemplate.evaluate().getContent();
  return htmlBody;
}
Then, we'll use this HTML content to send out the HTML email.
⚠ Please replace the email address youremail@example.com in the code snippet below with your email address.
function sendEmail() {
var stockData = getData();
var body = getEmailText(stockData);
var htmlBody = getEmailHtml(stockData);
MailApp.sendEmail({
to: "youremail@example.com",
subject: "Stock update",
body: body,
htmlBody: htmlBody
});
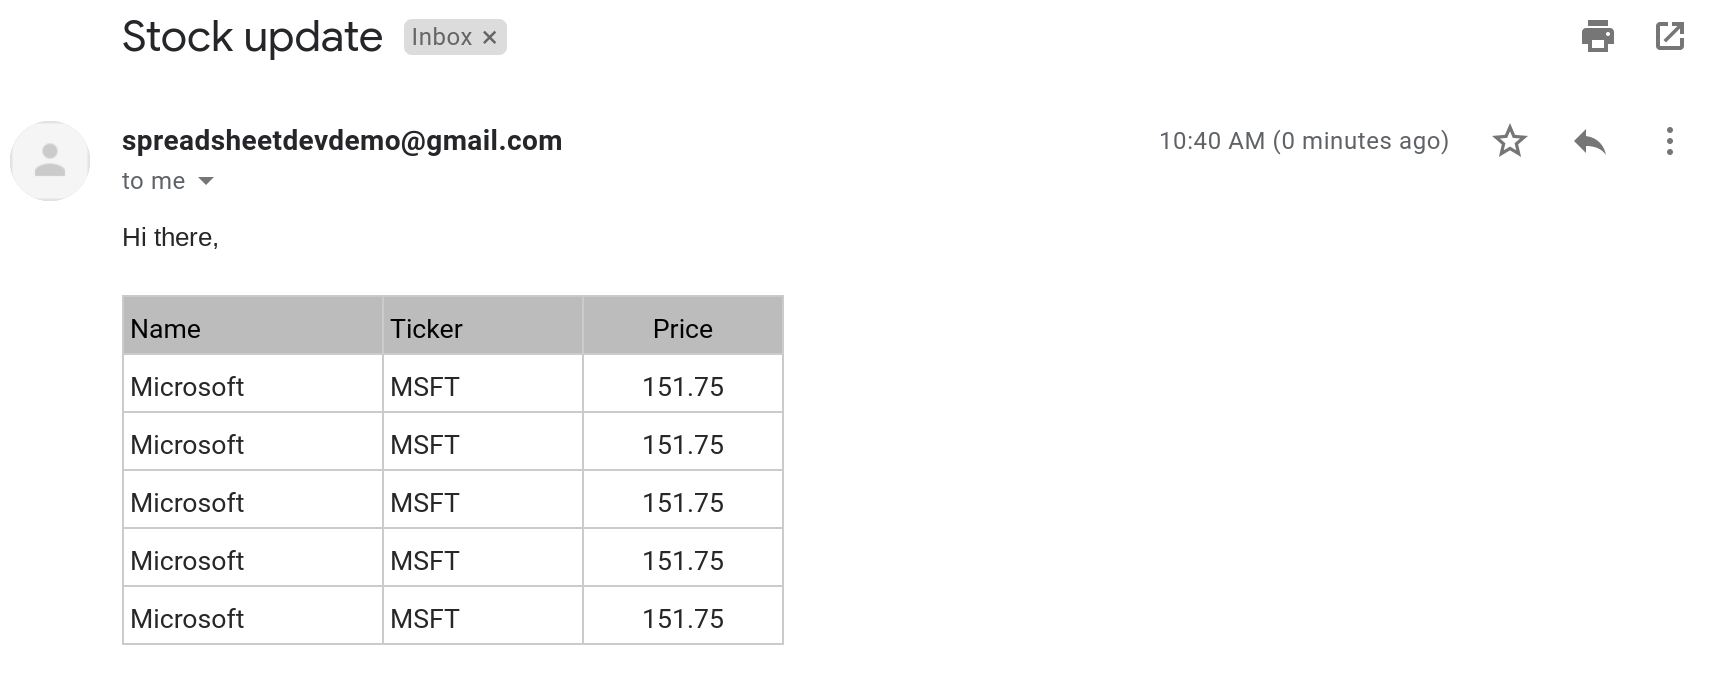
}When you run the sendEmail() function, you should receive an HTML email like the one below.
Are we done? Not yet! There is just one other thing you need to do to complete this tutorial. The above code does not use the stock price info at all. That is, the function getEmailHtml(stockData) does not use stockData anywhere.
We need the table in the HTML email to use the stock price information coming from the sheet. To do this, we need to make the variable stockData available to the template. That will enable us to make the template dynamic by using this data.
The statement htmlTemplate.stocks = stockData; makes the variable stockData available for use within the template through the property stocks. This property can be used like a variable within scriptlets in the Template.html file.
A scriptlet is a piece of code that can be embedded within a template to make it dynamic. You can read more information about scriptlets here: https://developers.google.com/apps-script/guides/html/templates#scriptlets
function getEmailHtml(stockData) {
  var htmlTemplate = HtmlService.createTemplateFromFile("Template.html");
  htmlTemplate.stocks = stockData;
  var htmlBody = htmlTemplate.evaluate().getContent();
  return htmlBody;
}
The next step is to populate the table in the HTML email by using the contents of the stocks variable that we made available to the template.
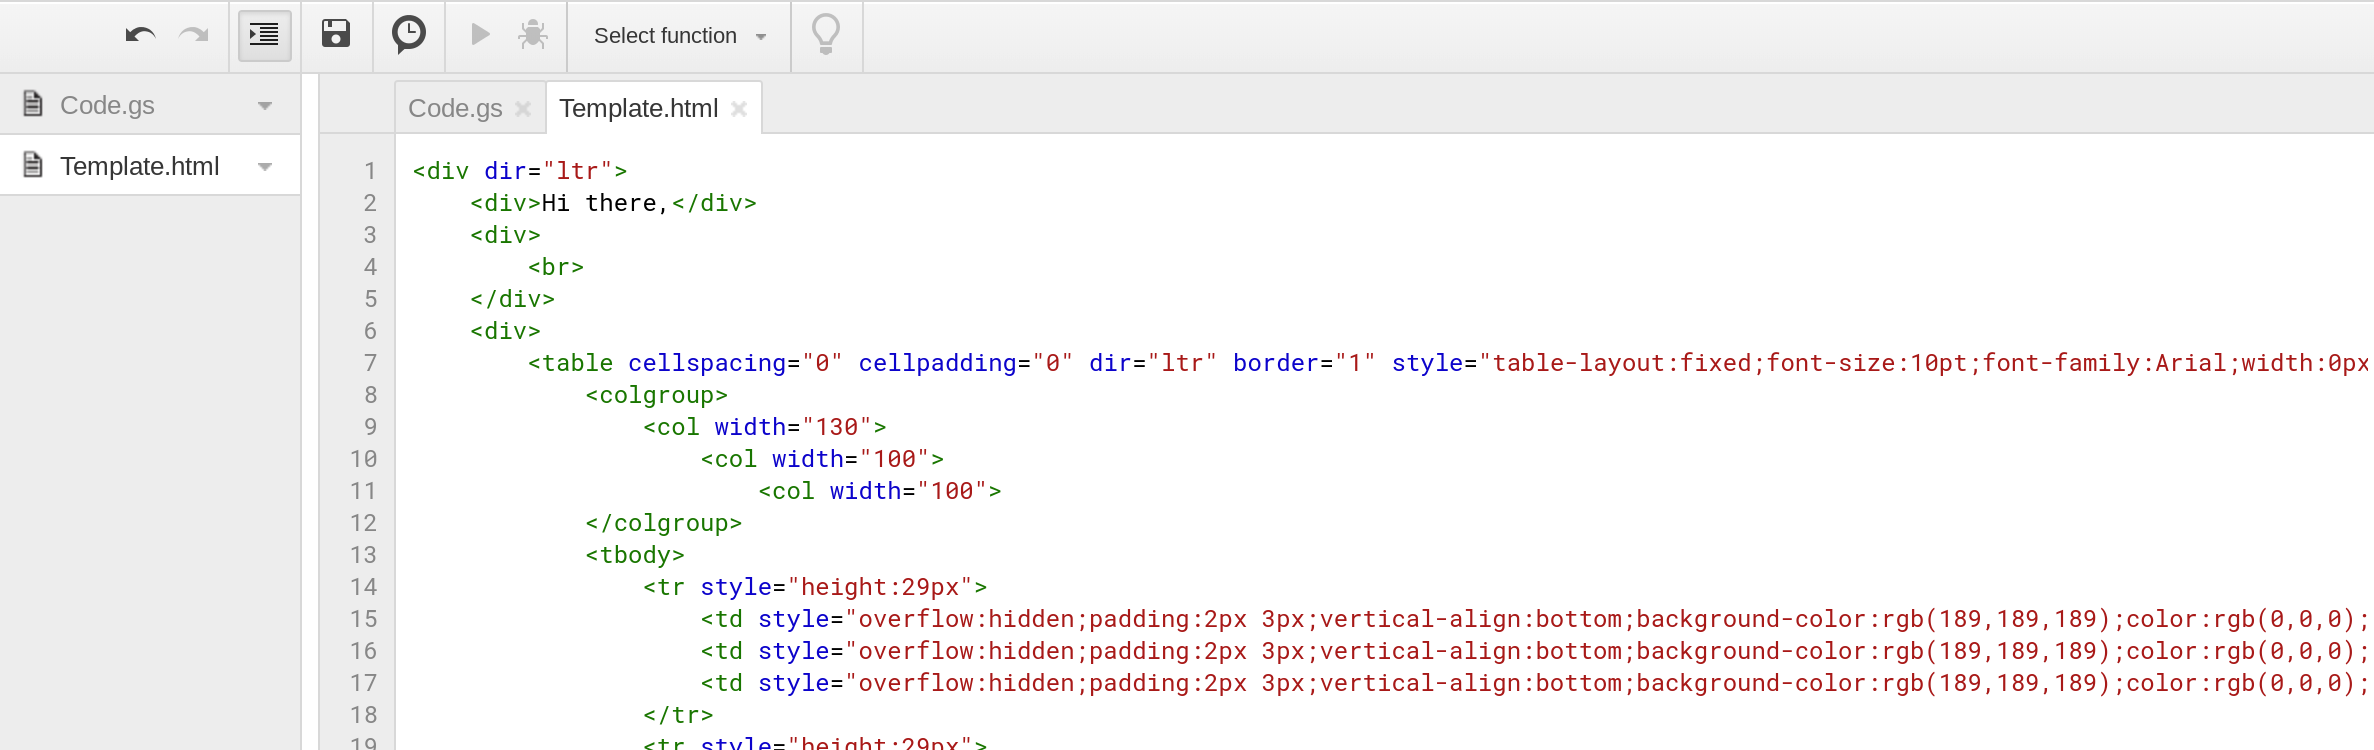
First, delete the HTML code for all the rows in the table other than the header row and the first row. The resulting HTML template should look like this:
<div dir="ltr">
    <div>Hi there,</div>
    <div>
        <br>
    </div>
    <div>
        <table cellspacing="0" cellpadding="0" dir="ltr" border="1" style="table-layout:fixed;font-size:10pt;font-family:Arial;width:0px;border-collapse:collapse;border:none">
            <colgroup>
                <col width="130">
                    <col width="100">
                        <col width="100">
            </colgroup>
            <tbody>
                <tr style="height:29px">
                    <td style="overflow:hidden;padding:2px 3px;vertical-align:bottom;background-color:rgb(189,189,189);color:rgb(0,0,0);border:1px solid rgb(204,204,204)">Name</td>
                    <td style="overflow:hidden;padding:2px 3px;vertical-align:bottom;background-color:rgb(189,189,189);color:rgb(0,0,0);border:1px solid rgb(204,204,204)">Ticker</td>
                    <td style="overflow:hidden;padding:2px 3px;vertical-align:bottom;background-color:rgb(189,189,189);color:rgb(0,0,0);text-align:center;border:1px solid rgb(204,204,204)">Price</td>
                </tr>
                <tr style="height:29px">
                    <td style="overflow:hidden;padding:2px 3px;vertical-align:bottom;border:1px solid rgb(204,204,204)">Microsoft</td>
                    <td style="overflow:hidden;padding:2px 3px;vertical-align:bottom;border:1px solid rgb(204,204,204)">MSFT</td>
                    <td style="overflow:hidden;padding:2px 3px;vertical-align:bottom;text-align:center;border:1px solid rgb(204,204,204)">151.75</td>
                </tr>
            </tbody>
        </table>
    </div>
</div>
When you send an email using this template, the email you receive will only have one row.
Next, we will use a for loop to dynamically create rows in the HTML table using the information in the stocks variable.
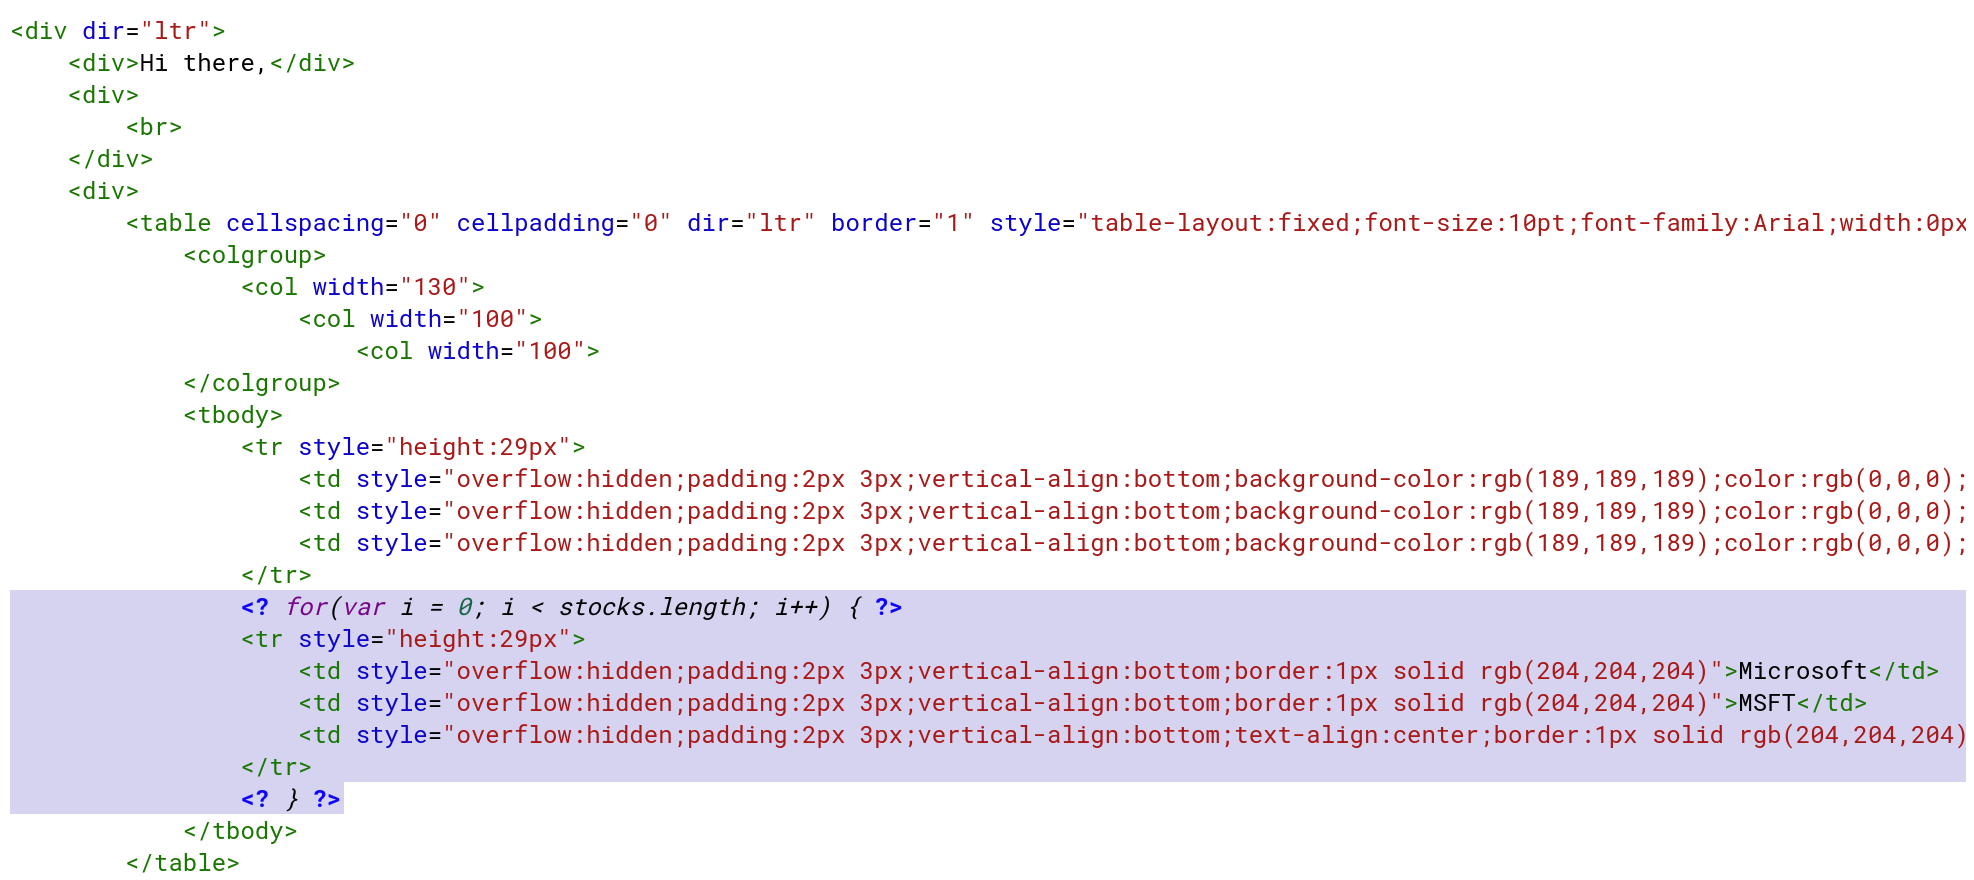
The characters <? and ?> tell Apps Script that the text in between them should be evaluated as code. They're called a standard scriptlet.
<? for(var i = 0; i < stocks.length; i++) { ?>
  <tr style="height:29px">
    <td style="overflow:hidden;padding:2px 3px;vertical-align:bottom;border:1px solid rgb(204,204,204)">Microsoft</td>
    <td style="overflow:hidden;padding:2px 3px;vertical-align:bottom;border:1px solid rgb(204,204,204)">MSFT</td>
    <td style="overflow:hidden;padding:2px 3px;vertical-align:bottom;text-align:center;border:1px solid rgb(204,204,204)">151.75</td>
  </tr>
<? } ?>
A for-loop is used to create N rows in the HTML table where N is the number of values in the stocks variable. Remember that stocks is an array of objects where each object contains information about a single stock. So N is the length of the stocks array.
If the variable stocks only has one value, the output of the above code will be:
  <tr style="height:29px">
    <td style="overflow:hidden;padding:2px 3px;vertical-align:bottom;border:1px solid rgb(204,204,204)">Microsoft</td>
    <td style="overflow:hidden;padding:2px 3px;vertical-align:bottom;border:1px solid rgb(204,204,204)">MSFT</td>
    <td style="overflow:hidden;padding:2px 3px;vertical-align:bottom;text-align:center;border:1px solid rgb(204,204,204)">151.75</td>
  </tr>
If it has two values, the output will be:
  <tr style="height:29px">
    <td style="overflow:hidden;padding:2px 3px;vertical-align:bottom;border:1px solid rgb(204,204,204)">Microsoft</td>
    <td style="overflow:hidden;padding:2px 3px;vertical-align:bottom;border:1px solid rgb(204,204,204)">MSFT</td>
    <td style="overflow:hidden;padding:2px 3px;vertical-align:bottom;text-align:center;border:1px solid rgb(204,204,204)">151.75</td>
  </tr>
At this time, the contents of your Template.html file should look like this:
<div dir="ltr">
    <div>Hi there,</div>
    <div>
        <br>
    </div>
    <div>
        <table cellspacing="0" cellpadding="0" dir="ltr" border="1" style="table-layout:fixed;font-size:10pt;font-family:Arial;width:0px;border-collapse:collapse;border:none">
            <colgroup>
                <col width="130">
                    <col width="100">
                        <col width="100">
            </colgroup>
            <tbody>
                <tr style="height:29px">
                    <td style="overflow:hidden;padding:2px 3px;vertical-align:bottom;background-color:rgb(189,189,189);color:rgb(0,0,0);border:1px solid rgb(204,204,204)">Name</td>
                    <td style="overflow:hidden;padding:2px 3px;vertical-align:bottom;background-color:rgb(189,189,189);color:rgb(0,0,0);border:1px solid rgb(204,204,204)">Ticker</td>
                    <td style="overflow:hidden;padding:2px 3px;vertical-align:bottom;background-color:rgb(189,189,189);color:rgb(0,0,0);text-align:center;border:1px solid rgb(204,204,204)">Price</td>
                </tr>
                <? for(var i = 0; i < stocks.length; i++) { ?>
                <tr style="height:29px">
                    <td style="overflow:hidden;padding:2px 3px;vertical-align:bottom;border:1px solid rgb(204,204,204)">Microsoft</td>
                    <td style="overflow:hidden;padding:2px 3px;vertical-align:bottom;border:1px solid rgb(204,204,204)">MSFT</td>
                    <td style="overflow:hidden;padding:2px 3px;vertical-align:bottom;text-align:center;border:1px solid rgb(204,204,204)">151.75</td>
                </tr>
                <? } ?>
            </tbody>
        </table>
    </div>
</div>
If you send an email by running the sendEmail() function, the email you receive will have the correct number of rows (based on your spreadsheet) but each row will have the same data.
This is because the number of rows in the table are dynamic but the actual contents of each row are still static. To fix this, replace:
"Microsoft" with
<?= stocks[i].name ?>"MSFT" with
<?= stocks[i].ticker ?>"151.75" with
<?= stocks[i].price ?>
The characters <?= and ?> are used to create what is known as a printing scriptlet. It's used to output dynamic content from code. In this case, we're using it to output information about each stock. The = in <?= is important since without it your scriptlet will become a standard scriptlet. A standard scriptlet will evaluate code but will not generate any output.

The final Template.html file should look like this:
<div dir="ltr">
    <div>Hi there,</div>
    <div>
        <br>
    </div>
    <div>
        <table cellspacing="0" cellpadding="0" dir="ltr" border="1" style="table-layout:fixed;font-size:10pt;font-family:Arial;width:0px;border-collapse:collapse;border:none">
            <colgroup>
                <col width="130">
                    <col width="100">
                        <col width="100">
            </colgroup>
            <tbody>
                <tr style="height:29px">
                    <td style="overflow:hidden;padding:2px 3px;vertical-align:bottom;background-color:rgb(189,189,189);color:rgb(0,0,0);border:1px solid rgb(204,204,204)">Name</td>
                    <td style="overflow:hidden;padding:2px 3px;vertical-align:bottom;background-color:rgb(189,189,189);color:rgb(0,0,0);border:1px solid rgb(204,204,204)">Ticker</td>
                    <td style="overflow:hidden;padding:2px 3px;vertical-align:bottom;background-color:rgb(189,189,189);color:rgb(0,0,0);text-align:center;border:1px solid rgb(204,204,204)">Price</td>
                </tr>
                <? for(var i = 0; i < stocks.length; i++) { ?>
                <tr style="height:29px">
                    <td style="overflow:hidden;padding:2px 3px;vertical-align:bottom;border:1px solid rgb(204,204,204)"><?= stocks[i].name ?></td>
                    <td style="overflow:hidden;padding:2px 3px;vertical-align:bottom;border:1px solid rgb(204,204,204)"><?= stocks[i].ticker ?></td>
                    <td style="overflow:hidden;padding:2px 3px;vertical-align:bottom;text-align:center;border:1px solid rgb(204,204,204)"><?= stocks[i].price ?></td>
                </tr>
                <? } ?>
            </tbody>
        </table>
    </div>
</div>
When you run the sendEmail() function, you'll see a nicely formatted HTML email that contains the data from your Google Sheet.

Whew! This ended up being a super long tutorial but hopefully you found it to be useful.
Summary
In this tutorial, I explained how to send HTML emails using Google Sheets and Apps Script. I also showed you how to create an HTML email template using Google Docs and Gmail.
Thanks for reading!
DISCLAIMER: This content is provided for educational purposes only. All code, templates, and information should be thoroughly reviewed and tested before use. Use at your own risk. Full Terms of Service apply.
Thanks for your feedback!
Your input helps improve the content for everyone.
