Send email when a Google Sheet is edited
Suppose you're a school teacher and you're planning an upcoming Parent-Teacher conference. Instead of using a printed sign up sheet, you decide to use a Google Sheets spreadsheet where parents can sign up for a meeting slot.
In the past you've had parents forget which slot they signed up for so you're hoping that a shared Google Sheet that they can access at any time will help solve this problem. You also want to receive an email notification whenever a parent signs up for a slot. This will help you keep track of who hasn't signed up yet so you can remind them when they drop off or pick up their kids.
In this tutorial, I'll show you how to send email notifications whenever a Google Sheets spreadsheet is edited. We'll use Google Sheets and some Google Apps Script code to create this "application".
What you will build in this tutorialFirst, you will create a spreadsheet where parents can sign up for a slot.
Next, you will create a HTML email template and write some Apps Script code to send out emails.
Finally, you will automate sending this email notification whenever your spreadsheet is edited by a parent.
First, you will create a spreadsheet where parents can sign up for a slot.
Next, you will create a HTML email template and write some Apps Script code to send out emails.
Finally, you will automate sending this email notification whenever your spreadsheet is edited by a parent.
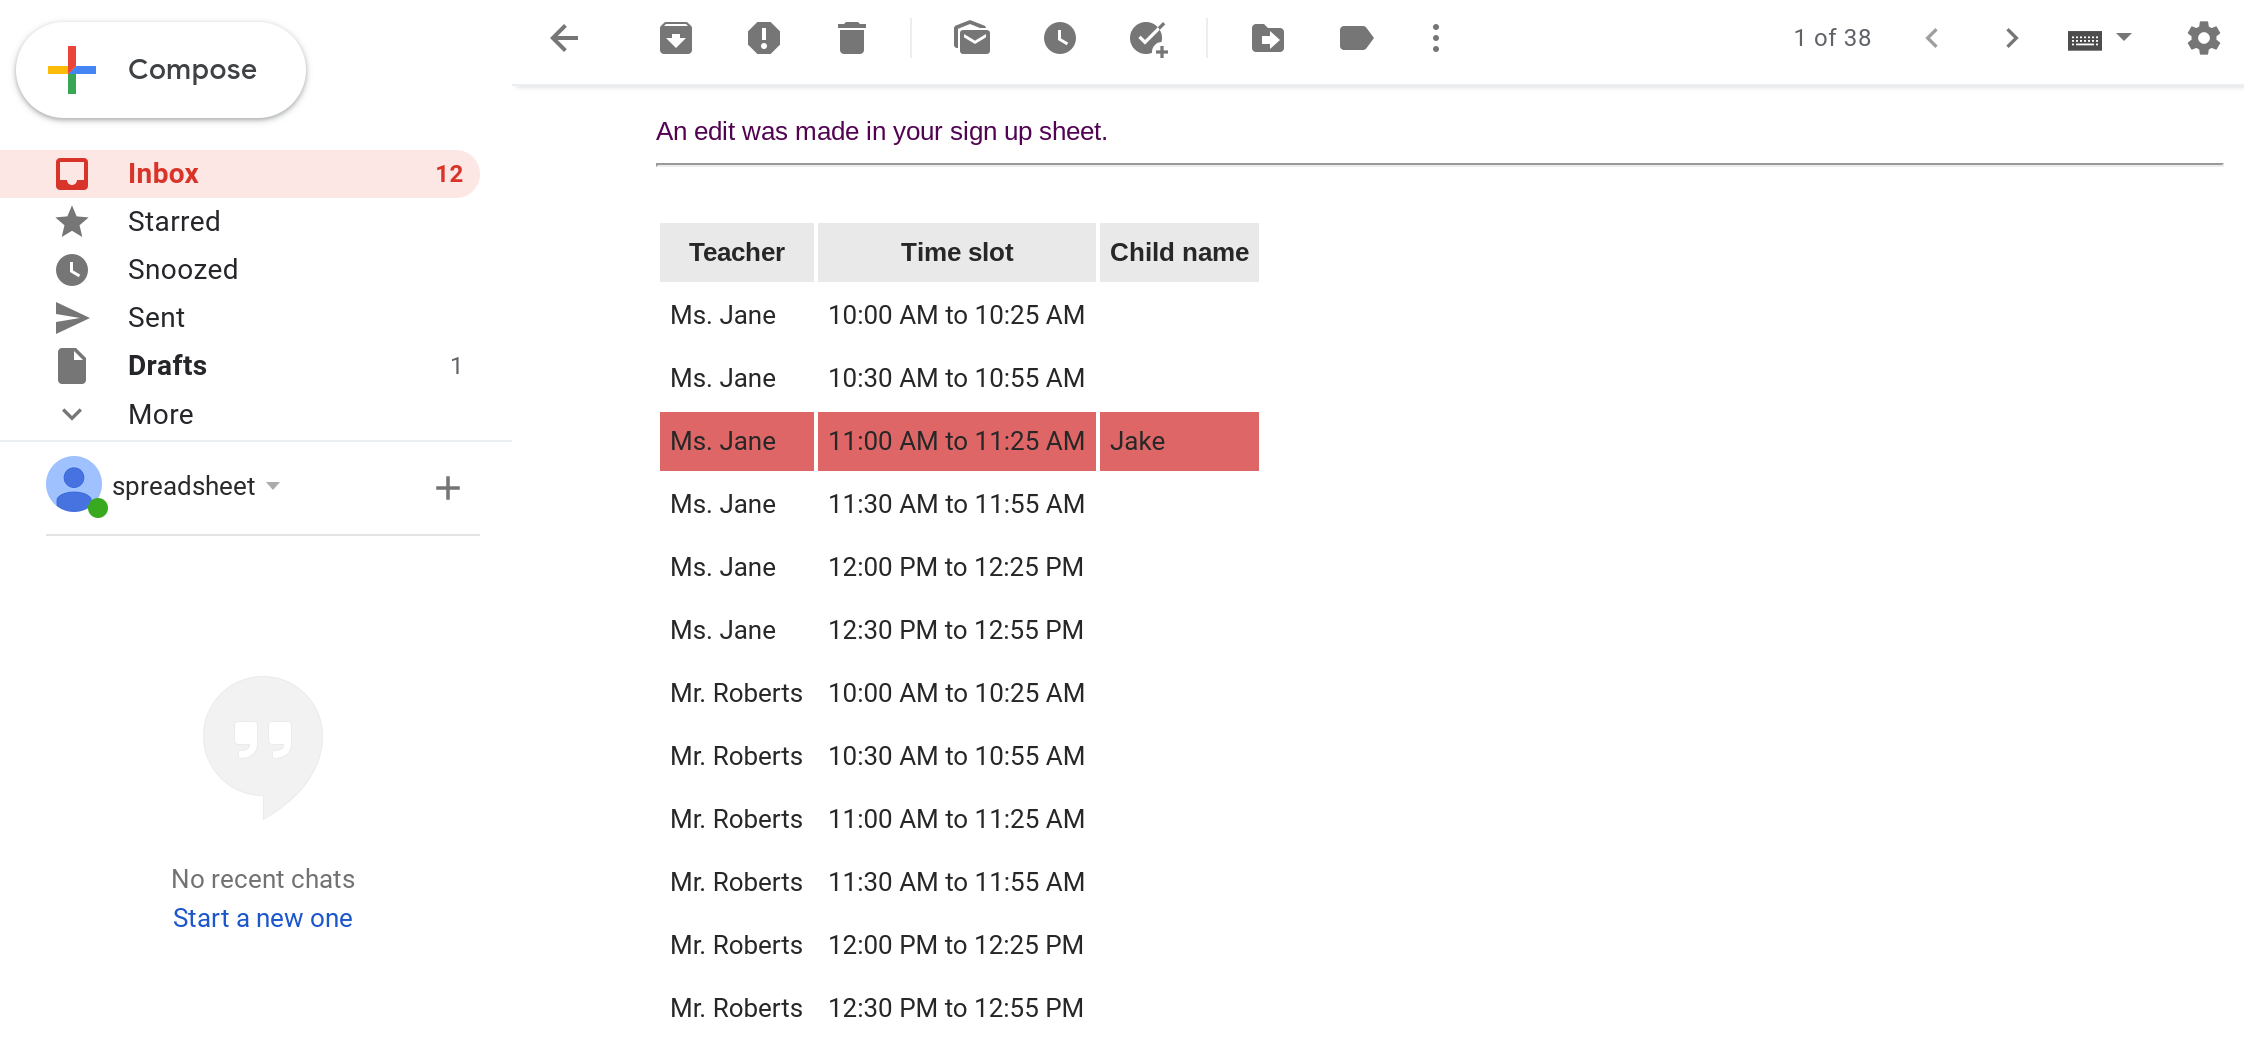
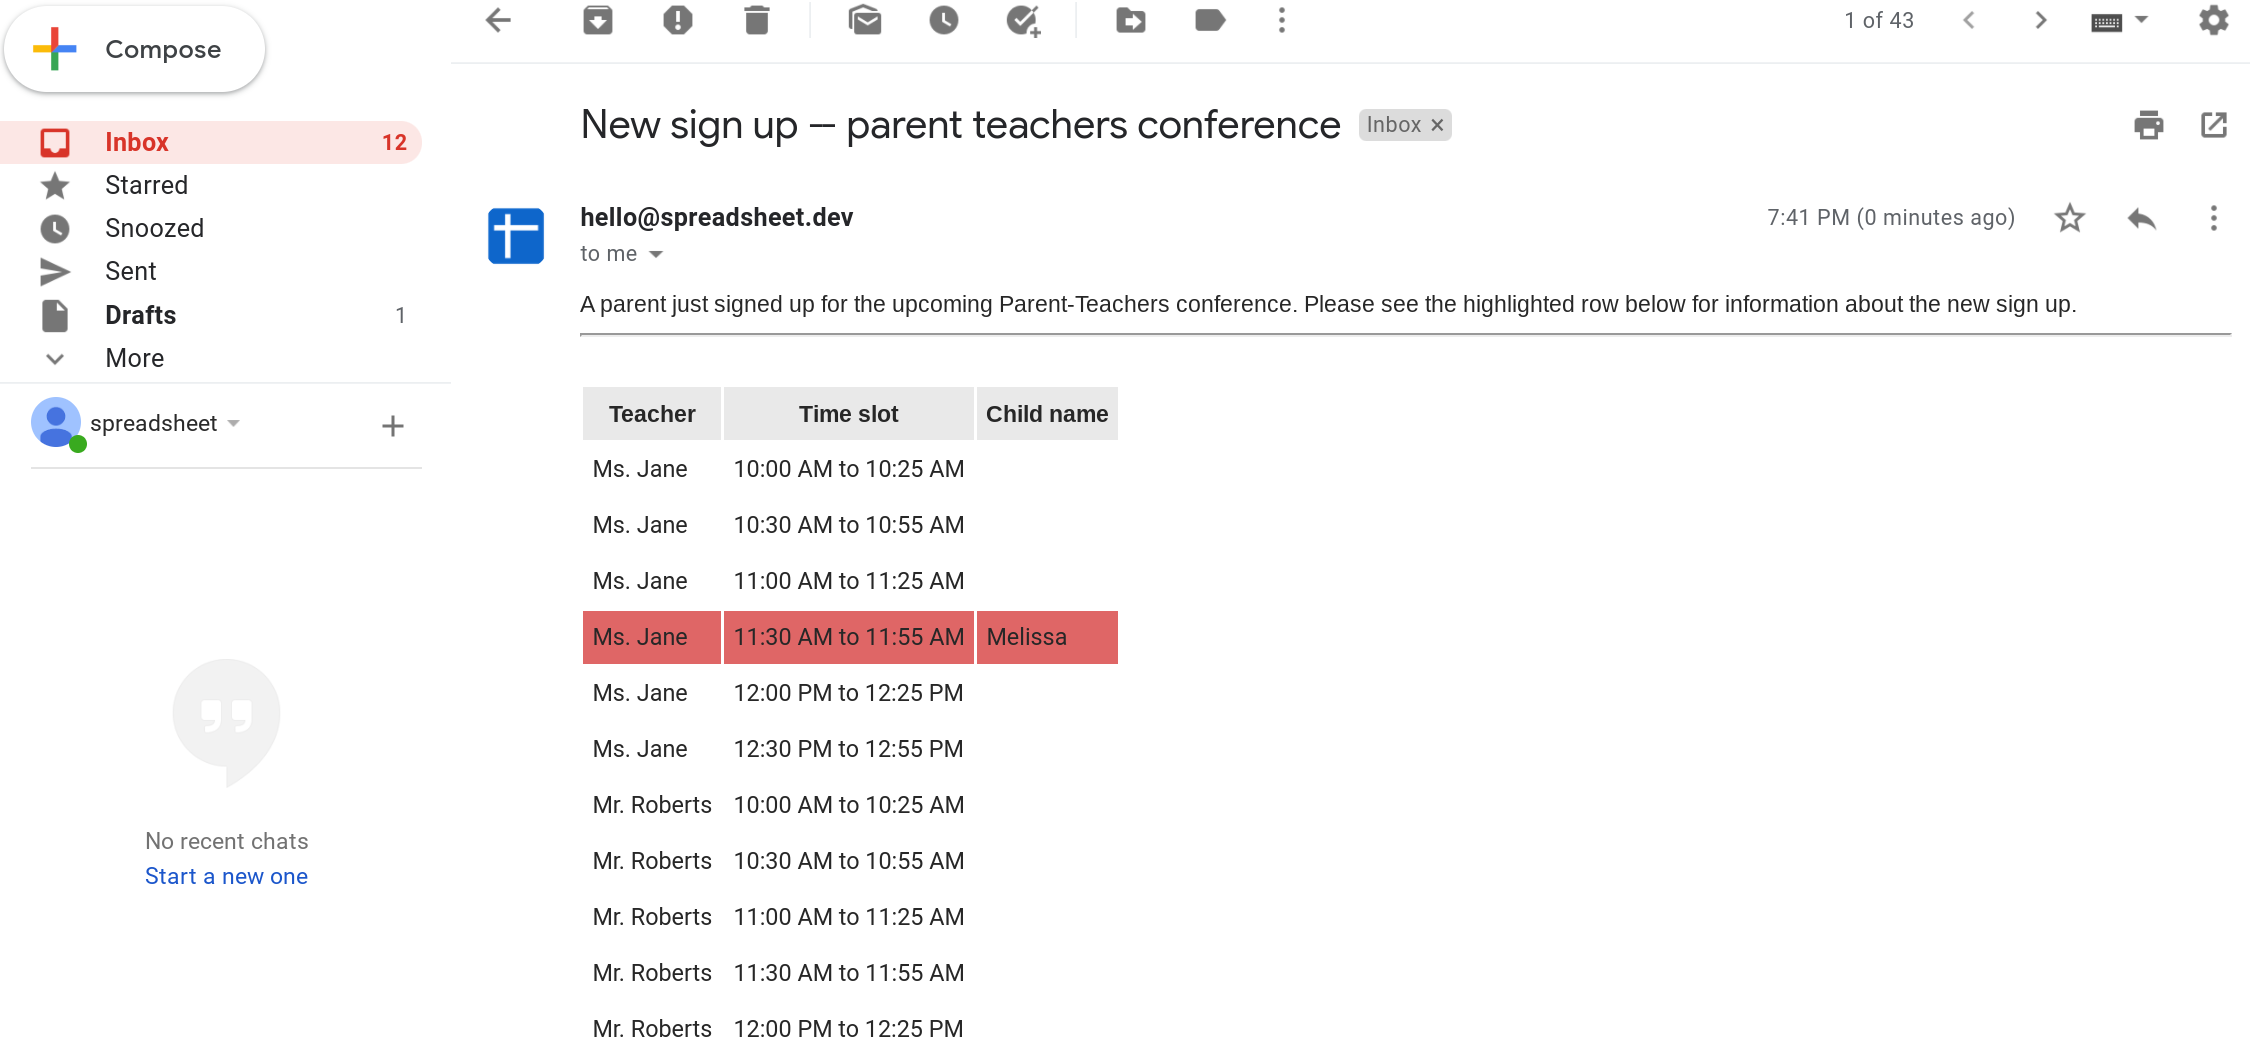
Below is a screenshot of the email you'll receive whenever a parent signs up for a slot. The email includes all of the information in the spreadsheet and it highlights the row that was edited.
Prerequisites
This tutorial assumes that you are reasonably familiar with Google Sheets and Google Apps Script. In particular, it assumes that you know:
Basic coding concepts and ideally some familiarity with JavaScript.
If you're not familiar with a concept listed above, you can read the articles that I've linked to to learn more. If something is still unclear, please don't hesitate to let me know using the form at the bottom of this post.
Five steps to begin sending an email notification whenever your Google Sheets spreadsheet is editedStep 1: Create your spreadsheet.
Step 2: Create a script that will send out the email notification.
Step 3: Set up a trigger to run your script whenever your spreadsheet is edited.
Step 4: Confirm that emails are sent whenever your spreadsheet is edited.
Step 5: Create an HTML email to make the notification more useful
Step 1 — Create a Google Sheets spreadsheet where parents can sign up for a meeting slot
Step 1: Create your spreadsheet.
Step 2: Create a script that will send out the email notification.
Step 3: Set up a trigger to run your script whenever your spreadsheet is edited.
Step 4: Confirm that emails are sent whenever your spreadsheet is edited.
Step 5: Create an HTML email to make the notification more useful
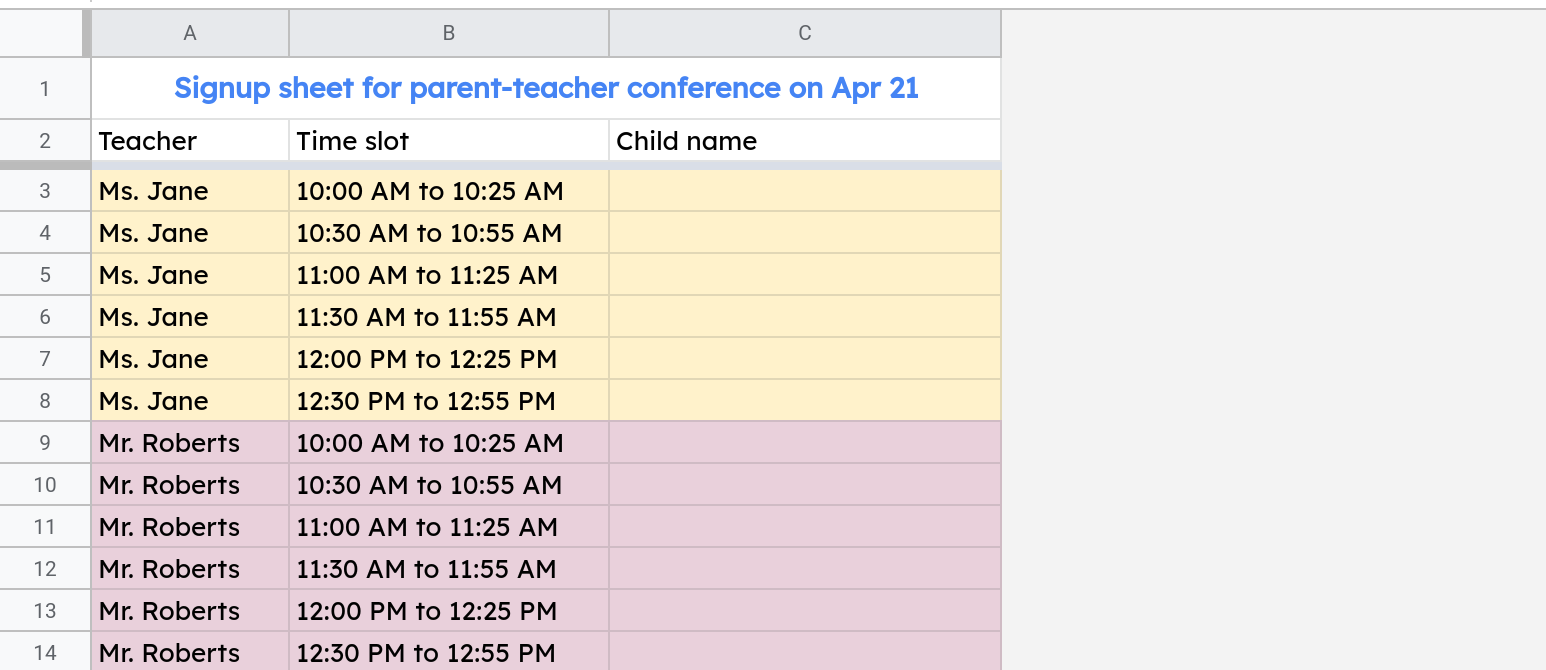
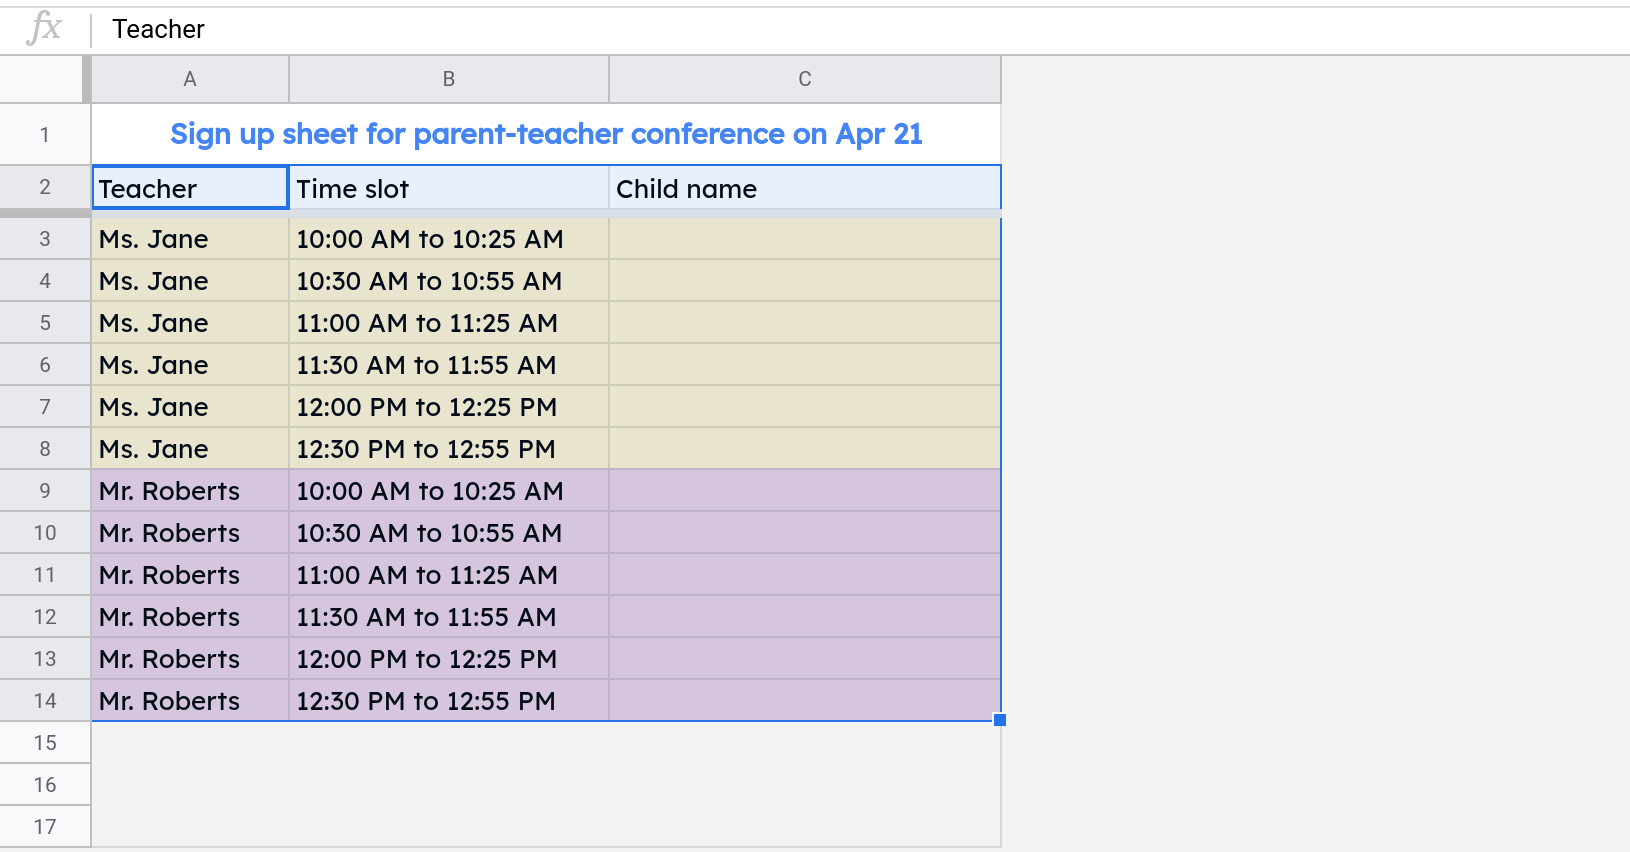
Create a sheet containing three columns: Teacher, Time slot and Child name. Since the class has two teachers and twelve kids, you decide to create six 25-minute long slots between 10:00 AM and 1:00 PM with 5-minute breaks in-between slots. Delete all the rows and columns in the spreadsheet that you will not be using.
Parents can sign up for a slot by entering their child's name in the third column (Column C).
Please feel free to customize the sheet to suit your needs. In this tutorial, you'll be sending an email whenever any value in Column C is edited. If your sheet has more columns, you can modify the code accordingly.
Step 2 — Create an Apps Script function that will send out email notificationsStep 2.1 — Create the script
Open the Script editor by selecting Extensions —> Apps Script and replace the code in the editor with the code below.
⚠ Please replace the email address in the code snippet below with your email address.
//@OnlyCurrentDoc
function processEdit(e) {
  MailApp.sendEmail({
    to: "youremail@example.com",
    subject: "New sign up -- parent teachers conference",
    body: "The Parent-Teacher conference sign up sheet was edited."
  });
}
How does the above code work?The processEdit() function will be run (by the trigger that you'll be setting up shortly) whenever your spreadsheet is edited.
The argument e is an object containing information about the edits that were made. For example, its range property will tell you the cell (or the range) that was edited.
The function body uses the MailApp object to send an email.
The //@OnlyCurrentDoc annotation tells Apps Script that you only want your script to get access to this spreadsheet and not your other files in Google Drive.
Step 2.2 — Test your script by running itStep 2.2.1 — Click the run button (play icon) to run the processEdit function.

Step 2.2.2 — Authorize your script
The processEdit() function will be run (by the trigger that you'll be setting up shortly) whenever your spreadsheet is edited.
The argument e is an object containing information about the edits that were made. For example, its range property will tell you the cell (or the range) that was edited.
The function body uses the MailApp object to send an email.
The //@OnlyCurrentDoc annotation tells Apps Script that you only want your script to get access to this spreadsheet and not your other files in Google Drive.
Step 2.2.1 — Click the run button (play icon) to run the processEdit function.
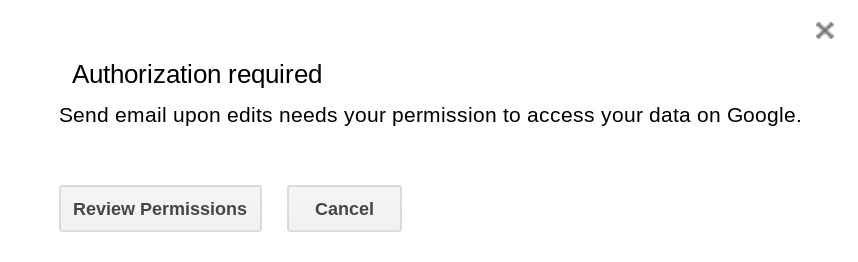
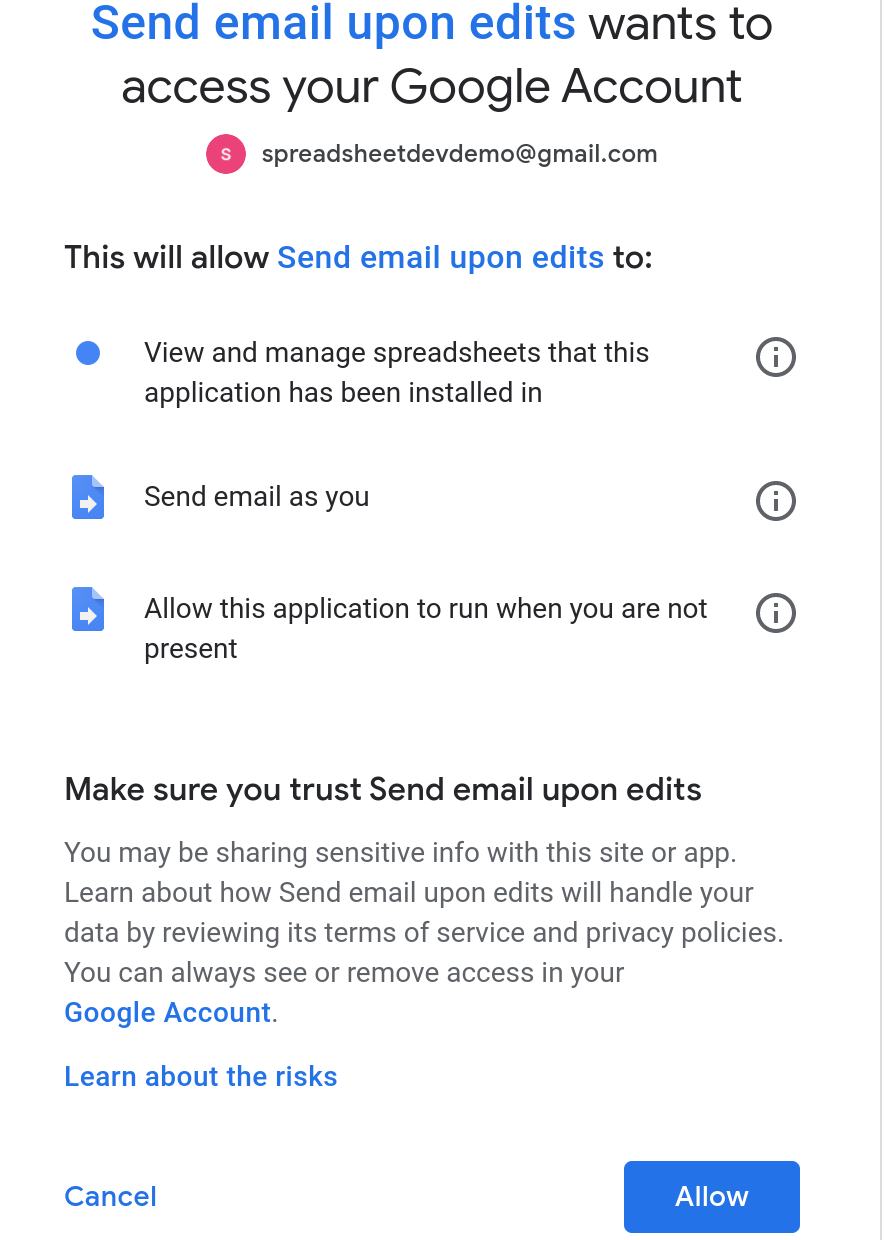
Apps Script will ask you to authorize your script. Click Review Permissions to continue.
You might be asked to select a Google Account if you are signed into multiple accounts.
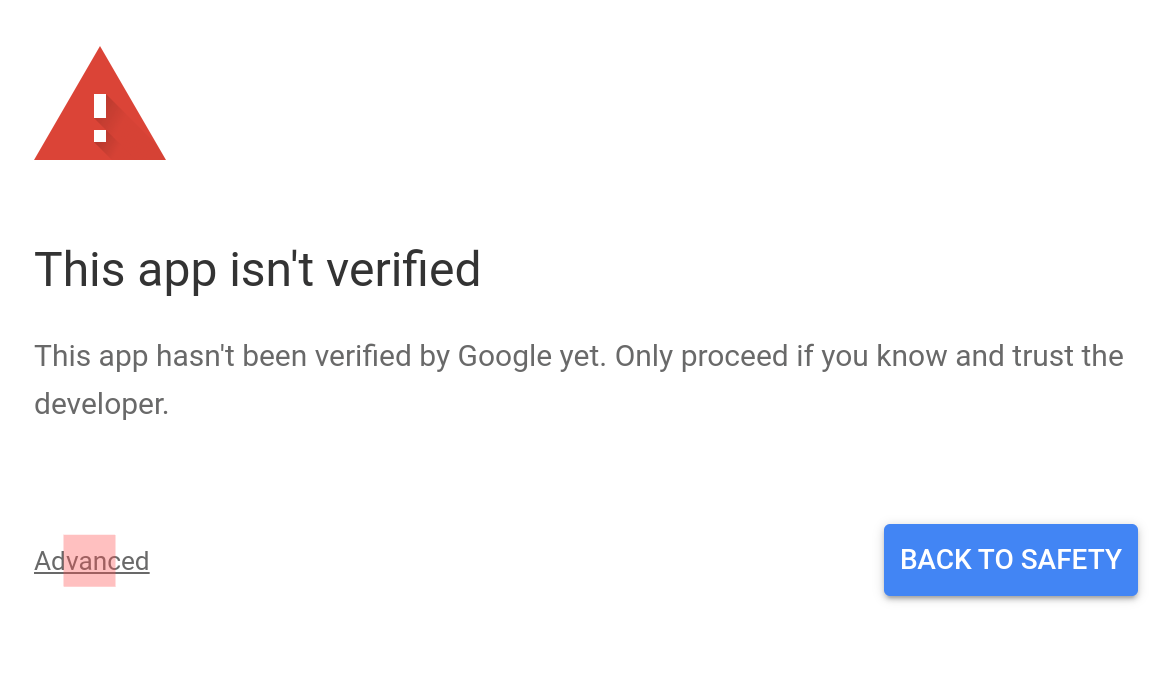
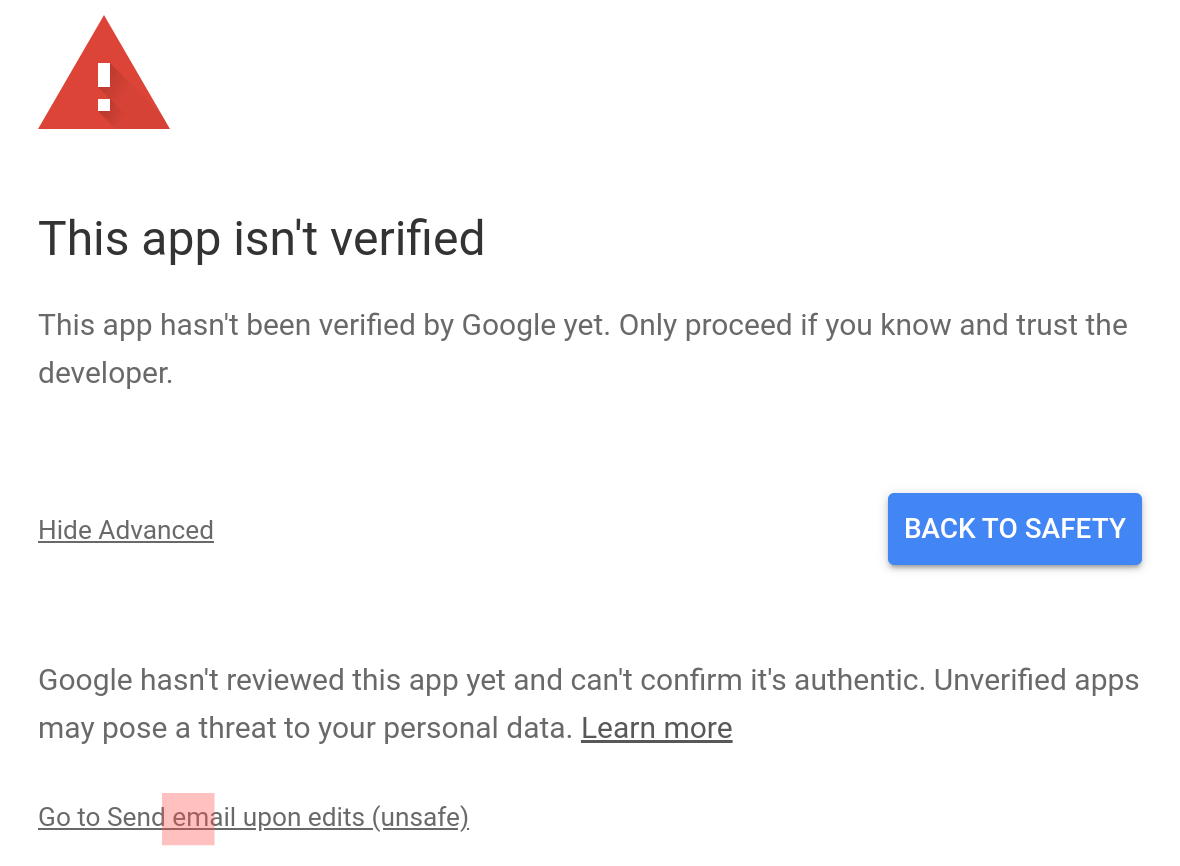
Google will warn you that your app isn't verified. Whenever you see this warning, you should only proceed if you trust the developer that created the script. In this case, you are the developer so it is fine to proceed. Click Advanced to continue.
Click the link at the bottom (i.e., the one called Go to <your script's name> ...) to continue.
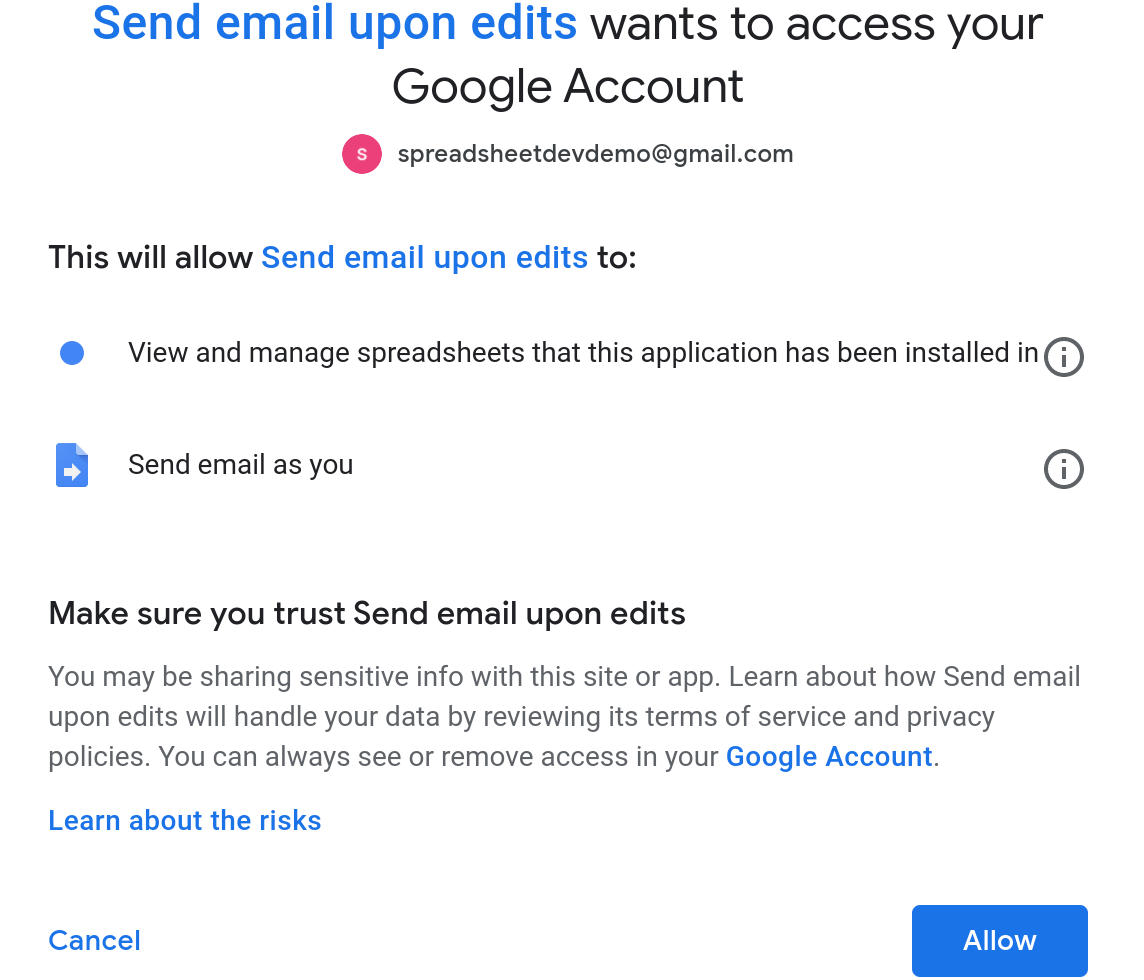
Review the permissions carefully and assuming you're OK with granting these permissions, click Allow to complete the authorization process.
In this case, the script needs two permissions:
It needs to be able to access the spreadsheet it is installed in (i.e,. the spreadsheet you created in step 1).
It needs to be able to send emails.
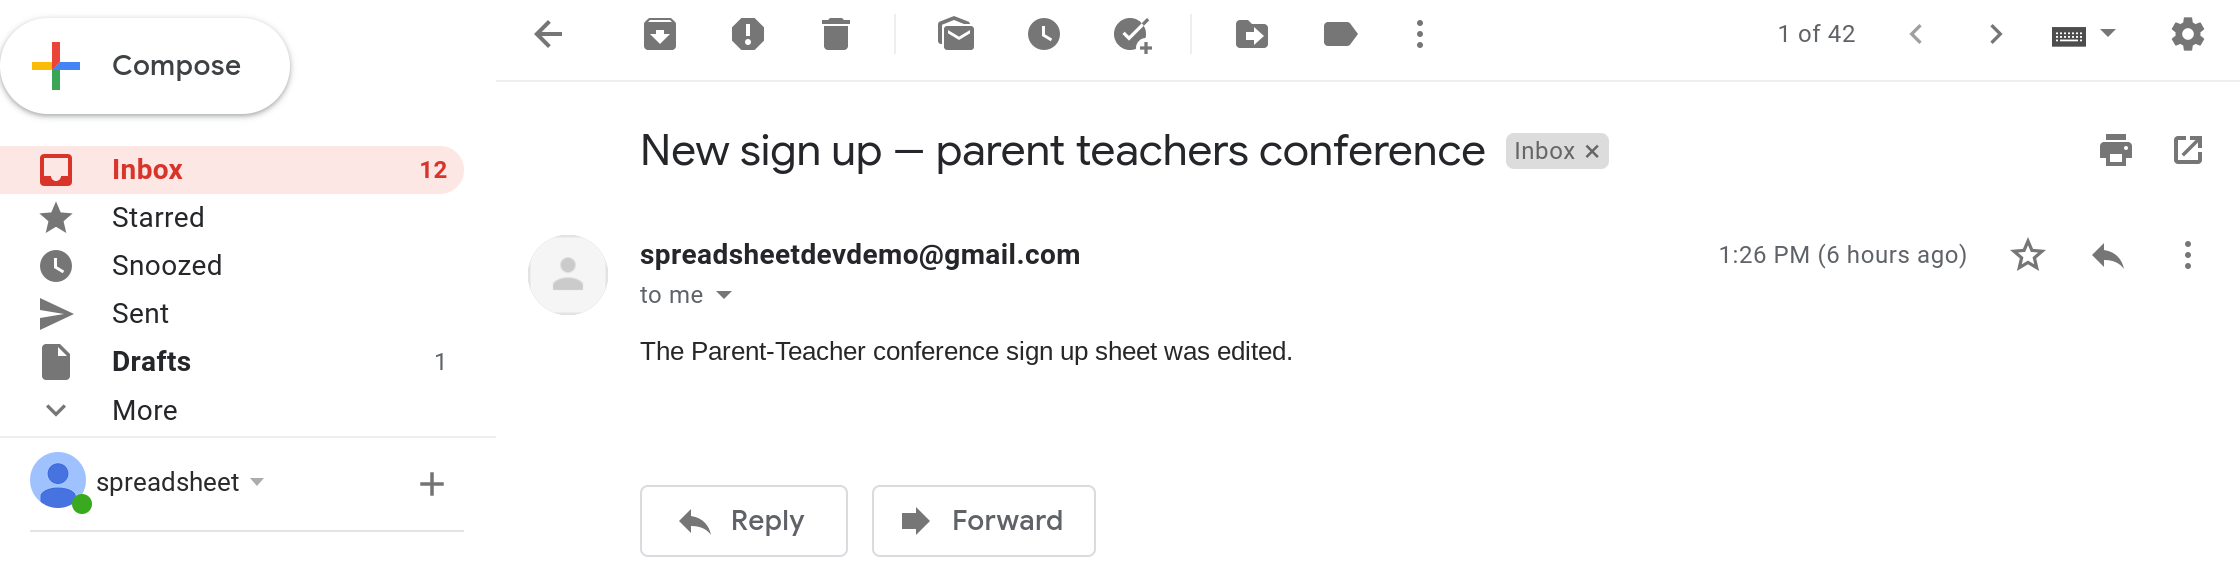
Step 2.3 — Check if you received the notification email
Check your email inbox. If you're script ran successfully, you should receive an email like the one below.

Step 3 — Set up a Spreadsheet Trigger to run your script whenever the spreadsheet is edited
So far you've created a script that will send out emails whenever you run it. The next step is to make it send out emails automatically.
A trigger is a feature in Google Apps Script that will automatically run your script whenever a specific event occurs in your spreadsheet.
If you'd like to learn more about triggers, I've written a detailed article on Triggers in Google Sheets.
We'll create an Installable Spreadsheet Trigger to run the processEdit() function whenever your spreadsheet is edited.
Step 3.1 — Click the clock button to open the Triggers page
Step 3.2 — Click + Add Trigger to create a new trigger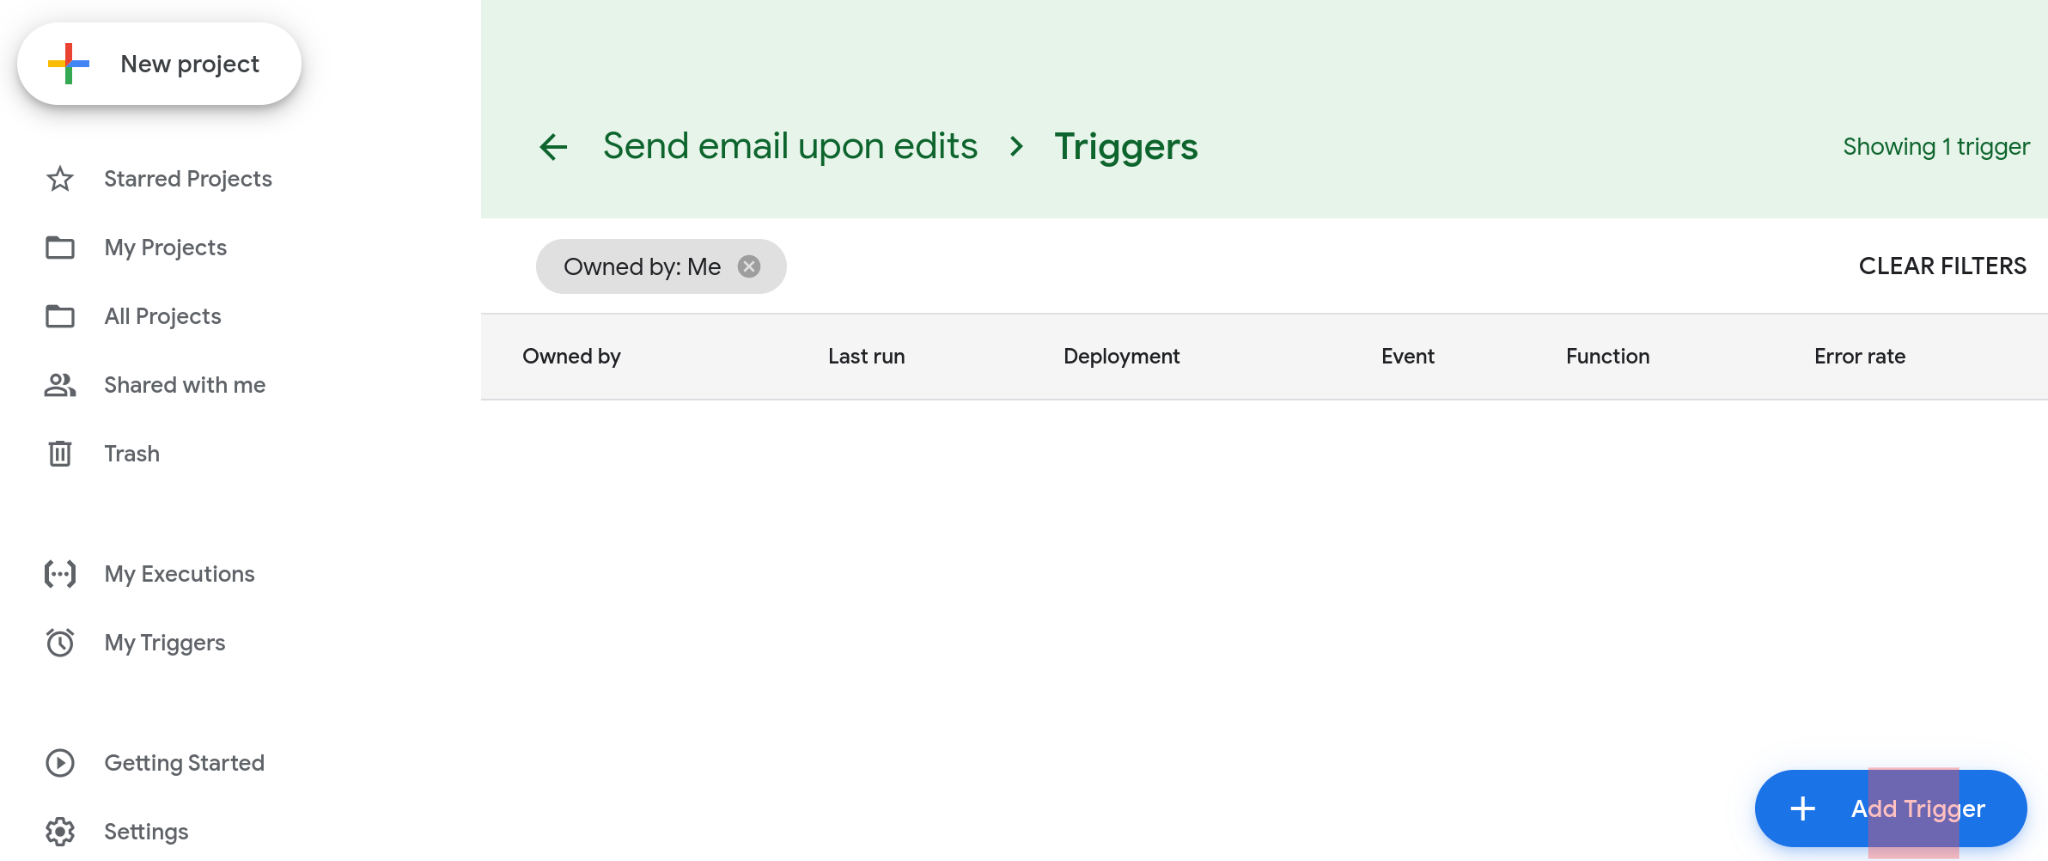
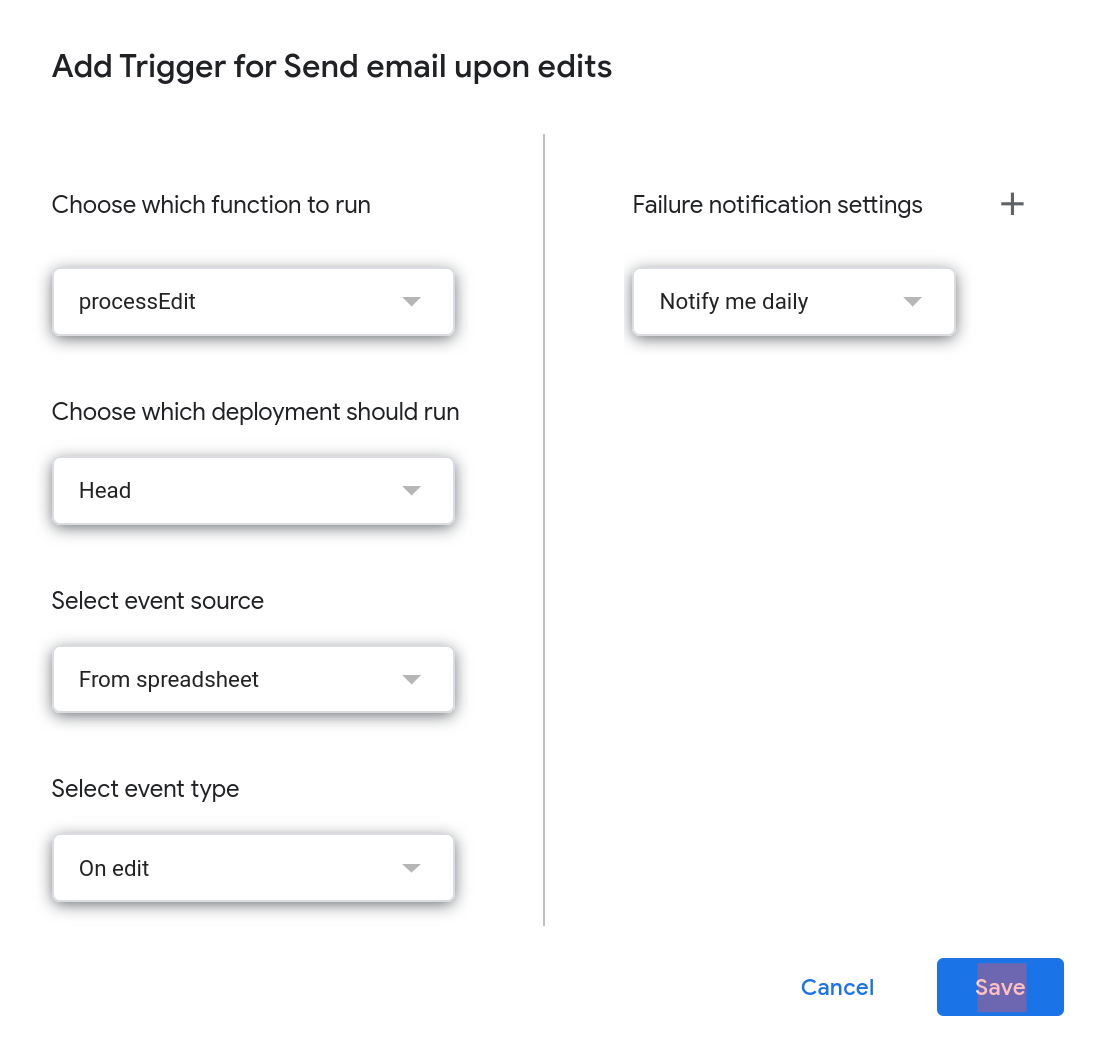
Step 3.3 — Configure the trigger
Step 3.3 — Configure the trigger
Choose the following settings to configure your trigger correctly:
Function to run: processEdit
Deployment: Head
Event source: From spreadsheet
Event type: On edit
Then click Save to create the trigger.
Step 3.4 — Authorize your script to run automatically
When you click Save, you might be asked to authorize your script again and grant it additional permissions. In particular, your script will now need permission from you "to run when you are not present". Once you click Allow, the trigger will be created.
Step 3.5 — You're done! Confirm that your new trigger is listed on the Triggers page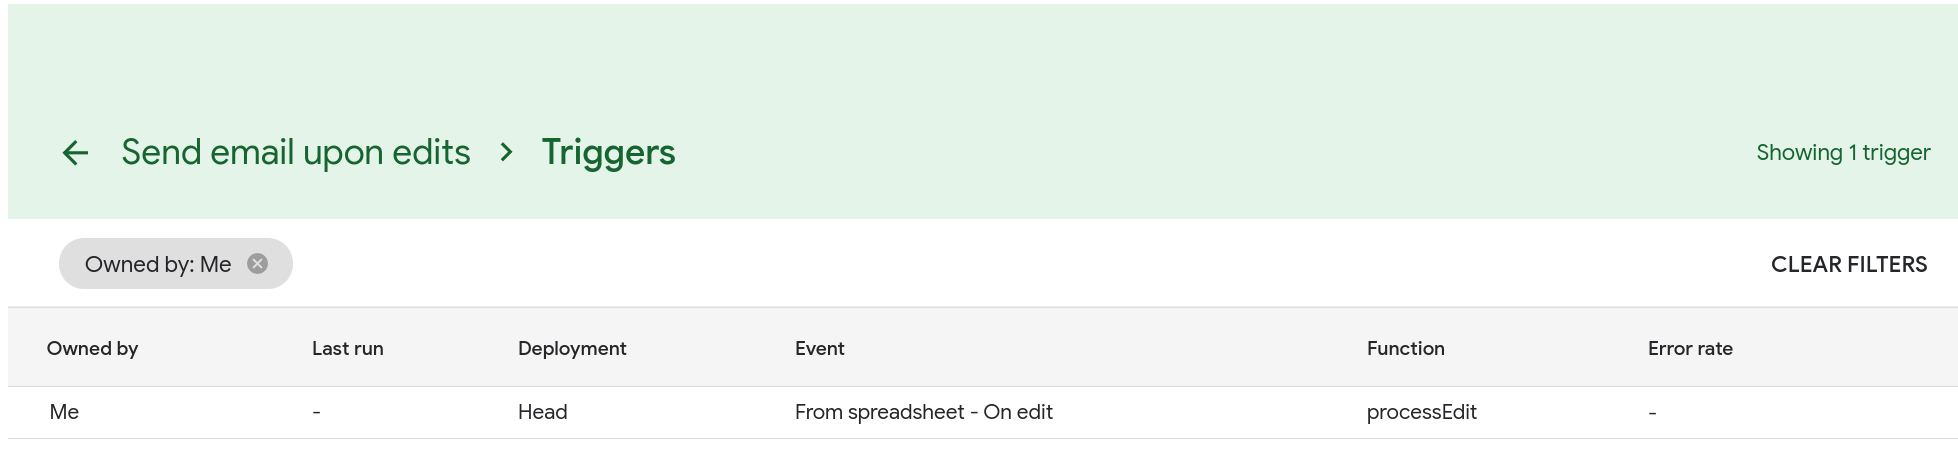
Step 4 — Confirm that emails are sent to you whenever your spreadsheet is edited
Edit your spreadsheet and confirm that you're receiving email notifications like the one below.

If it worked, you've successfully set up automated email notifications whenever your spreadsheet is edited. Congratulations!
Step 5 — Convert your email to a HTML template to highlight the changes that were made in the Spreadsheet
The email notification you created isn't that useful since it tells you someone edited your spreadsheet but it does not tell you what was edited.
The notification will be more useful if it told you what was edited in your spreadsheet.
To implement these changes, you need to first create a HTML template for the email and then modify your script to use this template.
Step 5.1 — Create a HTML templateStep 5.1.1 — Create a HTML file
Select File —> New —> HTML file from the menu bar.
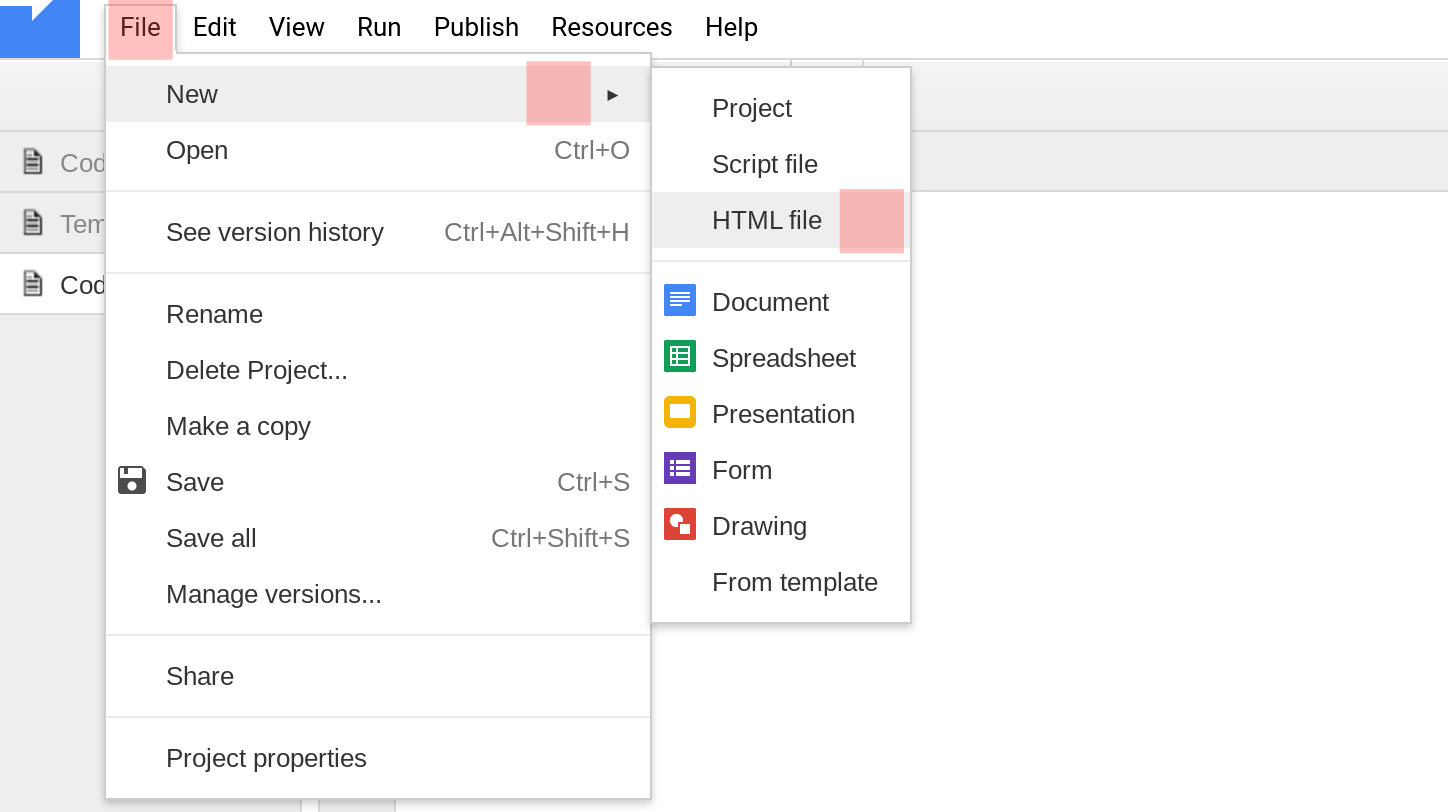
Enter Template.html as the name of your file.
Step 5.1.2 — Replace the contents of Template.html with the HTML code below A parent just signed up for the upcoming Parent-Teachers conference. Please see the highlighted row below for information about the new sign up.
<hr>
<br>
<table cellpadding='5'>
<tr>
<th bgcolor='#eaeaea'><?= headerRow[0] ?></th>
<th bgcolor='#eaeaea'><?= headerRow[1] ?></th>
<th bgcolor='#eaeaea'><?= headerRow[2] ?></th>
</tr>
<? var rowIndex = 3; ?>
<? for(var i = 0; i < rows.length; i++) { ?>
<? var background = rowIndex === editedRow ? "#e06666" : "#ffffff"; ?>
<tr>
<td bgcolor='<?= background ?>'><?= rows[i][0] ?></td>
<td bgcolor='<?= background ?>'><?= rows[i][1] ?></td>
<td bgcolor='<?= background ?>'><?= rows[i][2] ?></td>
</tr>
<? rowIndex = rowIndex + 1; ?>
<? } ?>
</table>
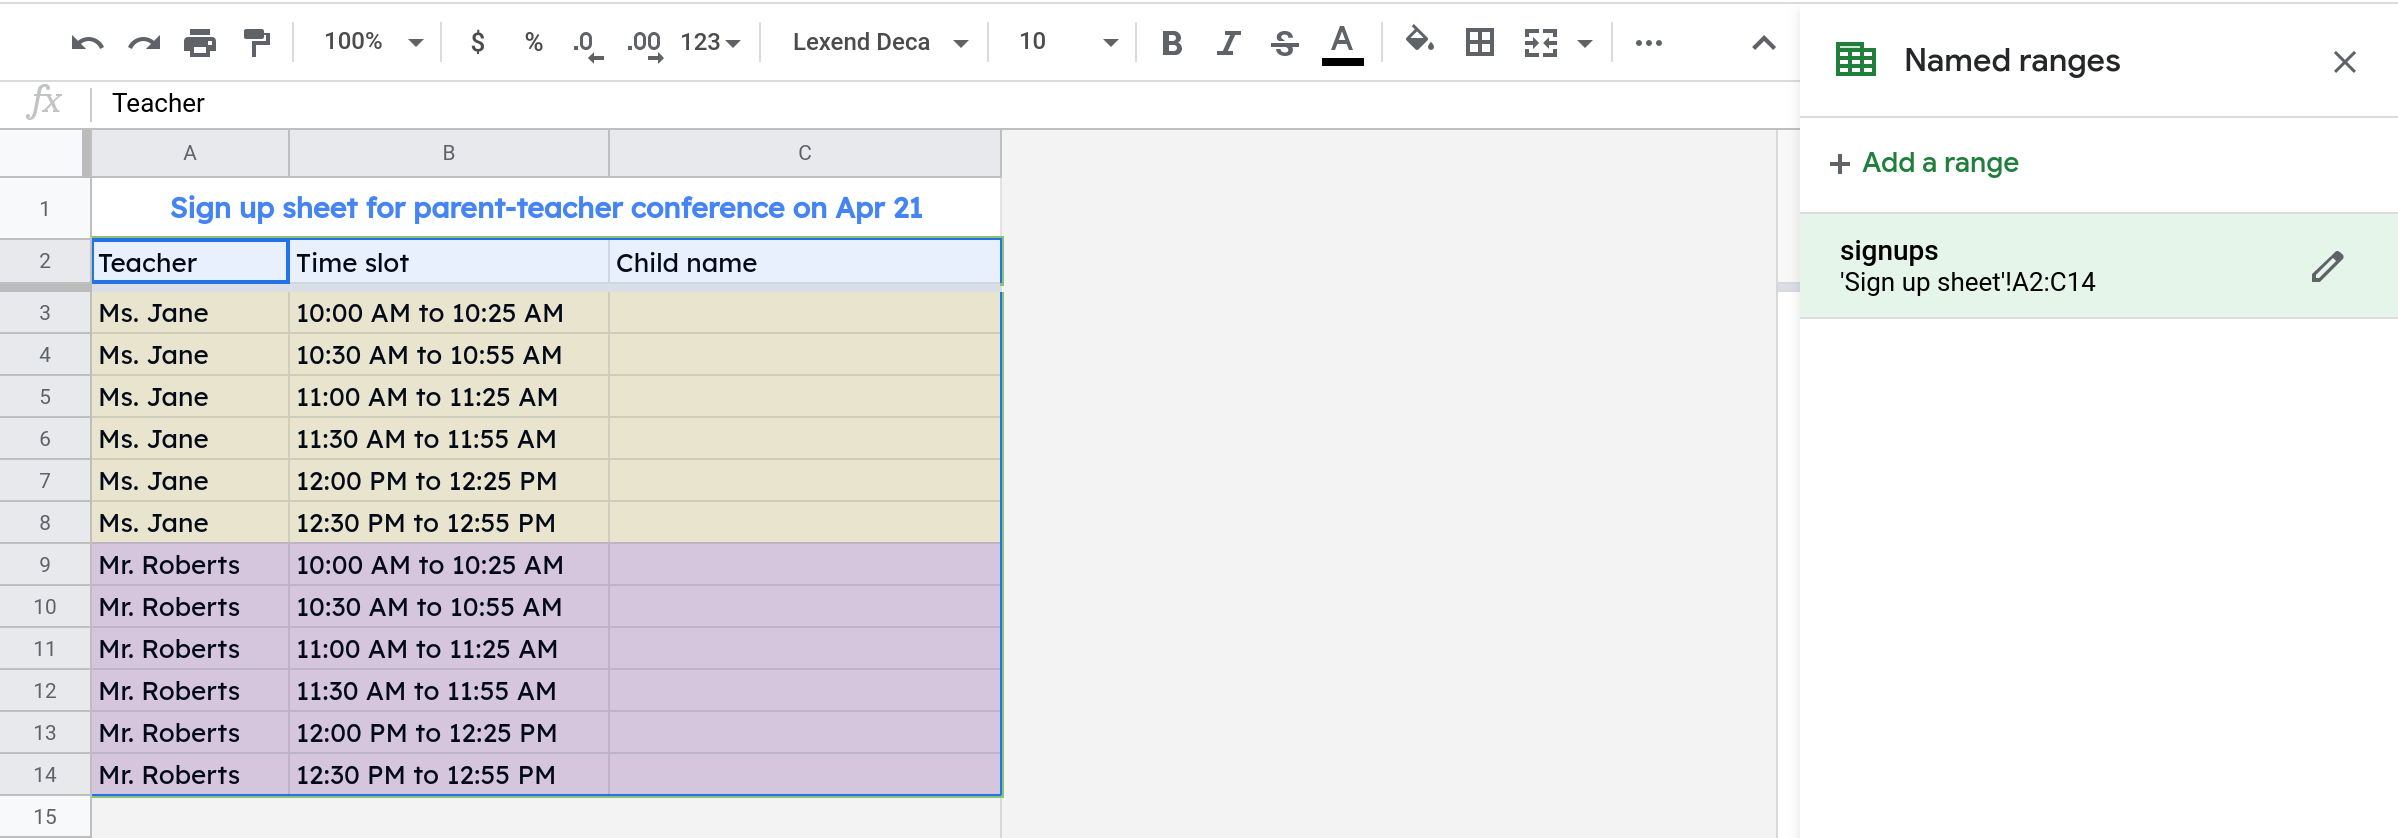
Step 5.2 — Create a named range to make it easy for your code to access the information in the sign up sheet
A parent just signed up for the upcoming Parent-Teachers conference. Please see the highlighted row below for information about the new sign up.
<hr>
<br>
<table cellpadding='5'>
  <tr>
    <th bgcolor='#eaeaea'><?= headerRow[0] ?></th>
    <th bgcolor='#eaeaea'><?= headerRow[1] ?></th>
    <th bgcolor='#eaeaea'><?= headerRow[2] ?></th>
  </tr>
  <? var rowIndex = 3; ?>
  <? for(var i = 0; i < rows.length; i++) { ?>
  <?   var background = rowIndex === editedRow ? "#e06666" : "#ffffff";  ?>
  <tr>
    <td bgcolor='<?= background ?>'><?= rows[i][0] ?></td>
    <td bgcolor='<?= background ?>'><?= rows[i][1] ?></td>
    <td bgcolor='<?= background ?>'><?= rows[i][2] ?></td>
  </tr>
  <?    rowIndex = rowIndex + 1; ?>
  <? } ?>
</table>Select the range A2:C:14 since this is the information that you'll be including in the email as a HTML table.
The code we'll write in the next step assumes that the first row in this range is a header row. If you do not have a header row in your sheet, you'll have to modify the code accordingly.
With the range selected, right click and select Define named range from the menu.
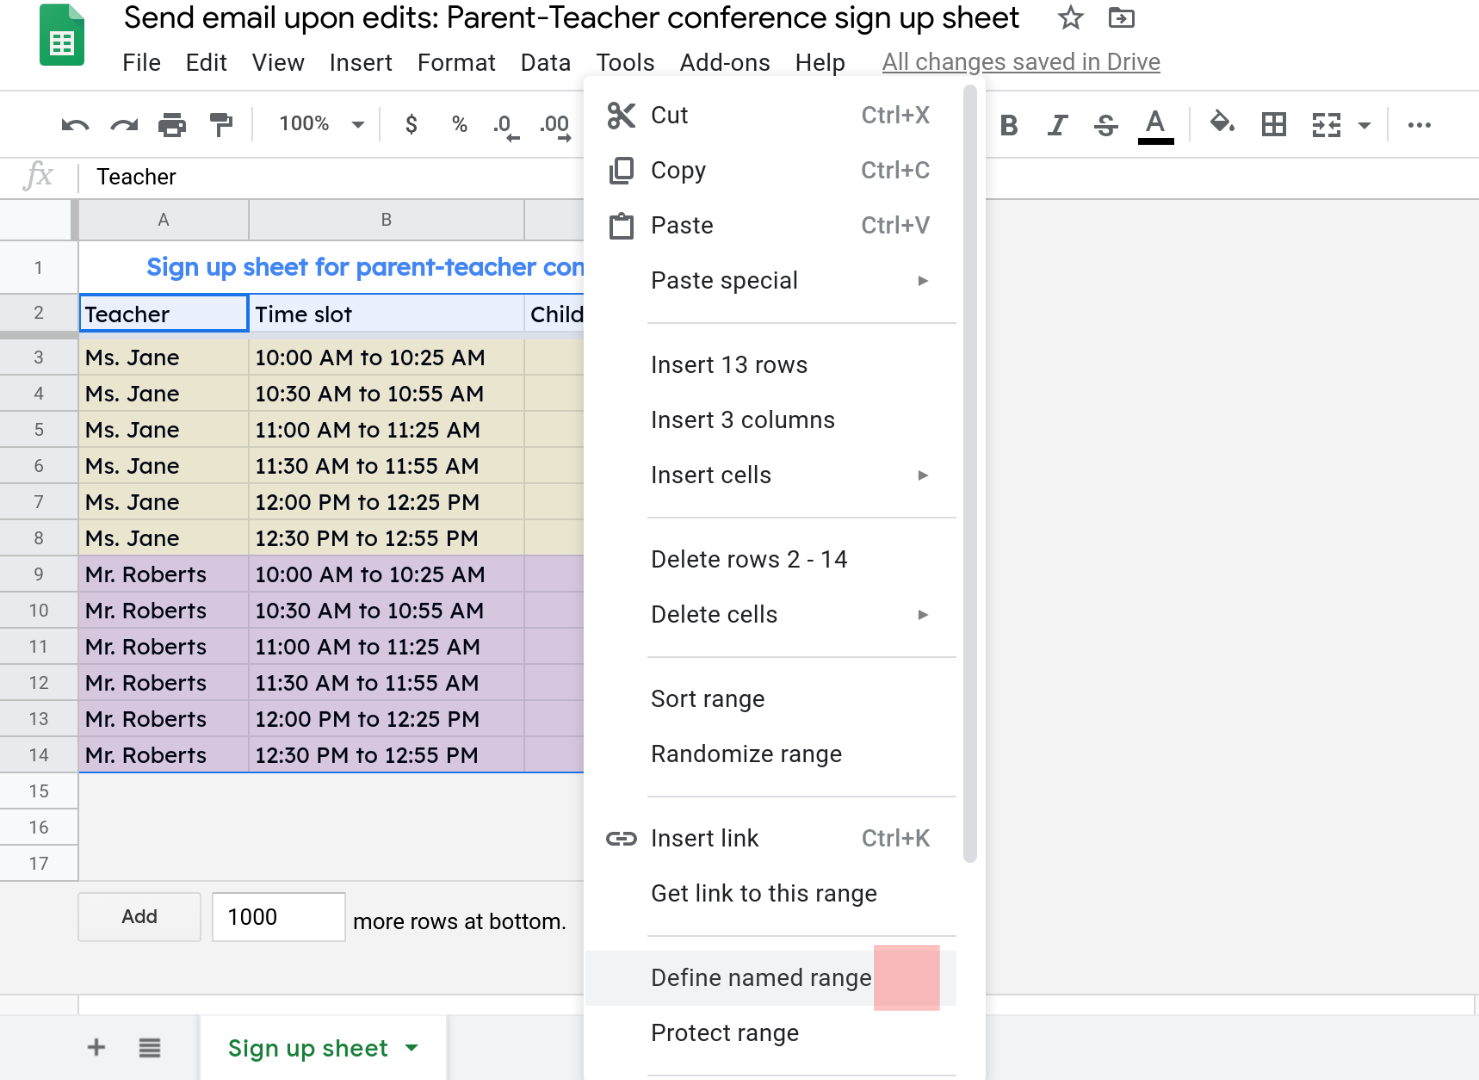
Enter "signups" as the name of your range and click Done to create a named range.
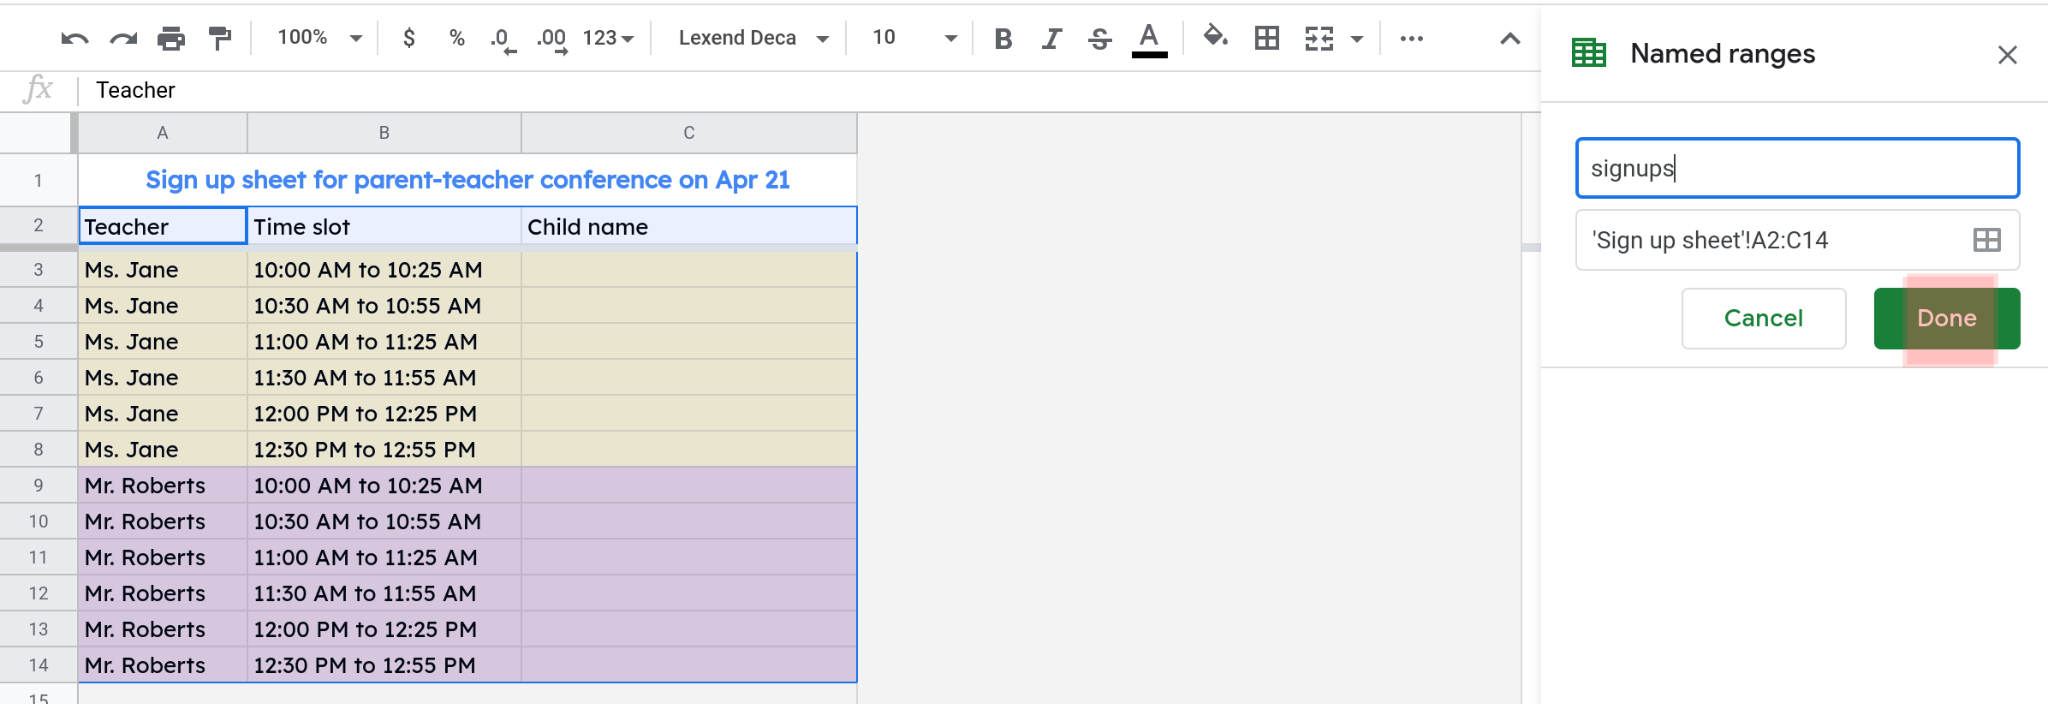
You should see the named range displayed in the sidebar.
Step 5.3 — Modify your script to use the HTML template⚠ Please replace the email address in the code snippet below with your email address.
//@OnlyCurrentDoc
function processEdit(e) {
  var sheet = SpreadsheetApp.getActive();
  var rows = sheet.getRangeByName("signups").getValues();
  var headerRow = rows.shift();
  var editedRow = e.range.getRow();

  var template = HtmlService.createTemplateFromFile("Template");
  template.headerRow = headerRow;
  template.editedRow = editedRow;
  template.rows = rows;

  var html = template.evaluate().getContent();

  MailApp.sendEmail({
    to: "youremail@example.com",
    subject: "New sign up -- parent teachers conference",
    htmlBody: html
  });
}
How does the above code work?
⚠ Please replace the email address in the code snippet below with your email address.
//@OnlyCurrentDoc
function processEdit(e) {
var sheet = SpreadsheetApp.getActive();
var rows = sheet.getRangeByName("signups").getValues();
var headerRow = rows.shift();
var editedRow = e.range.getRow();
var template = HtmlService.createTemplateFromFile("Template");
template.headerRow = headerRow;
template.editedRow = editedRow;
template.rows = rows;
var html = template.evaluate().getContent();
MailApp.sendEmail({
to: "youremail@example.com",
subject: "New sign up -- parent teachers conference",
htmlBody: html
});
}Let me describe how the above code works at a high-level so you can learn from it and also modify it to suit your needs.
I've also written a detailed tutorial on Sending HTML email from Google Sheets. Please read that tutorial if you want to learn more about how the code works.
This code will run whenever your spreadsheet is edited. When the trigger runs your script, it will also pass your script some information about which spreadsheet the trigger is for and the range that was edited.
The code does three things:
First, it reads all the information in the named "signups".
Then, it uses this information creates a few variables that will be used to put together the HTML content.
The variable
headerRowcontains the column headers (first row in the spreadsheet).The variable
editedRowcontains the row that was edited.The variable
rowscontains all the rows in the sign up sheet with the exception of the header row (which is now saved in the variableheaderRow).Next, these variables are passed to the template and the template is rendered by evaluating it. At this point, the HTML for your email has been generated.
Finally, the email is sent using the generated HTML code.
The code can be improved in a few ways:
The code does not check which cell was edited. So, for example, you will receive an email even if a parent edited the teacher's name.
You will receive an email for every edit. So if a parent makes a typo and later corrects it, you'll receive two emails.
Nothing prevents a parent from editing another parent's entry. The email will not tell you if the parent replaced one value with another. You'll only see the new value.
I will write another tutorial to show you how to handle these more advanced scenarios.
Step 5.3 — Test your shiny new email template
Instead of receiving an email that only tells you something was edited, you'll now receive an email that shows you exactly what was edited.

[Optional] Add protections to your sheet to ensure parents can only edit certain cells
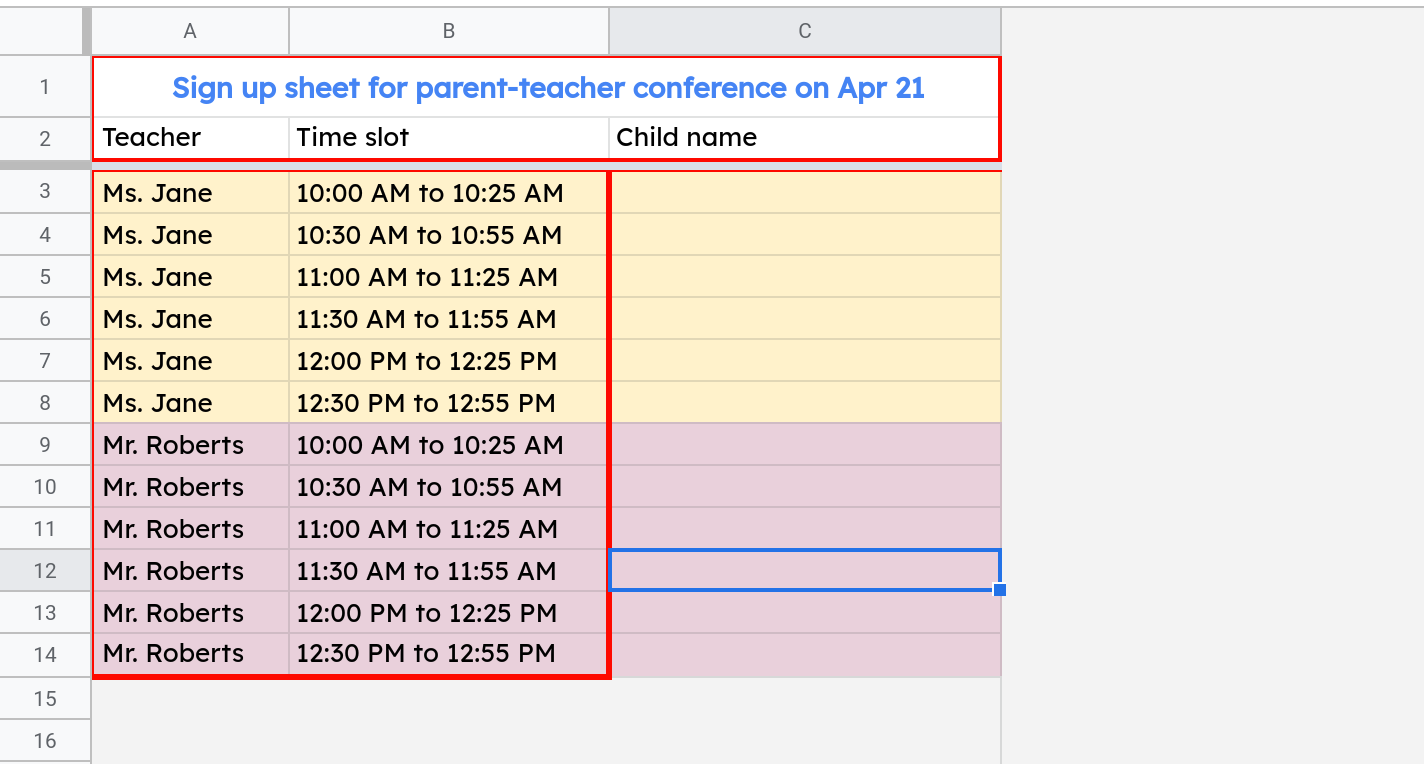
You probably do not want parents changing the structure of the sheet (i.e., adding columns or rows) or editing the time slots etc. So, the next step is to add protections to the sheet so that parents can only edit the cells in the spreadsheet that are relevant to them. In the spreadsheet above, this would be the range C3:C14.
In this example, we want to protect two ranges (highlighted in red in the image below):
A1:C2 (the first two rows)
A3:B14 (the first two columns excluding the first two rows since the range A1:C2 already protects the first two rows)
Once you protect the above two ranges, parents will only be able to edit the range C3:C14. This is where they will enter their child's name to sign up for a slot.
To add protections, select Data from the menu and then Protected sheets and ranges from the dropdown menu.
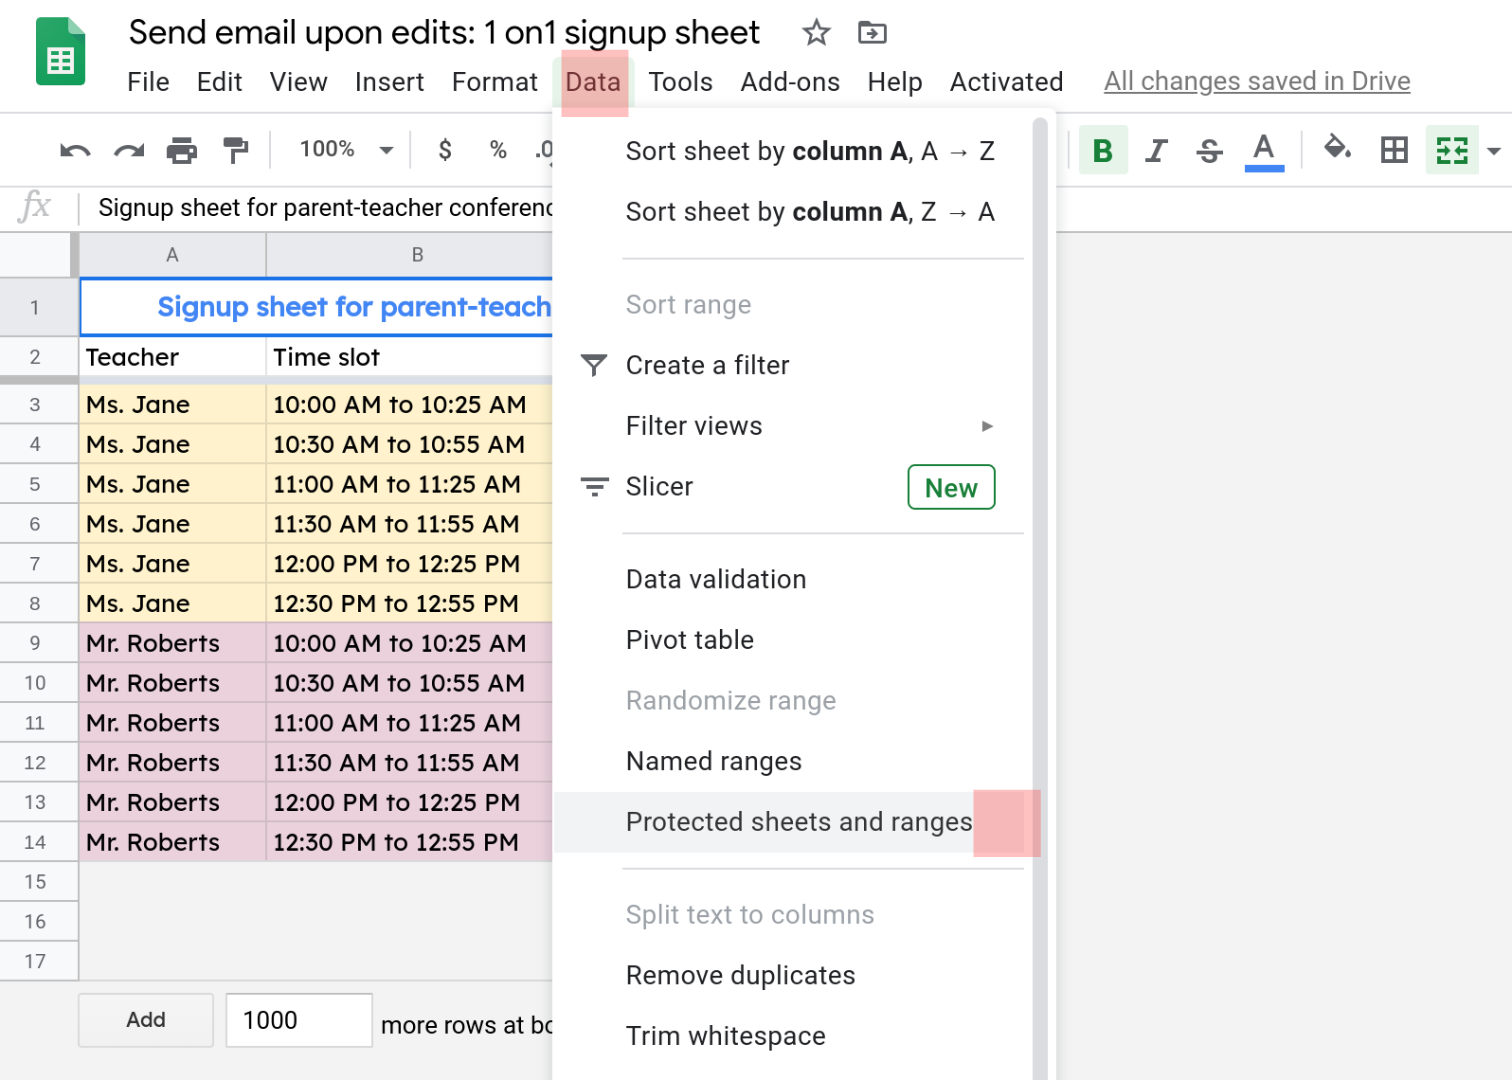
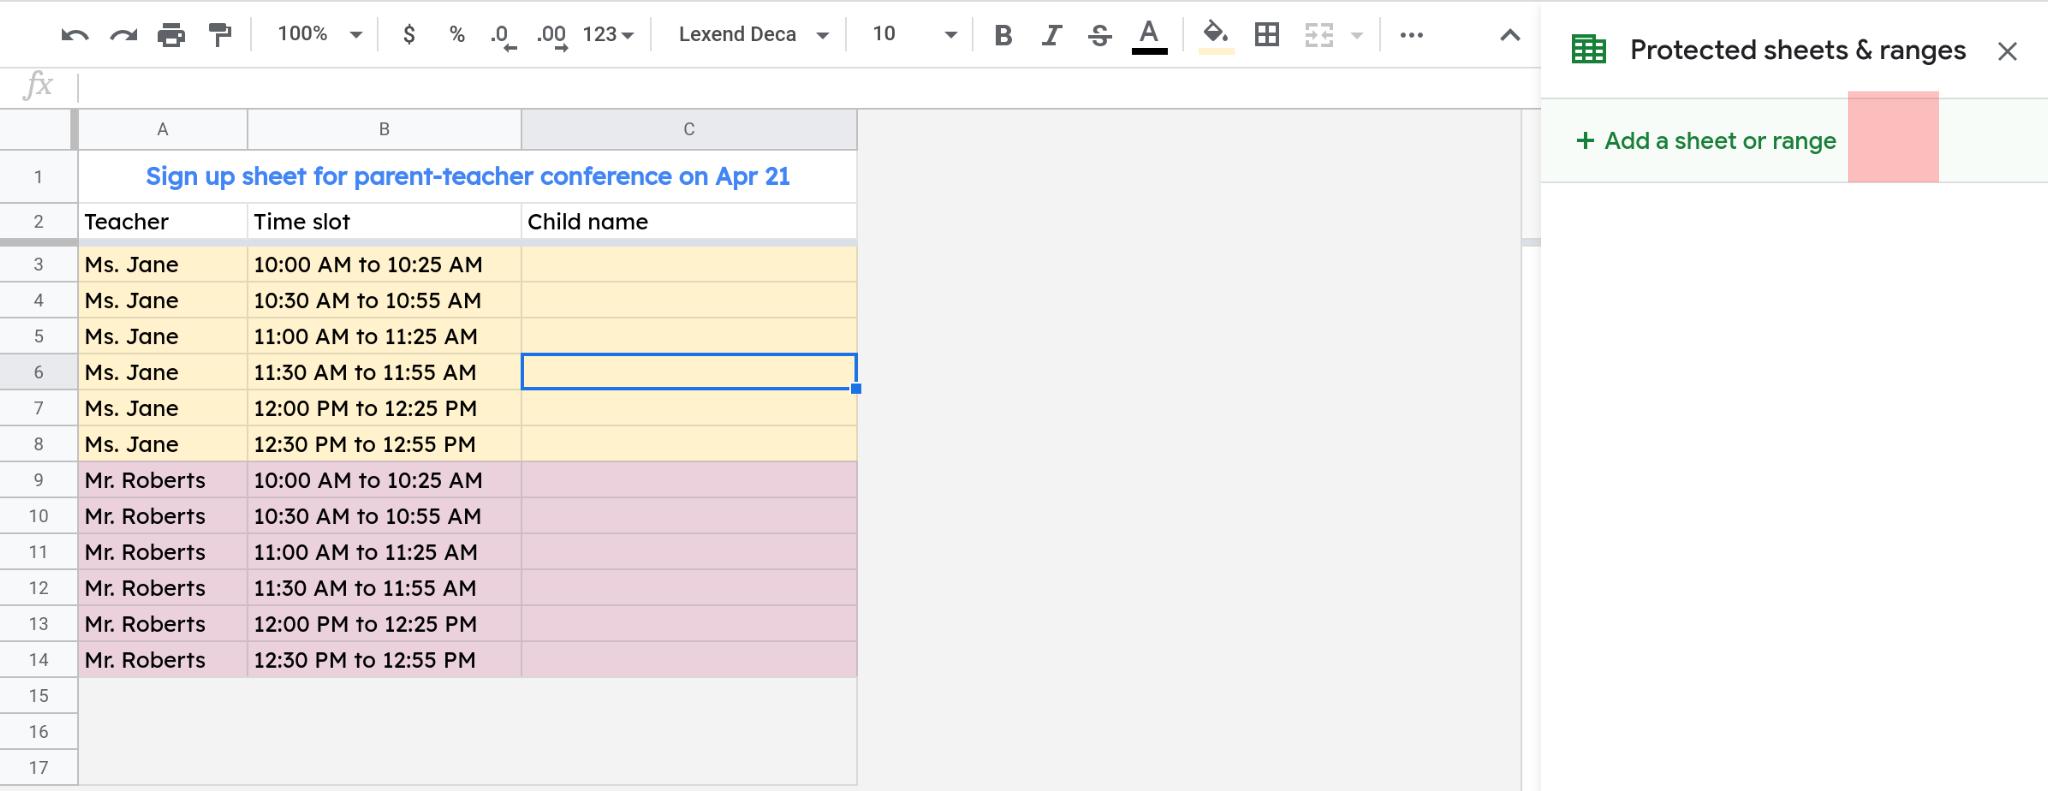
Then, select each range that you want to protect and set permissions so that only you can edit them. First, select + Add a sheet or range from the side bar menu.
Next, select click the
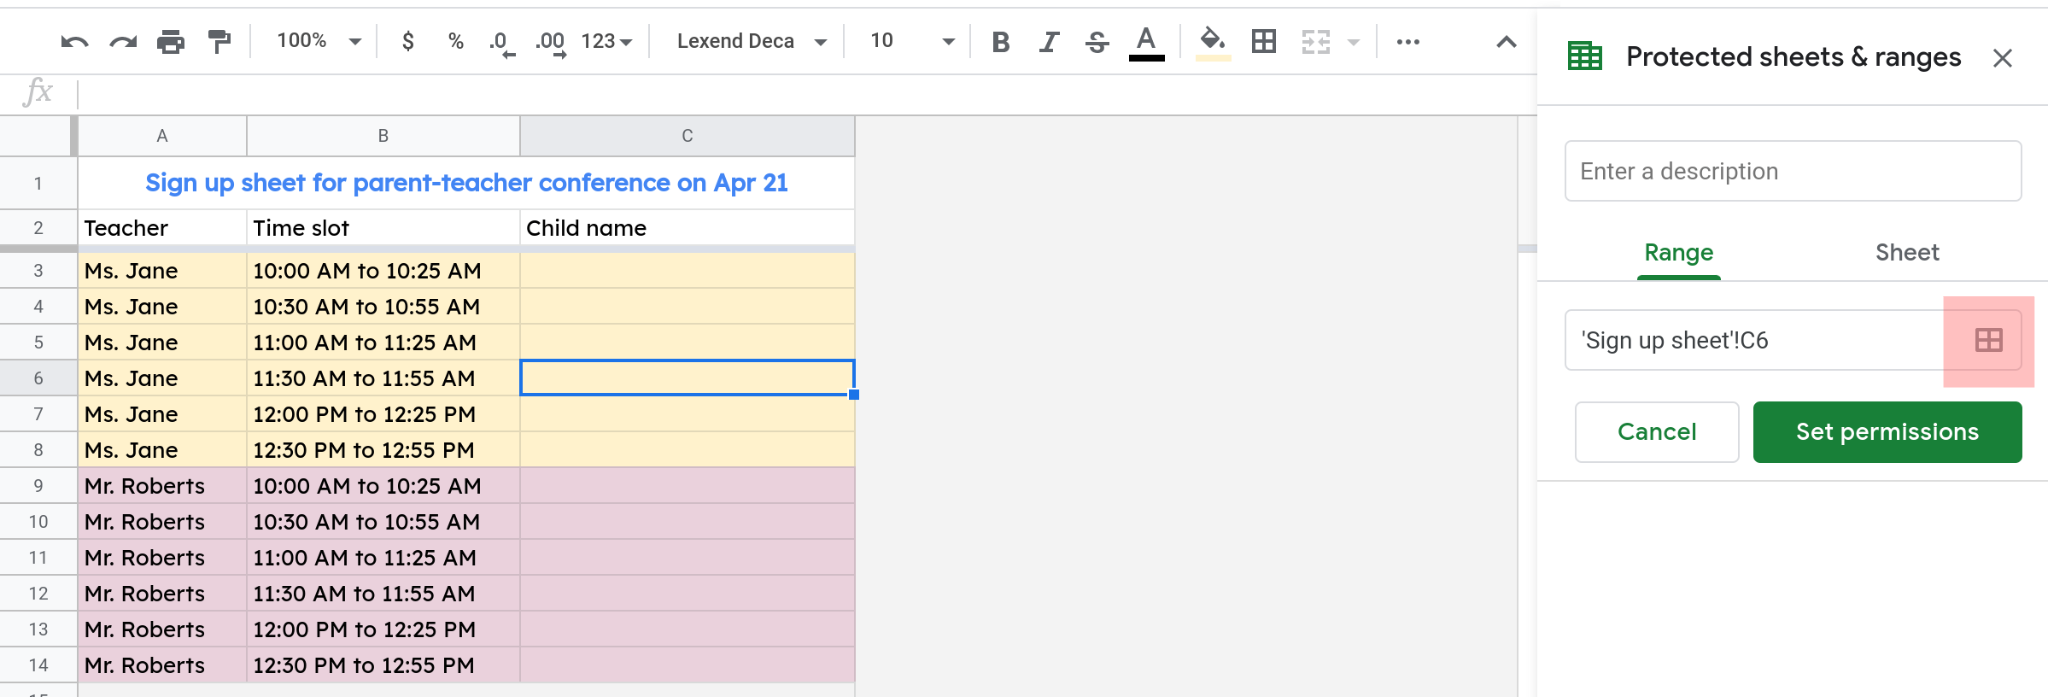
Then select the first range you want to protect and then press OK. Start with the range A1:C2 to protect the first two rows.
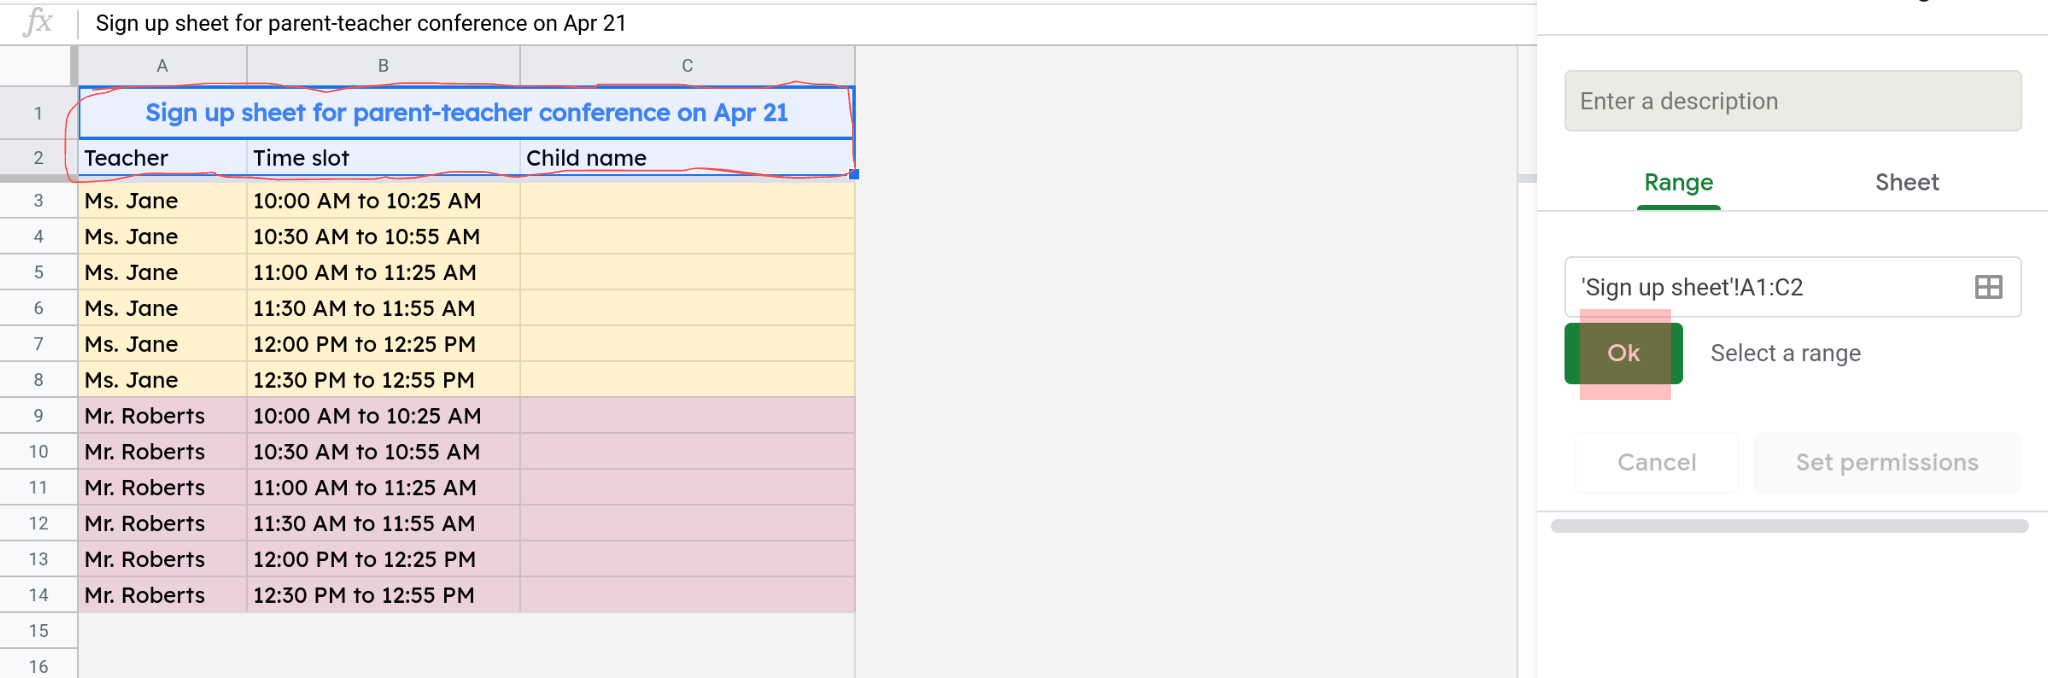
The final step is to set permissions so that only you can edit the range.
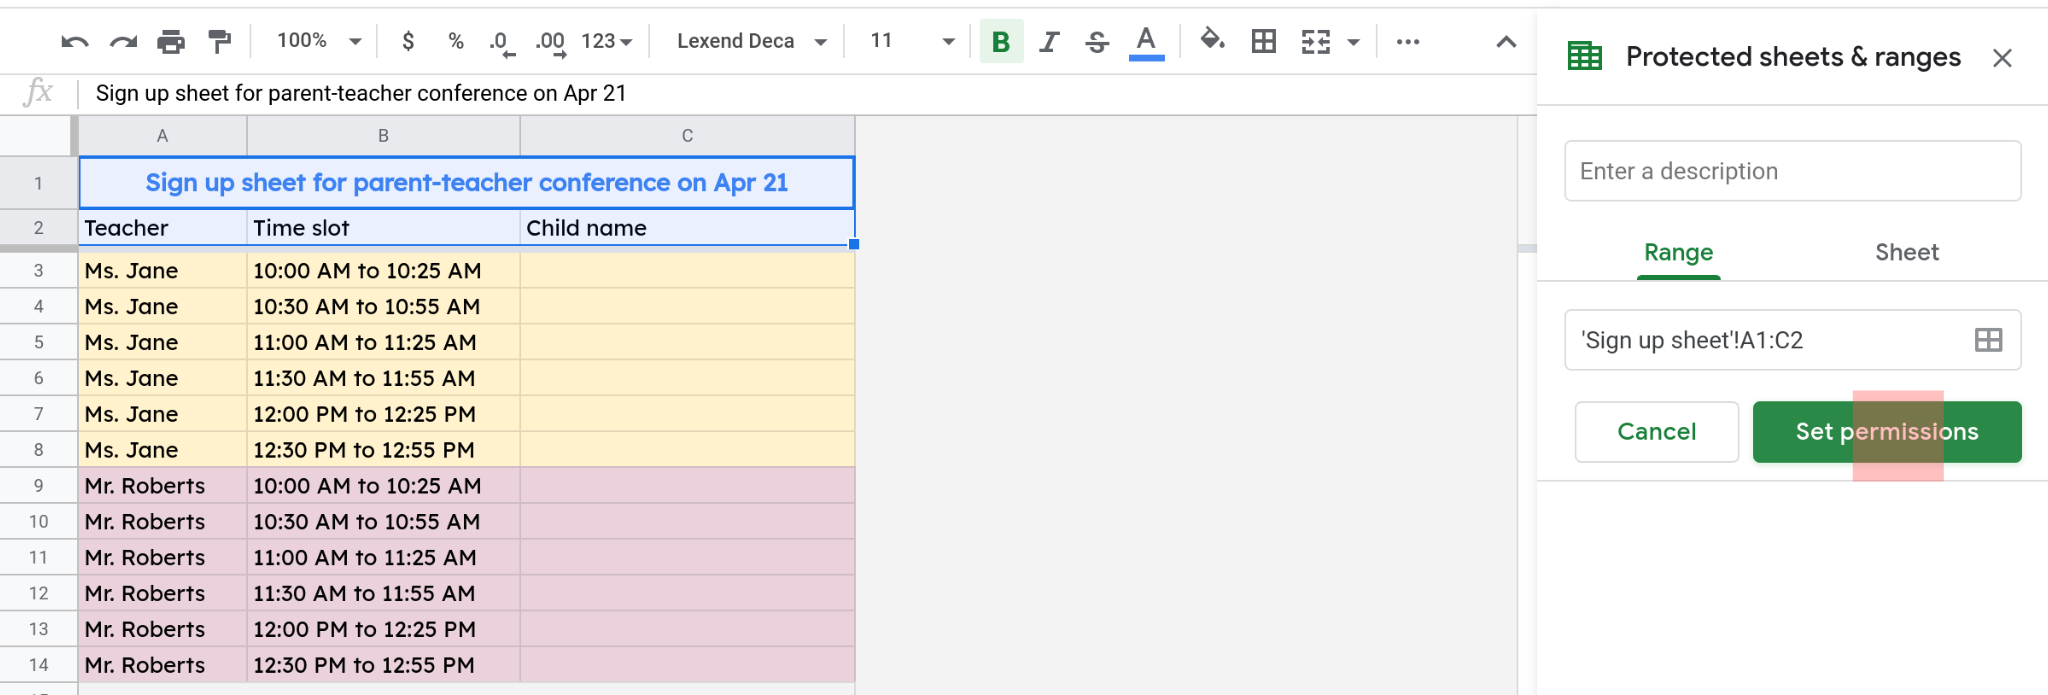
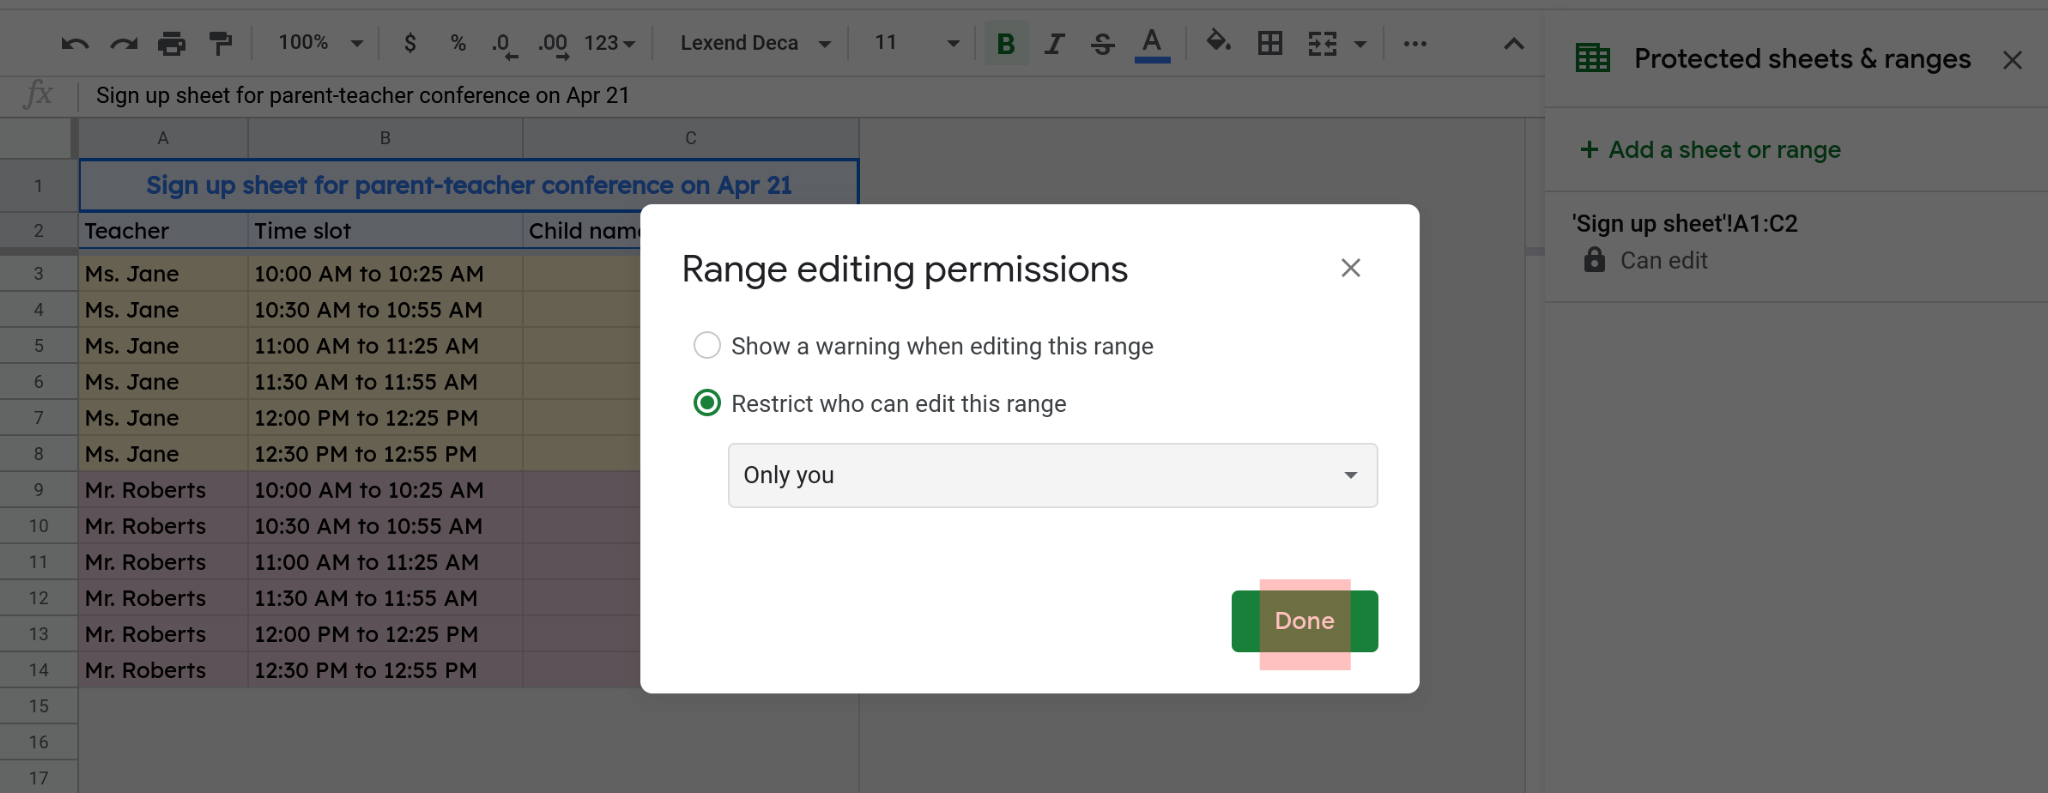
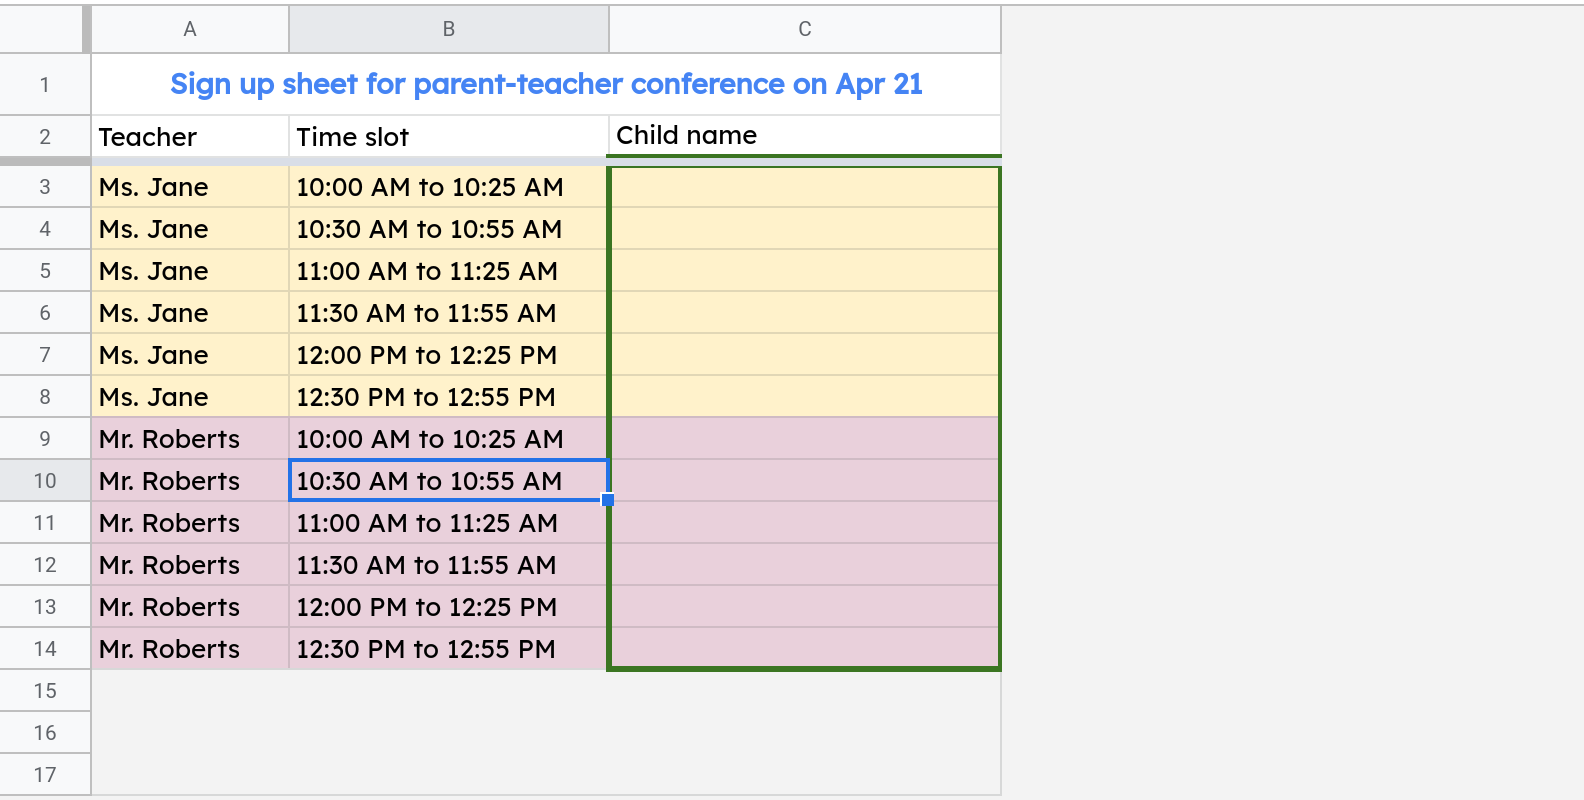
That's it, you've now added protections to the range A1:C2. Next, you need to protect the range A3:B14 to prevent parents from editing the teachers' names and the time slots. When you're done with this step, parents will only be able to edit the range C3:C14 (highlighted in green below).
Conclusion
This tutorial showed you how to send email notifications whenever a Google Sheets spreadsheet is edited. You learned:
How to create a named range to make it easier for your code to access the information in your spreadsheet?
How to create and send a HTML email that highlights the edits that were made to your spreadsheet?
How to set up protections so users of your sheet can only edit the cells you want them to?
You also created a really cool Parent-Teacher sign up application with just a few lines of code!
Thanks for reading!
DISCLAIMER: This content is provided for educational purposes only. All code, templates, and information should be thoroughly reviewed and tested before use. Use at your own risk. Full Terms of Service apply.
Thanks for your feedback!
Your input helps improve the content for everyone.
