Send email from Google Sheets based on a schedule
If you've worked in any organization of any size, you've probably had to put together and send reports on a regular basis to your team. In this post, I'll show you how to automate sending emails from Google Sheets based on a schedule.
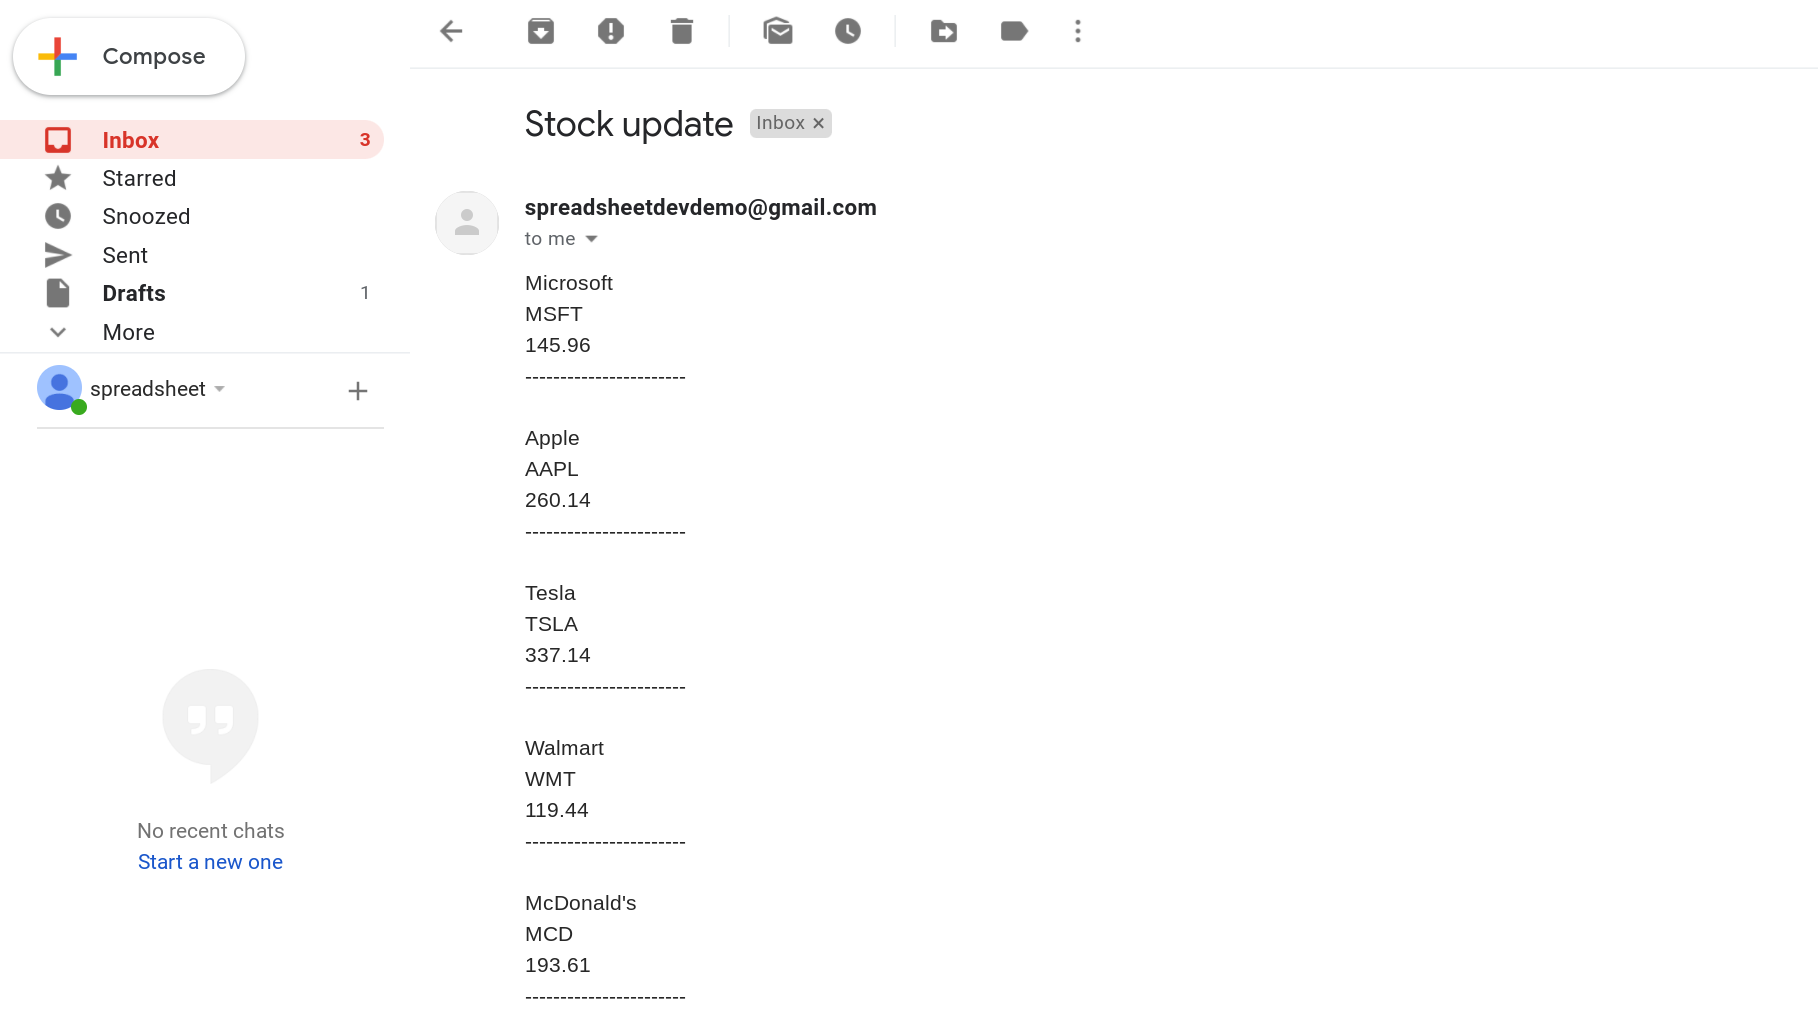
We'll build a stock price report that's emailed to us every morning from a Google Sheet. When we finish building it, the email report will look like this:

Disclaimer
I used to use this approach to keep a tab on stocks that I own but I have since moved to using other software since Google Finance data can sometimes be inaccurate or stale. Therefore, please treat this post as just an example of how to build automated email reports using Google Sheets. If your use case requires reliable and accurate information on stocks that you own, I'll let you evaluate and decide for yourself if this solution will work for you.
PrerequisitesYou're familiar with basic coding concepts. Ideally, you've used JavaScript or Google Apps Script before (they're both based on ECMAScript). If you're not familiar, I've created an introduction to apps script series that you can refer to.
You're familiar with Google Sheets and basic concepts such as using functions.
Create a Google Sheet containing data for the report
You're familiar with basic coding concepts. Ideally, you've used JavaScript or Google Apps Script before (they're both based on ECMAScript). If you're not familiar, I've created an introduction to apps script series that you can refer to.
You're familiar with Google Sheets and basic concepts such as using functions.
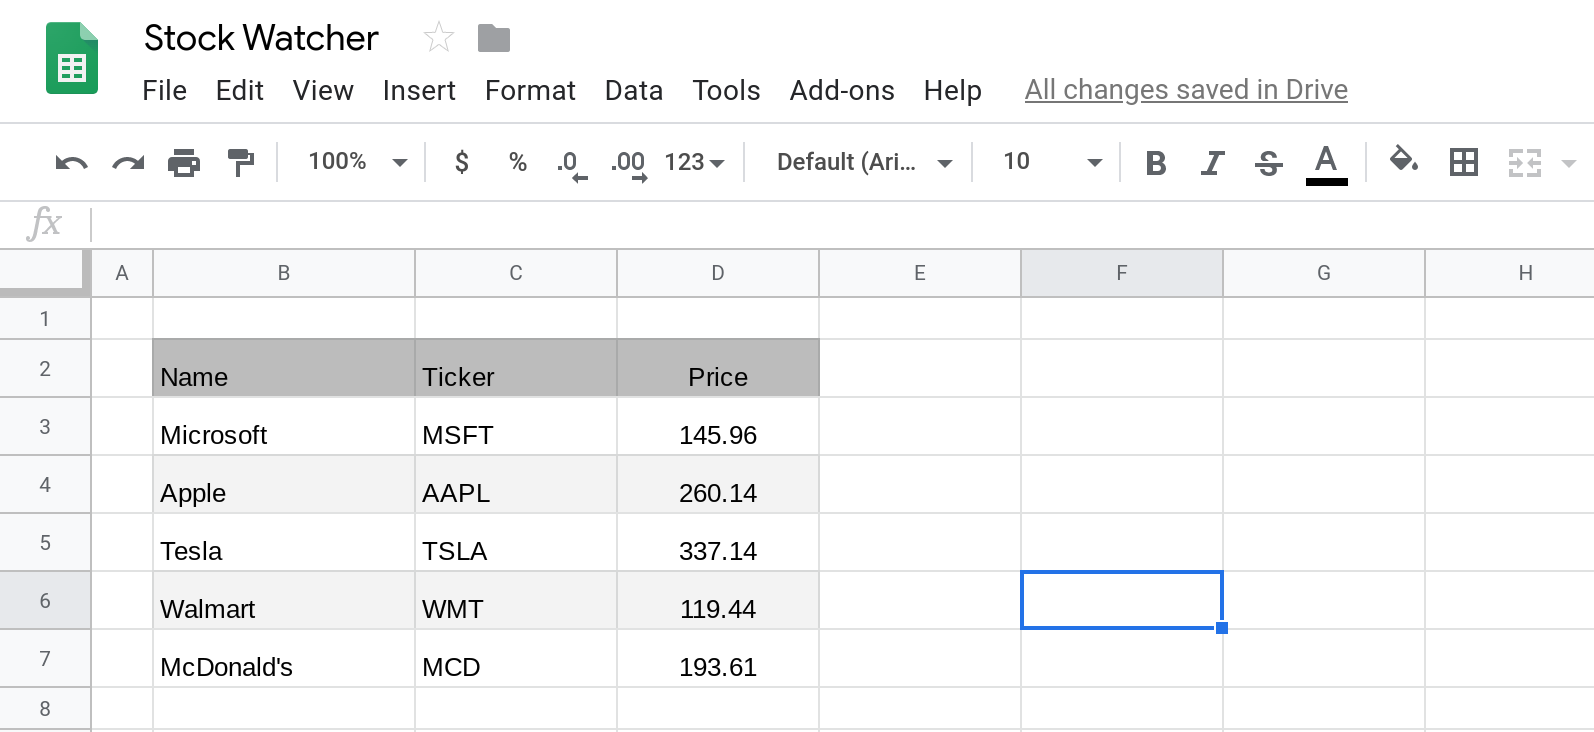
The first step is to create a Google Sheet and enter information about the stocks you want to track. Create a table with three columns in a sheet named "Data". The three columns are for each company's name, ticker symbol and stock price.
🛈 To get the current price of a stock, use the GOOGLEFINANCE formula.
Here is an example: =GOOGLEFINANCE(C3, "price"). Here the cell C3 contains the ticker symbol.
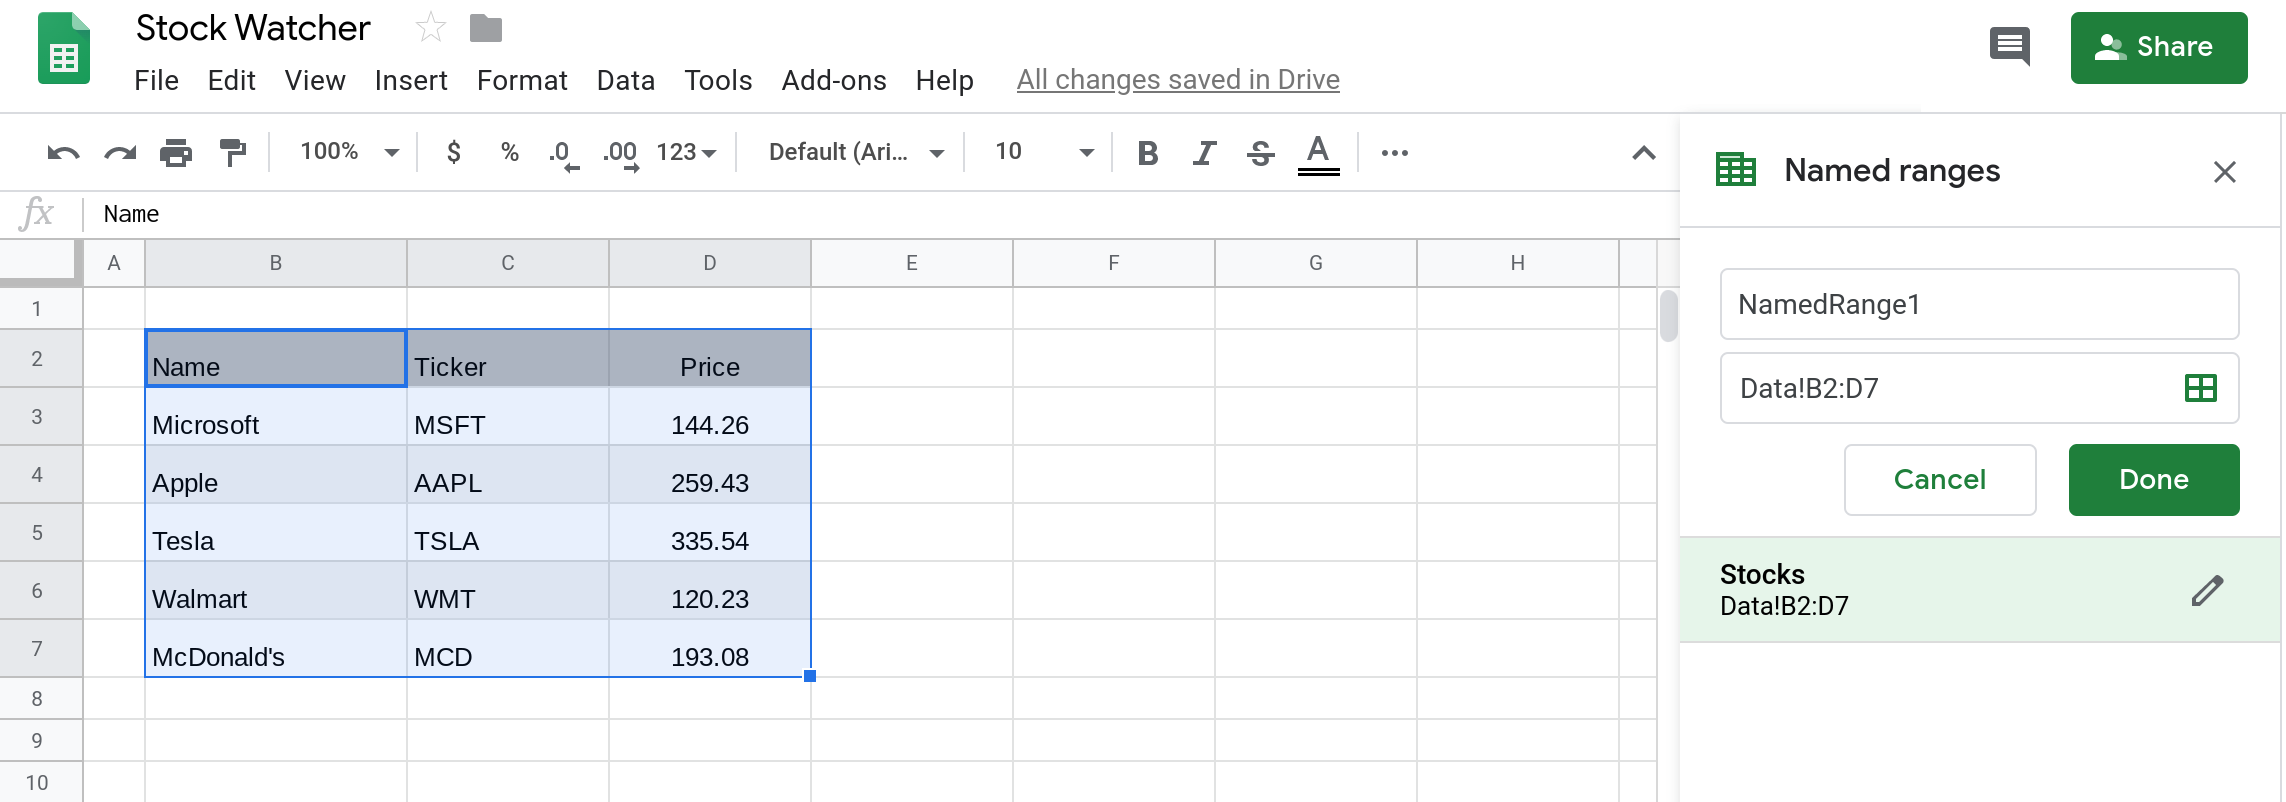
Create a Named Range for this data to make it easy to access it from a script.

Enter a name for the range. I named it "Stocks".
Create an apps script to read data from the Google sheet and email it
We'll implement this functionality using three functions:
A
getData()function will read the data from the Google sheet and will convert it into an array of objects.A
getEmailText()function will take this array of objects as input and will return the email message to be sent.A
sendEmail()function will use the above two functions to create and send the email message.
Create the getData() function to read data from the Google sheet and convert it into an array of objects
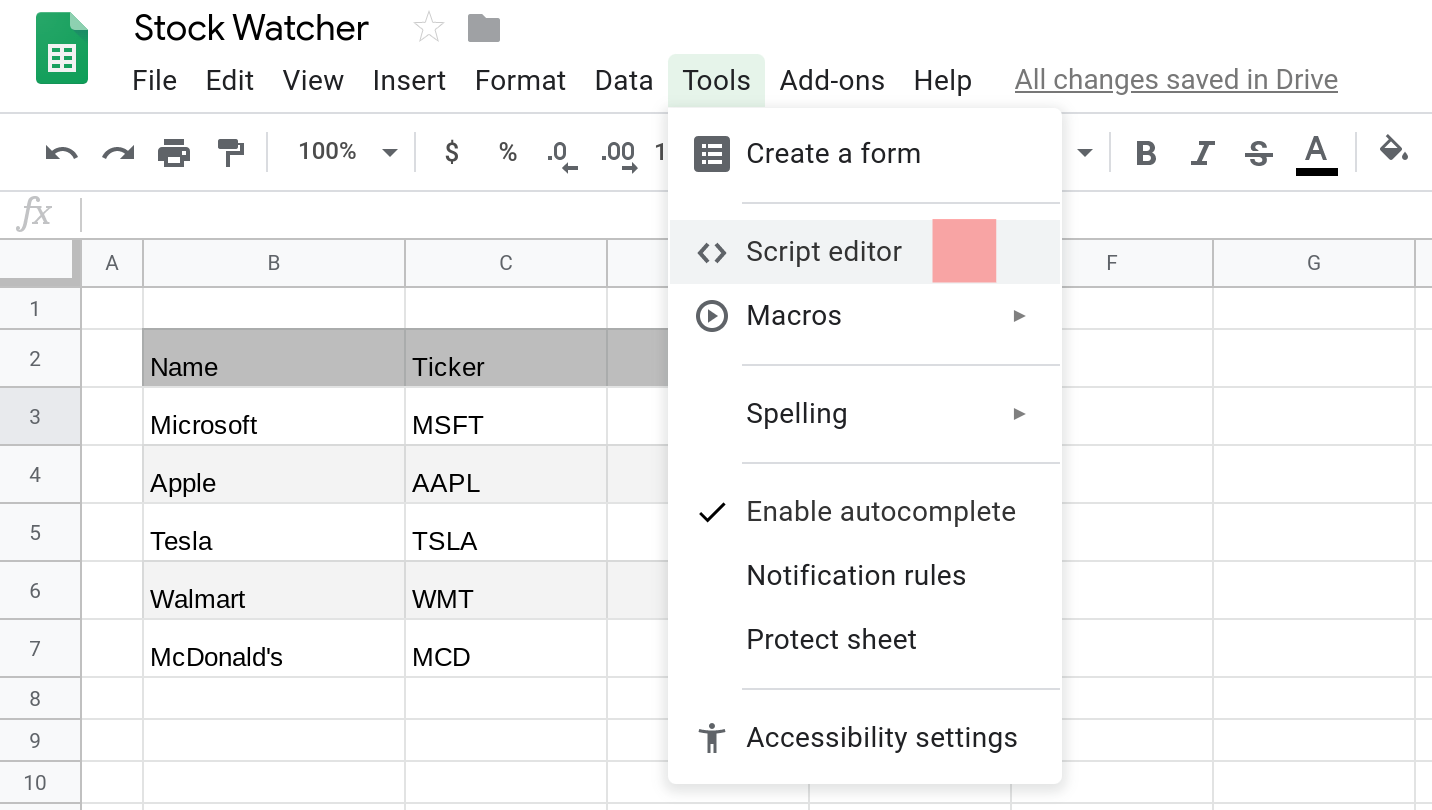
Create an apps script by selecting Extensions → Apps Script.
You should see a code editor like this:
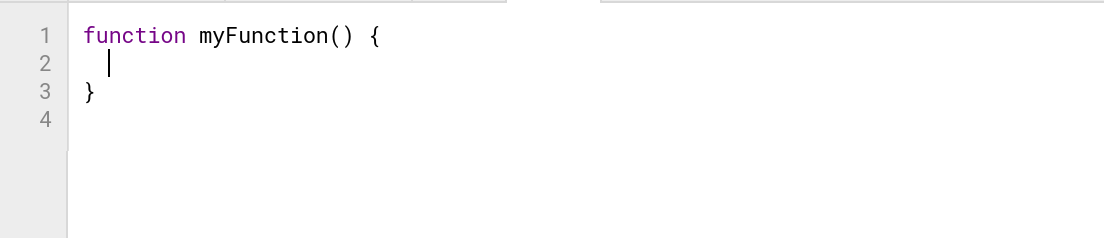
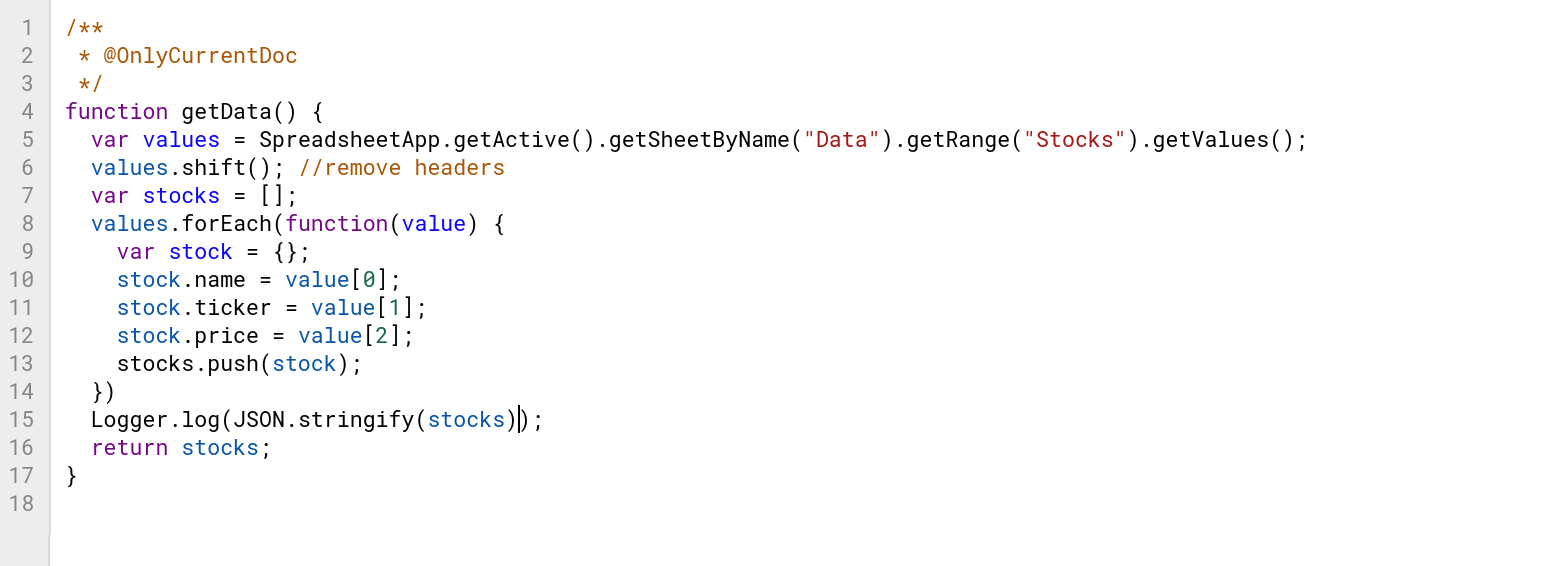
Enter the following code in the editor.
/**
 * @OnlyCurrentDoc
 */
function getData() {
  var values = SpreadsheetApp.getActive().getSheetByName("Data").getRange("Stocks").getValues();
  values.shift(); //remove headers
  var stocks = [];
  values.forEach(function(value) {
    var stock = {};
    stock.name = value[0];
    stock.ticker = value[1];
    stock.price = value[2];
    stocks.push(stock);
  })
  Logger.log(JSON.stringify(stocks));
  return stocks;
}
Run the code by clicking the play icon.

Google will ask you to authorize the script to access the data in your spreadsheet. Once you authorize it, the script will run. When it runs, you won't see any changes - it'll be like nothing happened. So what exactly does the script do? Let me explain the script line by line.
The function getData() reads the data in the spreadsheet and converts it into an array of objects. This representation makes it easier to work with the data.
If you are not familiar with arrays and objects in Apps Script, please refer to the following posts:
Name | Ticker | Price |
|---|---|---|
Microsoft | MSFT | 145.96 |
Apple | AAPL | 260.14 |
Tesla | TSLA | 337.14 |
Walmart | WMT | 119.44 |
McDonald's | MCD | 193.61 |
The function getData() converts the above table into the data structure below.
[
  {
    "name": "Microsoft",
    "ticker": "MSFT",
    "price": 145.96
  },
  {
    "name": "Apple",
    "ticker": "AAPL",
    "price": 260.14
  },
  {
    "name": "Tesla",
    "ticker": "TSLA",
    "price": 337.14
  },
  {
    "name": "Walmart",
    "ticker": "WMT",
    "price": 119.44
  },
  {
    "name": "McDonald's",
    "ticker": "MCD",
    "price": 193.61
  }
]
The function then logs this data structure before returning it. You can view the logs by selecting View → Logs OR by pressing CTRL + ENTER.

A pop-up window will show you the logs.
Restricting the authorization scope of the script
The @OnlyCurrentDoc annotation tells Google that you only want this script to get access to the spreadsheet that it was created from. If you remove this annotation, Google will think you want this script to be able to access all of your spreadsheets - we definitely don't want that!
Create the getEmailText() function to generate the body of the email
The getEmailText() function takes the output of the getData() function as input and returns a string containing the body of the email.
function getEmailText(stockData) {
  var text = "";
  stockData.forEach(function(stock) {
    text = text + stock.name + "\n" + stock.ticker + "\n" + stock.price + "\n-----------------------\n\n";
  });
  return text;
}
Newline character
The \n character is called a newline character and the text that follows it will start on the next line.
Create and send the email message
Finally, we'll create and send the email message using the email copy that the getEmailText() function returned.
⚠ Please replace the email address in the code snippet below with your email address.
function sendEmail() {
  var stockData = getData();
  var body = getEmailText(stockData);

  MailApp.sendEmail({
    to: "youremail@example.com",
    subject: "Stock update"
    body: body
  });
}
Putting it all together
The full script should look like the following:
⚠ Please replace the email address in the code snippet below with your email address.
function sendEmail() {
  var stockData = getData();
  var body = getEmailText(stockData);

  MailApp.sendEmail({
    to: "youremail@example.com",
    subject: "Stock update",
    body: body
  });
}

function getEmailText(stockData) {
  var text = "";
  stockData.forEach(function(stock) {
    text = text + stock.name + "\n" + stock.ticker + "\n" + stock.price + "\n-----------------------\n\n";
  });
  return text;
}

/**
 * @OnlyCurrentDoc
 */
function getData() {
  var values = SpreadsheetApp.getActive().getSheetByName("Data").getRange("Stocks").getValues();
  values.shift(); //remove headers
  var stocks = [];
  values.forEach(function(value) {
    var stock = {};
    stock.name = value[0];
    stock.ticker = value[1];
    stock.price = value[2];
    stocks.push(stock);
  })
  //Logger.log(JSON.stringify(stocks));
  return stocks;
}
Now try running the sendEmail() function. You should receive an email like the one below.
🛈 Note
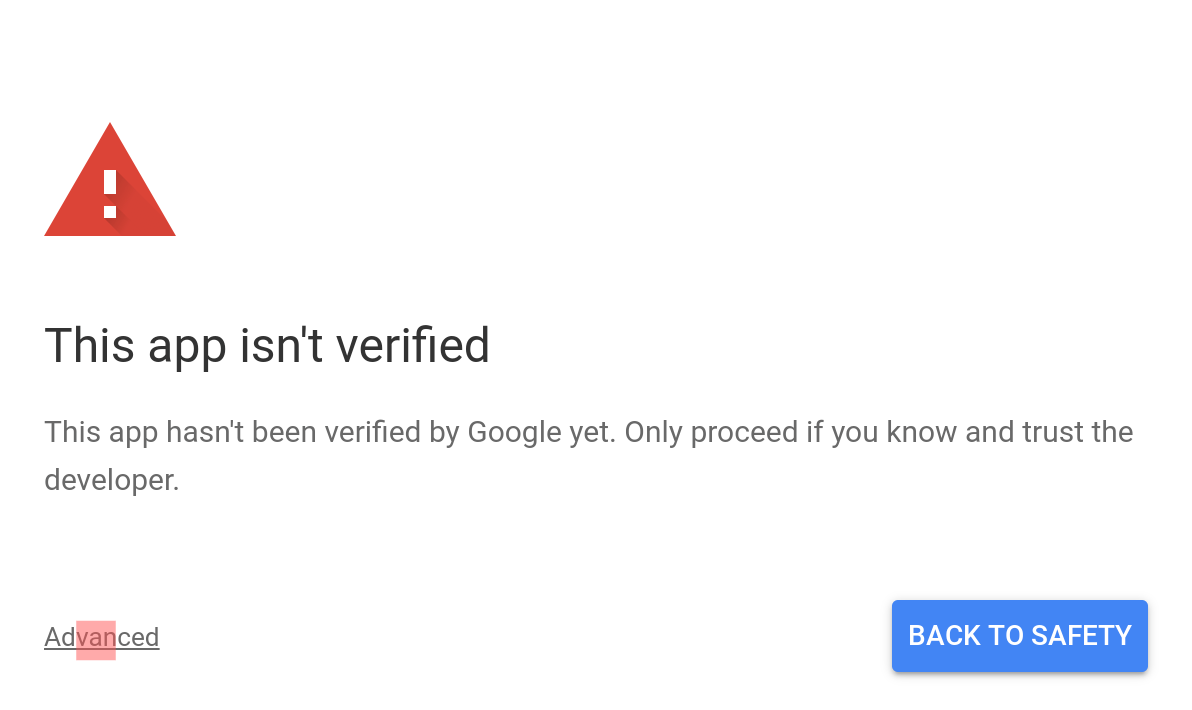
When you run your script, Google might ask you to authorize it again because the script is going to send an email on your behalf. If you're using a Gmail account and not a G Suite account, you might also see a warning that your app is unverified. If you see a warning like the one below, please read my post on authorizing apps scripts for more information on how to proceed.
Make the script run every morning
The final step is to automate sending this email every morning so you can keep a tab on the latest stock prices right from your email inbox.
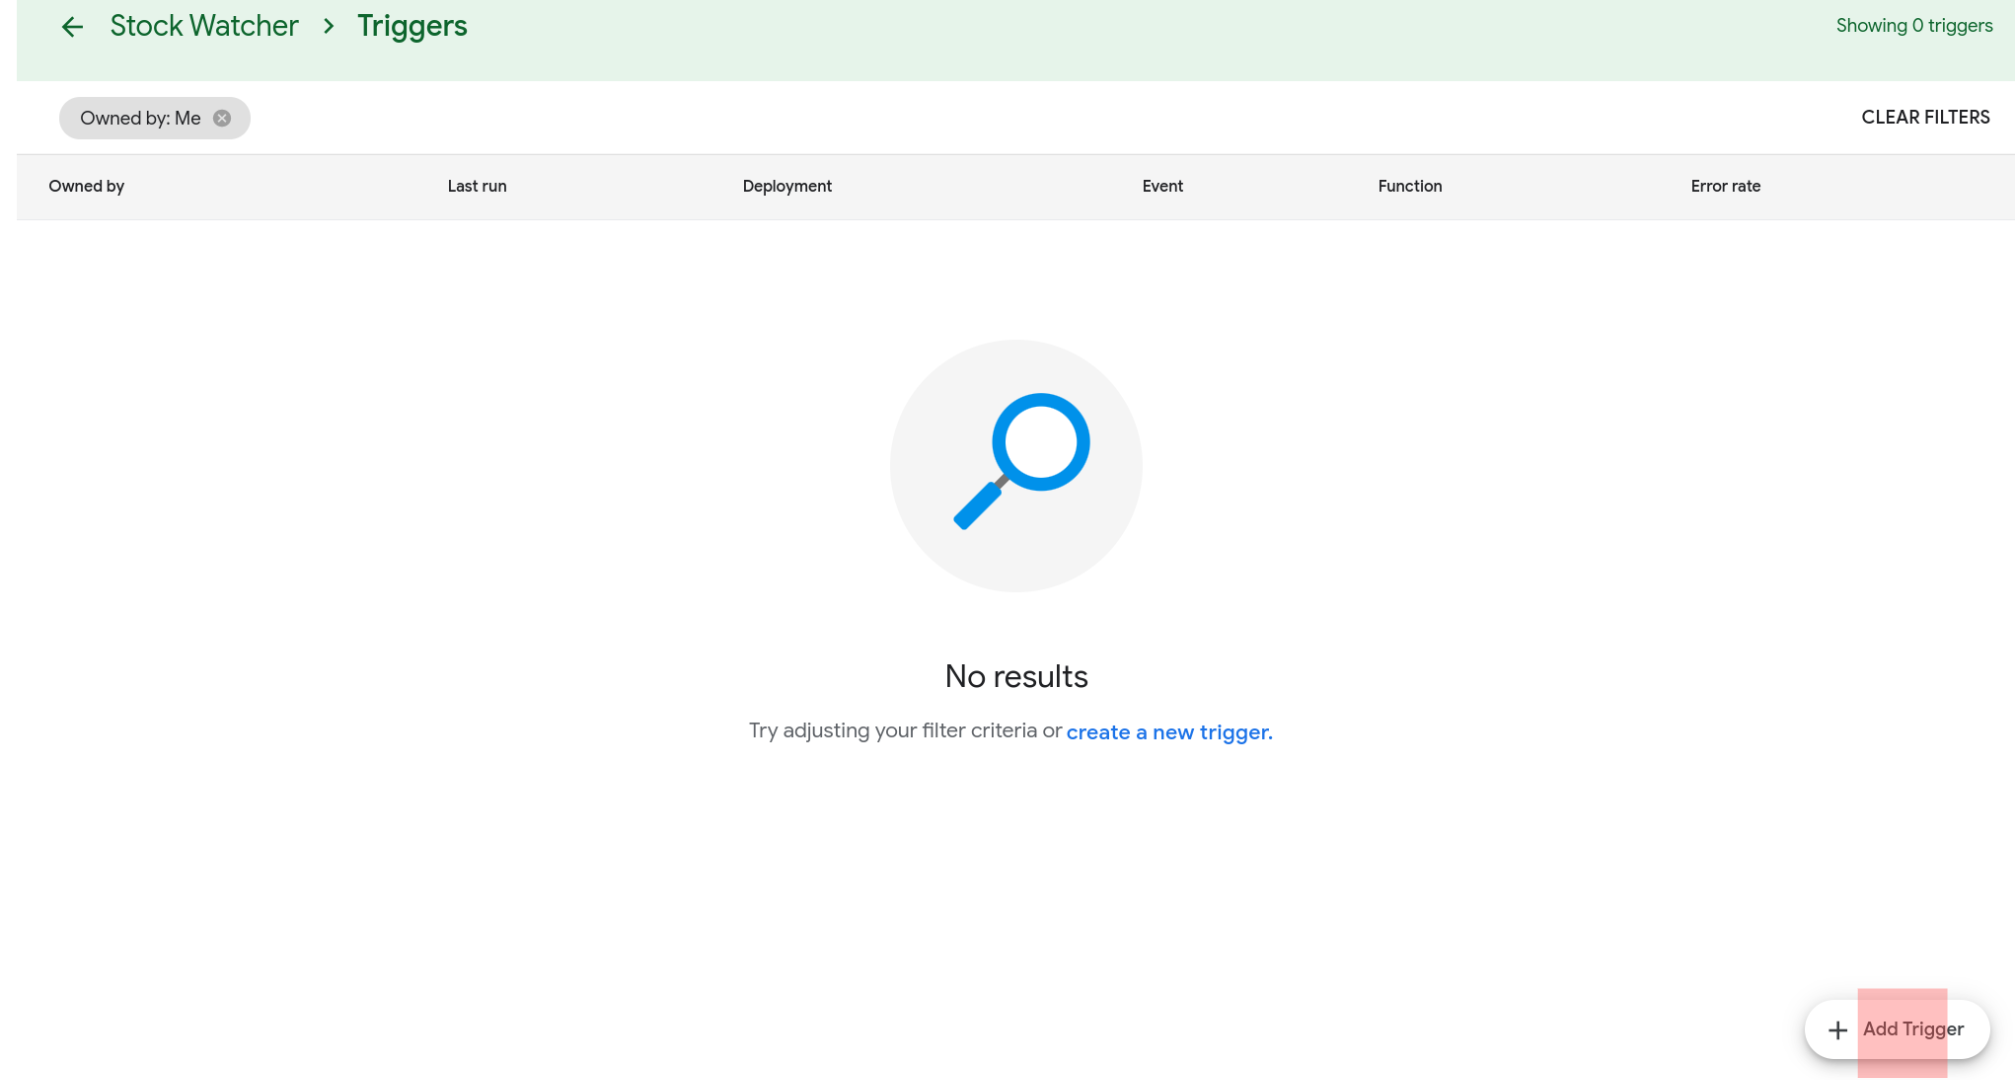
Click on the clock icon to set up a trigger. A trigger is used to run scripts on your behalf. They can be configured to run on specific days or specific times of the day etc. You can also configure the trigger to run your script whenever a change is made to your Google Sheet.

Click the Add trigger button to get started.
The next step is to configure the trigger. There are a bunch of options so let me explain what they are.
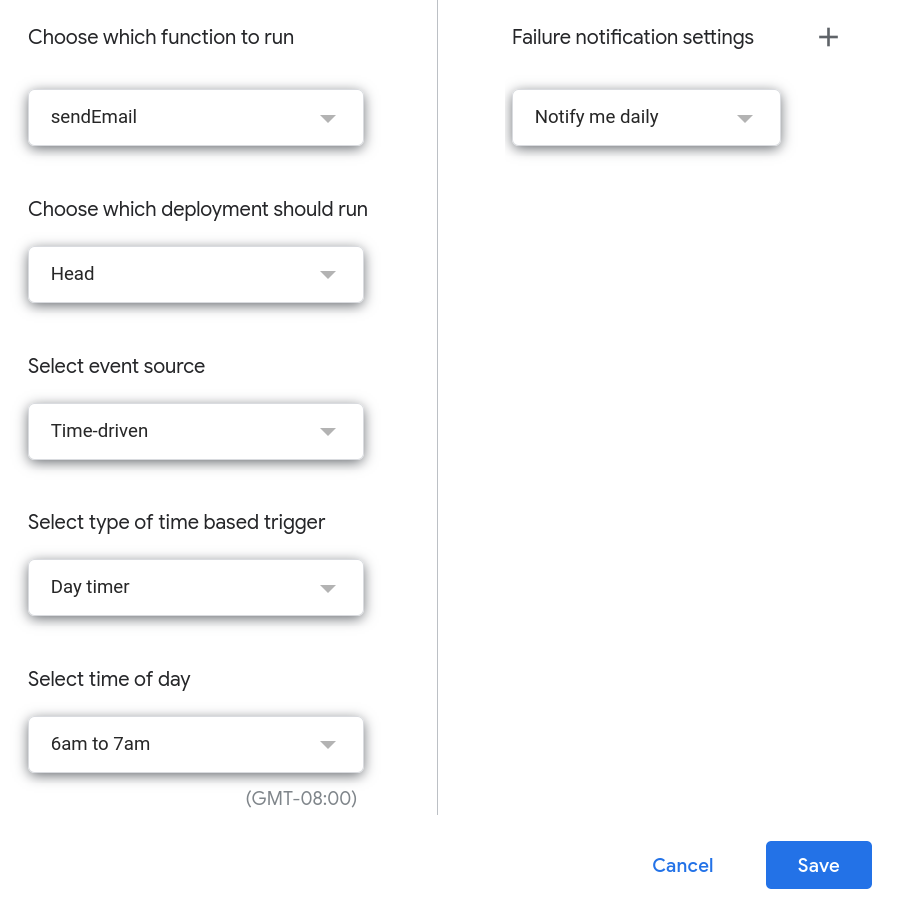
Choose the function in your apps script that the trigger should run. Instead of you manually running this function, the trigger will run it for you on your behalf. We will pick the
sendEmail()function.Always pick Head for the deployment that should be run. When you build more complex applications, you'll learn more about when not to use the Head deployment.
Set the event source to be Time-driven. This is because we want the report to be emailed every morning (ie, it is time based). You can also set up triggers that are event based. For example, you can send an email when changes are made in the sheet.
There are various ways to set up a Time-driven trigger. You can have a trigger run every hour, only on specific days of the month etc. In this case, we'll choose a Day timer since we want the trigger to run the sendEmail function every morning.
Finally, we'd like the email to be in our inbox before 7am so pick 6am to 7am as the time of the day.
That's it! Click Save to set up the trigger.
Once you click Save, the trigger will be created.

This trigger will run every morning between 6am and 7am. It will run the sendEmail() function on your behalf and you'll get an email report every morning.
Summary
In this post, we built a Stock Watcher application and we also learned how to send email from Google Sheets based on a schedule. In the next post, we'll learn how to make the email look nice using HTML. The email below looks a lot better doesn't it? Read the tutorial on sending HTML email from Google Sheets next.

Thanks for reading!
DISCLAIMER: This content is provided for educational purposes only. All code, templates, and information should be thoroughly reviewed and tested before use. Use at your own risk. Full Terms of Service apply.
Thanks for your feedback!
Your input helps improve the content for everyone.
