Triggers in Google Sheets
Triggers are a feature in Google Apps Script and they enable you to automate your tasks and workflows in Google Sheets.
For example, if you want a metrics report emailed to your boss every morning, you can use a Time-driven trigger along with some Apps Script code to automate sending this report.
In this article, you'll learn more about triggers, how they work and how to create them.
How do triggers in Google Sheets work?
The best way to understand how triggers work is to look at an example.
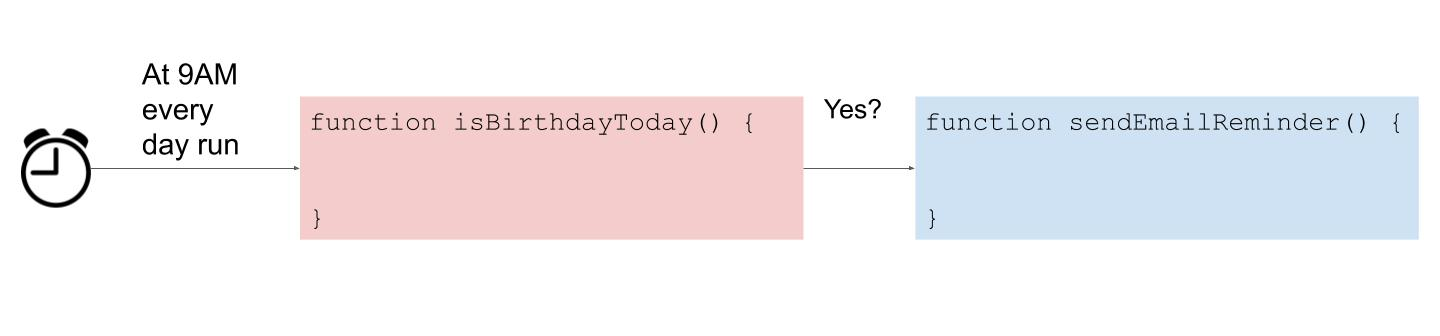
Suppose you're like me and you tend to forget the birthdays of your friends and relatives. You make a new year resolution to remember birthdays and you decide to use your spreadsheet skills to help you keep your resolution.
You enter all the birthdays you want to remember into a spreadsheet and then use a trigger to check it every morning at 6AM and send you an email if it is someone's birthday.
From a technical standpoint what is happening is that the trigger causes a Google Apps Script function to run every morning and this function reads the birthdays from the spreadsheet and sends you an email if that day happens to be someone's birthday.
Types of triggers in Google Sheets
There are two types of triggers in Google Sheets. They are: Time-driven triggers and Spreadsheet triggers.
Time-driven triggers
Use Time-driven triggers to run a function in your script periodically OR at a specific date and time in the future. Here are some examples of use cases where you might use a Time-based trigger:
Automatically sending a report to your team every morning.
Sending yourself an email every month to remind yourself of your goals or resolutions.
If you have an engineering background, a Time-driven trigger is similar to a CRON job.
There are six types of Time-based triggersSpecific date and time
Use this option to run a function in your script at a specific date and time in the future. You must specify the date and time in the YYYY-MM-DD HH:MM format and in the GMT-07:00 timezone (which is the Pacific Daylight Time or PDT). Also, the hours and minutes must be specified using the 24-hour clock.
Minutes timer
Use this option to run a function in your script every minute or once every N minutes (N can be 5, 10, 15 or 30).
Hour timer
Use this option to run a function in your script every hour or once every N hours (N can be 2, 4, 6, 8 or 12).
Day timer
Use this option to run a function in your script daily at a specific time interval. You can't choose the exact time but you can select time intervals that are an hour long each. Google will then randomly pick a time within this interval and the function will be run daily at this time. So if you pick "5am to 6am" as the time interval, Google might pick 5:23am as the time when the function will be run every day.
Week timer
Use this option to select the day of the week and the time interval on that day when a function in your script should be run. For example, you can make it run every Monday between 8am and 9am.
Month timer
Use this option to select the day of the month and the time interval on that day when a function in your script should be run. For example, you can make it run on the 5th of every month between midnight and 1am.
How to run your script only on the last day of every month?
Suppose you want to send your team a monthly report on the last day of every month, how do you set this up? The first step is straightforward, you'd write a script to create and send the email report. The next step is to automate running this script using a trigger. This isn't as straightforward as you'd think it would be.
You can't use a Month timer in this scenario because different months end on different dates. Some months have 30 days, others have 31 days and February has 28 days in a regular year and 29 days in a leap year.
One way to do this is by setting up a Day trigger that will run your script every day. Then in your script, include some logic to check if that day is the last day of a month
Spreadsheet triggers
Use Spreadsheet triggers to run a function in your script whenever something changes in your spreadsheet. Here are some examples of use cases where you might use a Spreadsheet trigger:
Automatically sending you an email whenever a new row is added to your spreadsheet.
Automatically sending you an email when a cell's value meets a condition.
Automatically validating the contents of a spreadsheet when its structure is modified (i.e., when a row or column is added or deleted).
Creating a menu in the spreadsheet when it is opened.
Sending yourself an email whenever a form is submitted.
Detecting whenever the user selects a new range in the spreadsheet.
Simple triggers and Installable triggers
There are two kinds of Spreadsheet triggers: Simple triggers and Installable triggers.
Simple triggers do not need user authorization but installable triggers must be authorized (i.e., installed) by the user.
Since simple triggers are run without user authorization, Google restricts what scripts can do when they are run by these triggers. Some of these restrictions are:
Scripts run by a Simple trigger cannot access any user data.
They cannot perform any action that requires user authorization. For example, they cannot make a request to an external URL or send emails on behalf of the user.
They will only run if the spreadsheet is opened in "Edit" mode. They won't work if the spreadsheet is opened in a View-only or Comment-only mode.
Installable triggers can access user data but they must be authorized by the user.
There are five types of events that you can use in a Spreadsheet trigger
Trigger event | Can it be used as a simple trigger? | Can it be used as an installable trigger? |
|---|---|---|
Open | Yes | Yes |
Edit | Yes | Yes |
Change | No | Yes |
Form Submit | No | Yes |
Selection change | Yes | No |
Open
Use an open trigger to run a function in your script when the spreadsheet is opened. While Google Sheets supports an installable version of the Open trigger, the simple version is more commonly used.
A common use case for Open triggers is adding a custom menu in a Google Sheets spreadsheet.

Edit
Use an Edit trigger to run a function in your script whenever one or more cells in your spreadsheet are edited.
Depending on your use case, you must pick either a Simple Edit trigger or an Installable one. Here are a few guidelines to help you pick the right type for your use case:
Use a Simple Edit trigger if your script will not access user data AND will not be taking any external actions (such as sending emails or accessing URLs) on behalf of the user.
Example use case: Performing some custom validation after every edit and alerting the user via an Alert dialog if validation fails.
Use an Installable Edit trigger if your script needs access to user data OR will be taking some external action such as sending emails.
Example use case: Sending you an email whenever the value in Column J changes from "Pending" to "Approved".
Change
Use a Change trigger to run a function in your script whenever the structure of your spreadsheet changes. Here are some examples of structural changes that will result in this trigger being fired:
INSERT_ROW: A new row is added to the spreadsheet.
INSERT_COLUMN: A new column is added to the spreadsheet.
REMOVE_ROW: A row is removed from the spreadsheet.
REMOVE_COLUMN: A column is removed from the spreadsheet.
INSERT_GRID: A new sheet is added to the spreadsheet.
REMOVE_GRID: A sheet is deleted from the spreadsheet.
FORMAT: A range's formatting is changed.
EDIT: A range in the spreadsheet is edited.
OTHER: Some other change is made such as:
Protecting a sheet or a range within a sheet..
Hiding a sheet or making a previously hidden sheet visible.
Sorting the data in a sheet.
etc.
Change triggers are only available as an Installable trigger. Unlike the Open and Edit triggers, there is no Simple Change trigger. The user must authorize the trigger before it can be used.
Here is an example use case where a Change trigger can be used: Suppose your team maintains an important financial model in a spreadsheet. You want to be notified whenever any structural changes are made to that spreadsheet so you can validate that the model still works correctly. You can set up a Change trigger to run an Apps Script function whenever structural changes are made to the spreadsheet and this function will then send you an email notification.
Form submit
Use a Form submit trigger to run a function in your script whenever a user submits a Form that is linked to your spreadsheet.
Form submit triggers are only available as an Installable trigger. Unlike the Open and Edit triggers, there is no Simple Form submit trigger. The user must authorize the trigger before it can be used.
A very common use case for a Form submit trigger is sending yourself or your team an email with the contents of the Form submission.
Selection change
Use a selection change trigger to run a function in your script whenever the user selects a new range in your spreadsheet. Google Sheets only supports a simpler version of the selection change trigger, there is no installable version.
How to create a trigger?
A simple trigger can only be created using code whereas an installable trigger can be created using code or via a UI.
Creating a simple trigger (Open or Edit or Selection change)
To create a simple trigger, just create a function called onOpen, onEdit, or onSelectionChange (depending on the type of trigger you want) in your script. The onOpen() function will be automatically run whenever your spreadsheet is opened, the onEdit() function will be automatically run whenever your spreadsheet is edited and the onSelectionChange() function will be automatically run whenever the user selects a new range in your spreadsheet.
Remember that there are a number of security related restrictions placed on Simple triggers. So if your simple trigger does not work you should check if your function is trying to do something that requires user authorization. You can always use an installable version of an Open or Edit trigger if your code needs access to user data.
Here is an example of how to create a Simple Open trigger that creates a custom menu called "Admin Settings" whenever the spreadsheet is opened.
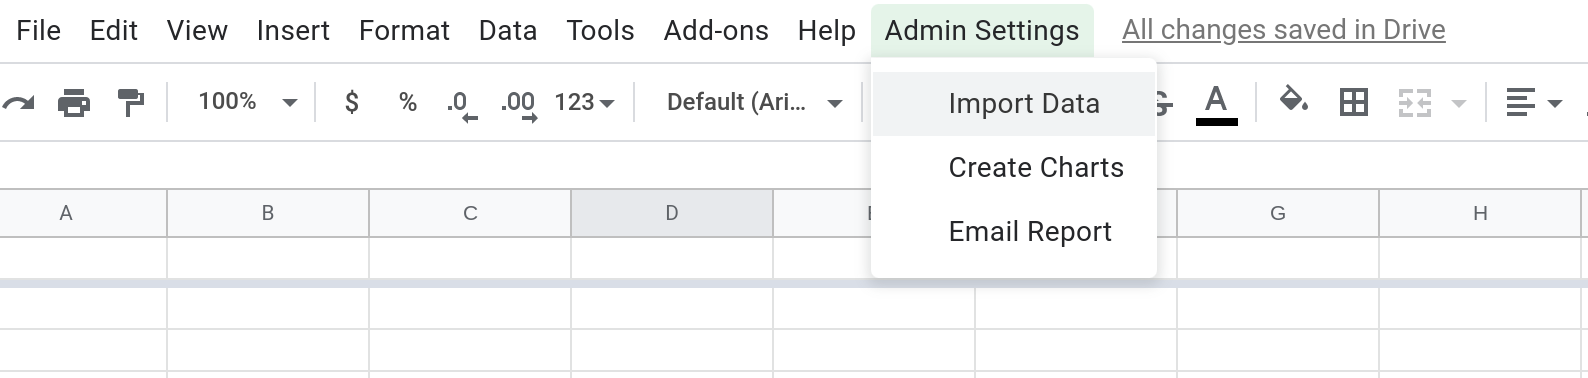
function onOpen() {
  SpreadsheetApp.getUi().createMenu("Admin Settings")
  .addItem("Import Data", "importData")
  .addItem("Create Charts", "createCharts")
  .addItem("Email Report ", "emailReport")
  .addToUi();
}

//A function that imports data into the spreadsheet.
function importData () {

}

//A function that creates charts in the spreadsheet.
function createChart () {

}

//A function that creates a report using the charts and emails it to the team.
function emailReport () {

}
In the code above, importData, createCharts and emailReport are functions to be run when the user selects the corresponding menu item from the Admin Settings menu. Please note that the code for these functions will need to be written to make the functionality work, i.e., for something to happen when the user selects an item from the menu (right now these functions are just placeholders).
Creating installable triggers
You can create installable triggers using code or via a UI.
Creating Installable triggers via the UIStep 1 — Click the Clock icon to open the UI for creating triggers.

Step 2 — Click the + Add Trigger button 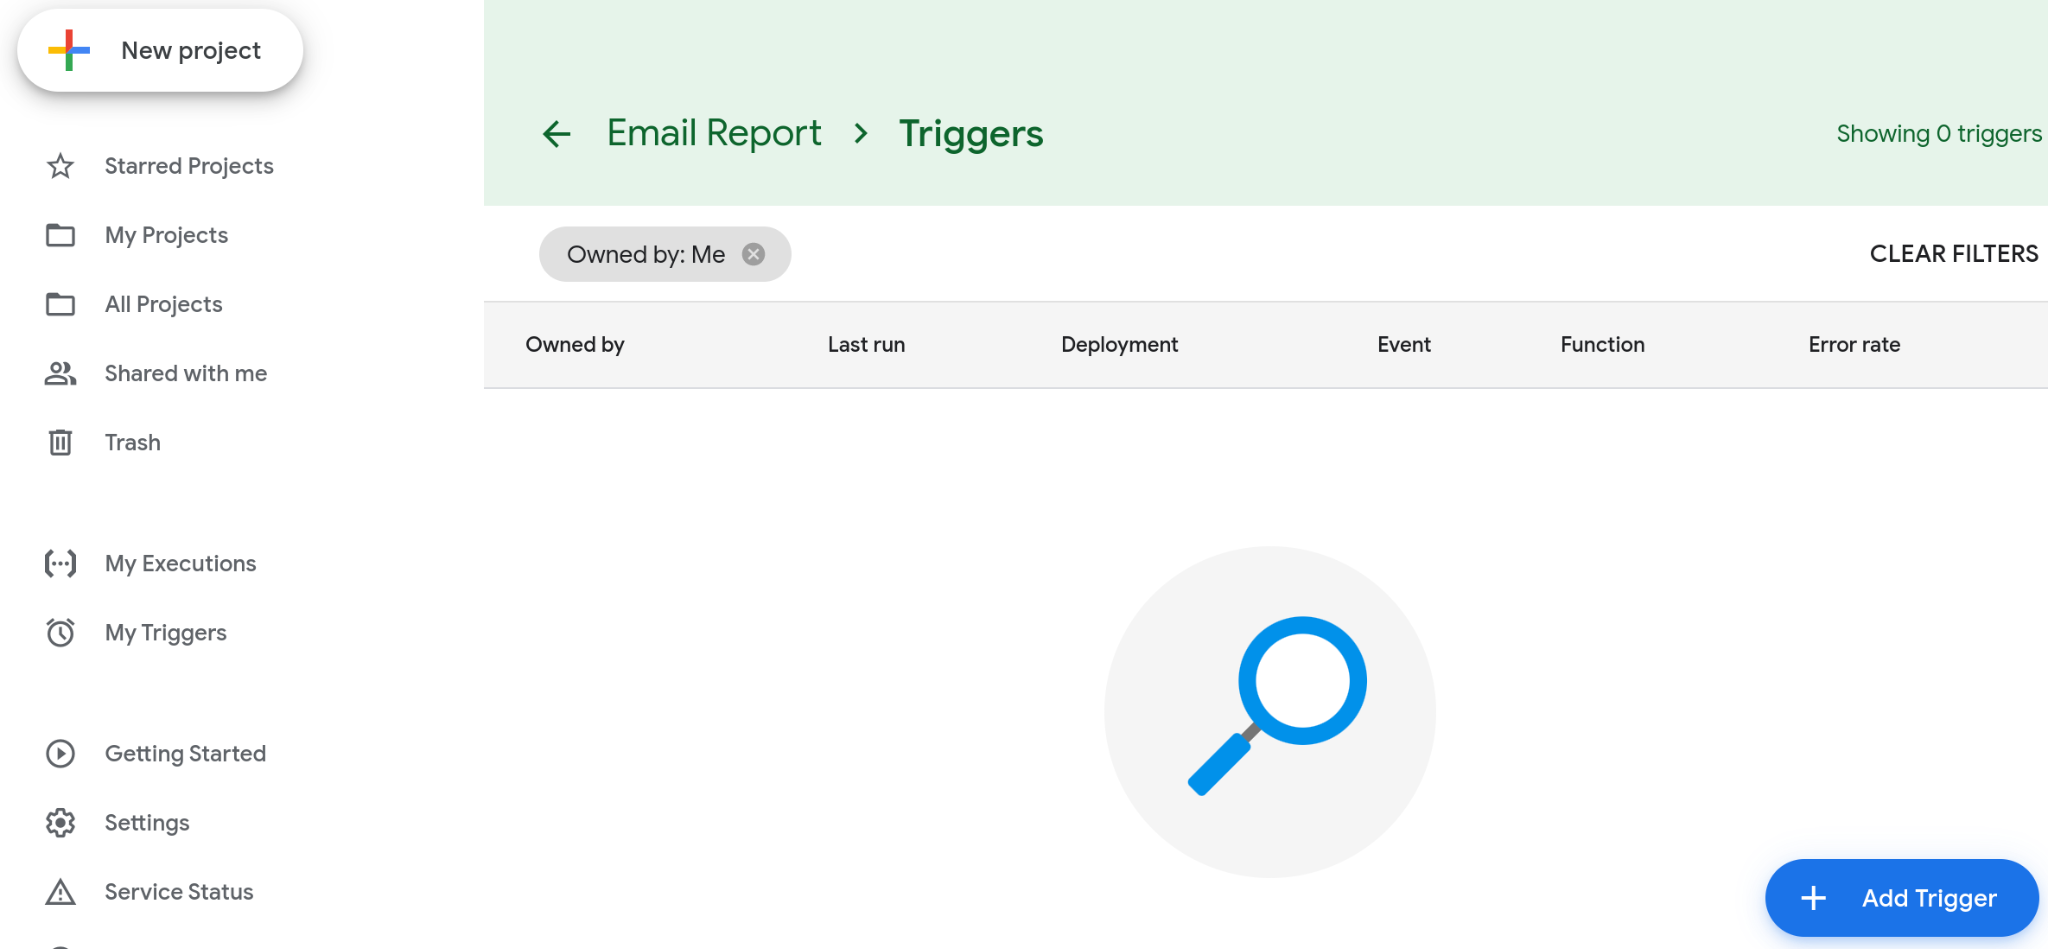
Step 3 — Configure the trigger and click Save to create it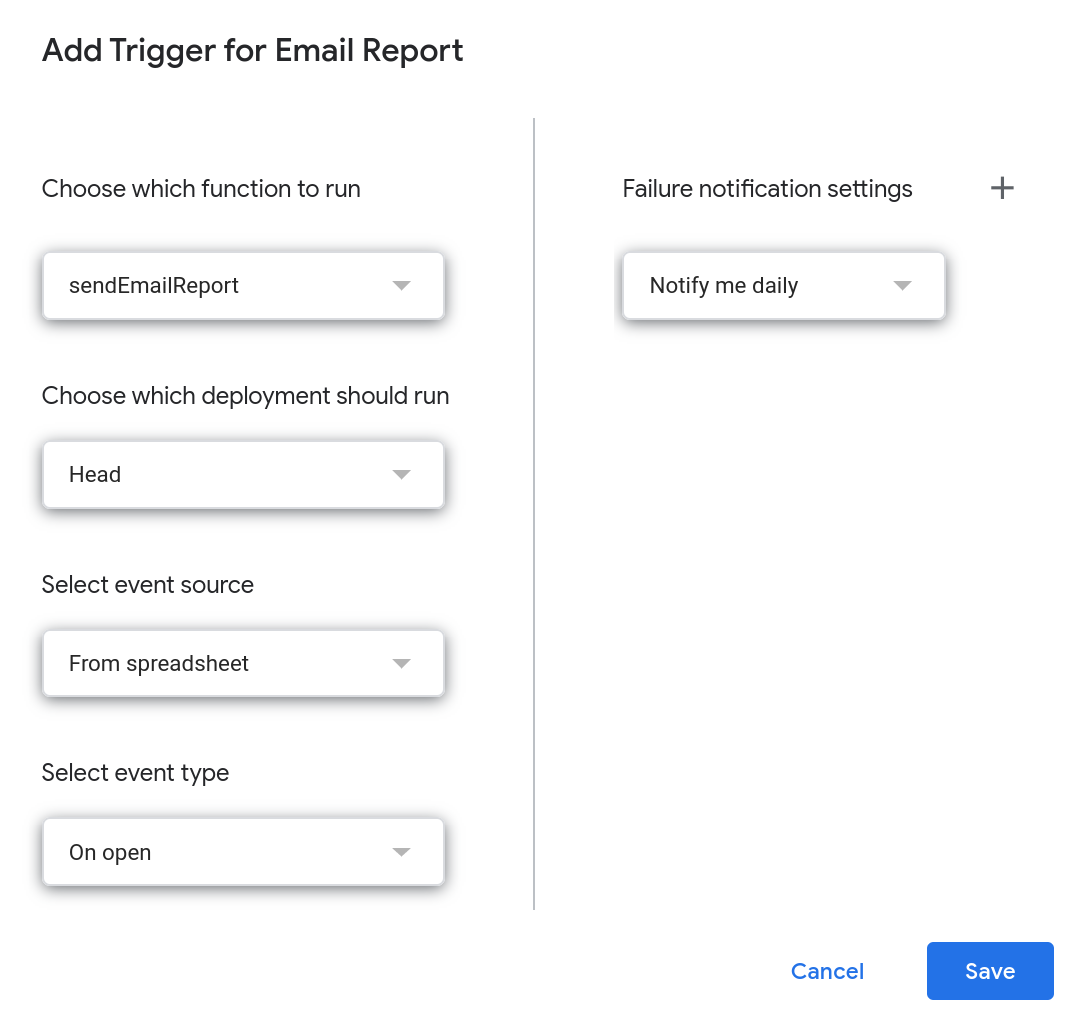
To configure your trigger, you need to select a few options:
The function the trigger should run. The dropdown will list all the functions in your script. Pick the one that should be run when the trigger fires.
The deployment that should be run. Unless you've created and published a "version" of your script, you should always select Head.
The event source (i.e., the type of trigger). Pick Time-driven or Spreadsheet. (There is also a Calendar source but this article doesn't cover it yet.)
Select the event type. For example, pick "On edit" if you want the trigger to fire whenever the Spreadsheet is edited or pick a date and time if you're setting up a Time-driven trigger that should fire at some specific time in the future.
Choose how often you want to be notified if your trigger fails to run.
Step 4 — That's it! Your shiny new trigger will be listed on the Triggers page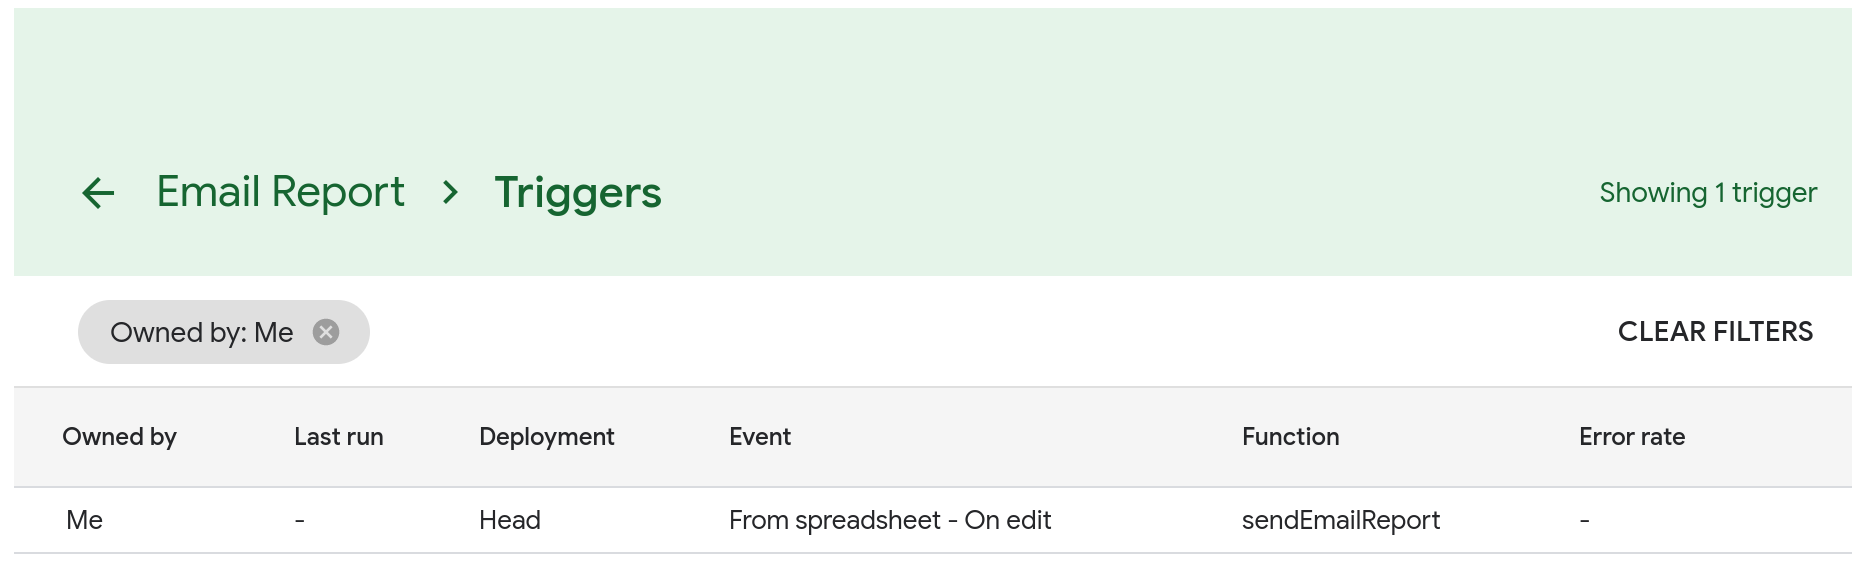
In the above screenshot, I've configured an On edit trigger that will run the sendEmailReport function whenever the spreadsheet is edited.
You can navigate to this page from your script by clicking the clock icon (see Step 1).
Creating Installable triggers using code
To create an installable trigger using code, you need to write a function that will create your trigger and then run in manually from the script editor.
For example, to create an Edit trigger that will run the sendEmailReport function whenever your spreadsheet is edited, you need to: 1) Create a function that will set up this trigger and 2) Run this function manually from the script editor by clicking on the play icon.
Step 1 — Create a function to set up an installable Edit triggerfunction createOnEditTrigger() {
ScriptApp.newTrigger("sendEmailReport") // Run the sendEmailReport function.
.forSpreadsheet(SpreadsheetApp.getActive()) // Create the trigger in this spreadsheet.
.onEdit() // We want to set up an Edit trigger.
.create(); // Create it!
}
Step 2 — Run this function manually to create the trigger
function createOnEditTrigger() {
  ScriptApp.newTrigger("sendEmailReport") // Run the sendEmailReport function.
    .forSpreadsheet(SpreadsheetApp.getActive()) // Create the trigger in this spreadsheet.
    .onEdit() // We want to set up an Edit trigger.
    .create(); // Create it!
}Select the createOnEditTrigger function from the dropdown menu and click on the play icon to create the trigger.

Don't create multiple triggers for the same event
If you click run the createOnEditTrigger function three times, you'll end up creating three edit triggers instead of just one! This is not good because all three triggers will fire when your spreadsheet is edited and your sendEmailReport function will be run three times resulting in multiple emails being sent ☹️.
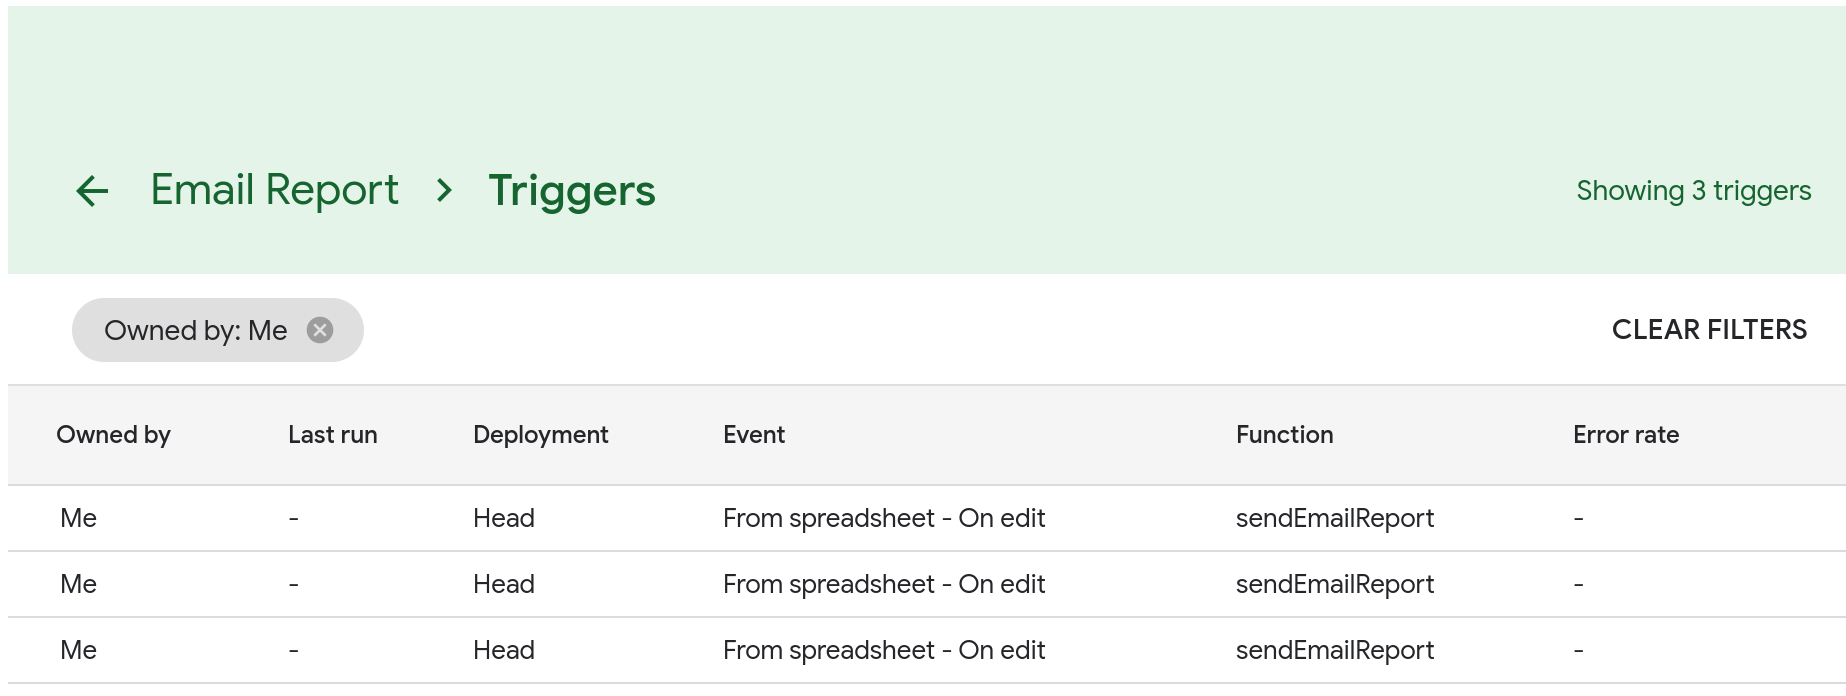
To prevent this, either check the Triggers page manually to confirm that you've only created one trigger OR modify your code to only create a new trigger if it hasn't already been created.
// Create an Edit trigger only if it hasn't already been created

function createOnEditTrigger() {
  var triggers = ScriptApp.getProjectTriggers();
  var shouldCreateTrigger = true;
  triggers.forEach(function (trigger) {
    if(trigger.getEventType() === ScriptApp.EventType.ON_EDIT && trigger.getHandlerFunction() === "sendEmailReport") {
      shouldCreateTrigger = false;
    }
  });

  if(shouldCreateTrigger) {
    ScriptApp.newTrigger("sendEmailReport")
      .forSpreadsheet(SpreadsheetApp.getActive())
      .onEdit()
      .create();
  }
}
Sample code for creating the various types of installable triggers
Below are links to the official documentation where Google has provided code samples that show you how to create the various types of installable triggers.
Spreadsheet triggers
Time-driven triggers
Specific date and time: there are three ways to set this up:
Option 1: Create a trigger that will fire N milliseconds after the current time
Option 3: Create a trigger that will run around midnight on a specific date
Every N days (e.g., everyday)
Optionally also specify the hour (e.g., everyday at 6 am)
Optionally also specify the hour and the minute (e.g., everyday at 6:30 am)
Every N hours (e.g., every 6 hours)
Every N minutes (N must be 1, 5, 10, 15 or 30)
Every N weeks (e.g., every 2 weeks)
Monthly on a specific day (e.g., the first of every month)
Weekly on a specific day of the week (e.g., every Friday)
How to set the correct timezone in your Time-driven trigger?
Use inTimezone("<timezone>") to set the correct timezone while creating the trigger. See the official documentation for an example of how to do this.
The Event object in a trigger
When a trigger fires, it will pass some information to the function it runs. This information can be very useful in certain situations. For example, the Edit trigger will pass information about the range in the spreadsheet that was edited. The function can then use this information to decide if it should take some action.
Perhaps you only care about edits to column A your spreadsheet. In this example, your function can use the range information passed to it via the event object to check which columns were edited.
// Create an Edit trigger only if it hasn't already been created
function createOnEditTrigger() {
  var triggers = ScriptApp.getProjectTriggers();
  var shouldCreateTrigger = true;
  triggers.forEach(function (trigger) {
    if(trigger.getEventType() === ScriptApp.EventType.ON_EDIT && trigger.getHandlerFunction() === "sendEmailReport") {
      shouldCreateTrigger = false;
    }
  });

  if(shouldCreateTrigger) {
    ScriptApp.newTrigger("sendEmailReport")
      .forSpreadsheet(SpreadsheetApp.getActive())
      .onEdit()
      .create();
  }
}

// The sendEmailReport function is run whenever the Edit trigger fires
function sendEmailReport(e) {
  // Check which columns were edited
  var range = e.range;
  // Check if Column A is edited in Sheet1 (GridId or gid is 0)
  if(range.getColumn() === 1.0 && range.getGridId() === 0) {
    //Column A was edited so send the email report.
    //<write some code to send the email>
  }
}
The properties of the event object will vary depending on the type of trigger that fired. You can learn more about these properties in the official Apps Script documentation:
Restrictions that you should be aware of when creating triggers
For security reasons, Google restricts what scripts can and cannot do when run by a trigger. These restrictions are different for Simple and Installable triggers.
Restrictions that apply to both Simple and Installable triggersTriggers do not run if the spreadsheet is opened in read-only (view or comment) mode.
Script executions do not cause triggers to run. For example, edits you make to the spreadsheet using a script will not cause the Edit trigger to fire.
They are subject to quota limitations in Apps Script.
Additional restrictions that only apply to Simple TriggersThe script must be bound to a Google Sheet. It cannot be a standalone script.
The script cannot perform actions that require user authorization and it also cannot access user data.
For example, the script cannot send emails since this requires user authorization. The script can only edit the spreadsheet it is bound to — it cannot access or edit other documents in Google Drive.
They can only determine the identity of the user using the spreadsheet if:
The user and the developer of the script belong to the same G Suite domain OR
The user is the developer of the script.
They cannot run for longer than 30 seconds.
For more information on restrictions that apply to Simple Triggers, please refer to the documentation.
Additional restrictions that only apply to Installable TriggersInstallable triggers run as the user that created them. For example, if your installable trigger runs a script that sends emails, these emails will be sent from your email address.
You can create installable triggers on behalf of other users provided they authorize this action. This means that you cannot create Installable Triggers on behalf of other users in the background without their knowledge.
Your script can run any Installable Trigger that is associated with your spreadsheet but it cannot edit or modify triggers that you did not create.
For example, if you have set things up so that each user creates an installable trigger that runs as their account, then you will not be able to edit or delete these triggers. Each user will have to edit/delete the trigger they created. You will, however, be able to run any trigger associated with the spreadsheet.
For more information on restrictions that apply to Installable Triggers, please refer to the documentation.
Summary
Triggers do not run if the spreadsheet is opened in read-only (view or comment) mode.
Script executions do not cause triggers to run. For example, edits you make to the spreadsheet using a script will not cause the Edit trigger to fire.
They are subject to quota limitations in Apps Script.
The script must be bound to a Google Sheet. It cannot be a standalone script.
The script cannot perform actions that require user authorization and it also cannot access user data.
For example, the script cannot send emails since this requires user authorization. The script can only edit the spreadsheet it is bound to — it cannot access or edit other documents in Google Drive.
They can only determine the identity of the user using the spreadsheet if:
The user and the developer of the script belong to the same G Suite domain OR
The user is the developer of the script.
They cannot run for longer than 30 seconds.
For more information on restrictions that apply to Simple Triggers, please refer to the documentation.
Additional restrictions that only apply to Installable TriggersInstallable triggers run as the user that created them. For example, if your installable trigger runs a script that sends emails, these emails will be sent from your email address.
You can create installable triggers on behalf of other users provided they authorize this action. This means that you cannot create Installable Triggers on behalf of other users in the background without their knowledge.
Your script can run any Installable Trigger that is associated with your spreadsheet but it cannot edit or modify triggers that you did not create.
For example, if you have set things up so that each user creates an installable trigger that runs as their account, then you will not be able to edit or delete these triggers. Each user will have to edit/delete the trigger they created. You will, however, be able to run any trigger associated with the spreadsheet.
For more information on restrictions that apply to Installable Triggers, please refer to the documentation.
Summary
Installable triggers run as the user that created them. For example, if your installable trigger runs a script that sends emails, these emails will be sent from your email address.
You can create installable triggers on behalf of other users provided they authorize this action. This means that you cannot create Installable Triggers on behalf of other users in the background without their knowledge.
Your script can run any Installable Trigger that is associated with your spreadsheet but it cannot edit or modify triggers that you did not create.
For example, if you have set things up so that each user creates an installable trigger that runs as their account, then you will not be able to edit or delete these triggers. Each user will have to edit/delete the trigger they created. You will, however, be able to run any trigger associated with the spreadsheet.
For more information on restrictions that apply to Installable Triggers, please refer to the documentation.
This article introduced you to Triggers in Google Sheets. Here is a summary of
Triggers are a feature of Google Apps Script and they enable you to automate tasks and workflows in Google Sheets. Instead of running your script manually, you can make your script run automatically by using a trigger!
There are two types of triggers: Time-driven triggers and Spreadsheet triggers.
Use Time-driven triggers to run your script at a specific time in the future or on a recurring schedule.
Use Spreadsheet triggers to run your script whenever your spreadsheet is opened, edited or its structure is modified. You can also use a Spreadsheet trigger to run your script whenever a Google Form associated with your spreadsheet is submitted.
There are two kinds of Spreadsheet triggers: Simple triggers and Installable triggers.
A Simple Trigger is easy to set up and scripts that use them do not need user authorization to run. However, scripts run by a Simple Trigger cannot access user data or perform actions that would otherwise need authorization.
An Installable Trigger must be installed and authorized by the user. Unlike Simple Triggers, they can access user data and perform actions that need user authorization.
You can create triggers programmatically or via a UI.
For security reasons, Google places a number of restrictions on what scripts can or cannot do when they're run by a trigger. Please keep these restrictions in mind while designing your application.
Thanks for reading!
DISCLAIMER: This content is provided for educational purposes only. All code, templates, and information should be thoroughly reviewed and tested before use. Use at your own risk. Full Terms of Service apply.
Thanks for your feedback!
Your input helps improve the content for everyone.
