Automated Annual Reminders: Google Sheets to Calendar
Have you ever forgotten an important annual event? Whether it's a friend's birthday, a work anniversary, a subscription renewal, or an annual health check-up, it's easy to let these significant dates slip by in our busy lives. What if you could automate reminders for all these recurring annual events using tools you already use daily? In this tutorial, I'll show you how to create an automated annual reminder system using Google Sheets and Google Calendar.
This versatile system can be adapted for various purposes:
Remembering birthdays and anniversaries
Tracking employee work milestones
Managing subscription renewals
Scheduling annual health check-ups
Monitoring vehicle maintenance schedules
Keeping track of contract renewal dates
This project will take about 30 minutes to set up, but once it's done, you'll have a powerful tool to keep you on top of all your important annual events!
Prerequisites
This tutorial assumes the following prerequisites:
Basic knowledge of Google Sheets
Familiarity with Google Calendar
Basic understanding of Google Apps Script (If you're new to Apps Script, check out my Google Apps Script Tutorial to get started)
Understanding of how to customize Google Calendar events
6 steps to implement automated annual reminders
Step 1 — Set up your Google Sheets spreadsheet
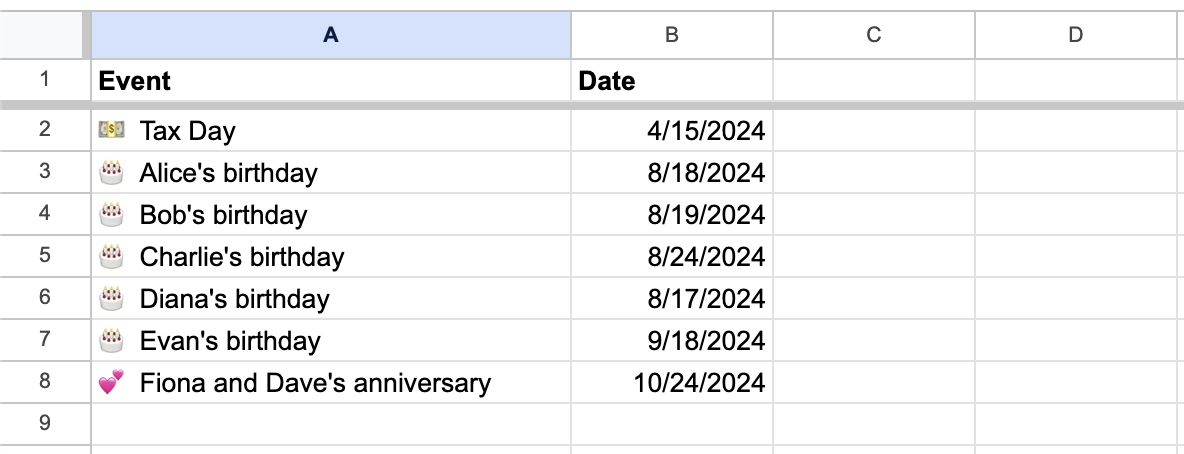
First, we need to create a Google Sheets spreadsheet to store our event information.
Open Google Sheets and create a new spreadsheet.
In the first row, add two column headers: "Event" and "Date".
Under these headers, start entering the events and their corresponding annual dates.
Note
Date format Make sure to enter the dates in a format that Google Sheets recognizes as a date. For example, "MM/DD/YYYY" or "Month Day, Year".
Step 2 — Create a new Apps Script project
Now that we have our data, let's create an Apps Script project to work with it.
In your Google Sheets spreadsheet, go to Extensions > Apps Script.
This will open the Apps Script editor in a new tab.
Rename your project to something like "Annual Reminders".
Step 3 — Write the main function
Let's start by writing our main function that will read the data from our spreadsheet and create calendar events.
In the Apps Script editor, replace the default myFunction() with the following code:
//@OnlyCurrentDoc
function sheetsToCalendar() {
  // Open the spreadsheet and get the active sheet
  var sheet = SpreadsheetApp.getActiveSpreadsheet().getActiveSheet();

  // Get all the data in the sheet (assuming two columns: Event, Date)
  var data = sheet.getDataRange().getValues();

  // Get the default calendar
  var calendar = CalendarApp.getDefaultCalendar();

  // Loop through each row of data, skipping the header row
  for (var i = 1; i < data.length; i++) {
    var eventName = data[i][0]; // Event
    var eventDate = new Date(data[i][1]); // Date

    if (!eventName || !eventDate) {
      continue; // Skip rows with missing event or date
    }

    // Create the event for the date one week in advance
    var oneWeekBefore = new Date(eventDate);
    oneWeekBefore.setDate(eventDate.getDate() - 7);
    var eventTitleOneWeekBefore = "[Upcoming] " + eventName;
    createEvent(calendar, eventTitleOneWeekBefore, oneWeekBefore);

    // Create the event for the date the day before
    var dayBefore = new Date(eventDate);
    dayBefore.setDate(eventDate.getDate() - 1);
    var eventTitleDayBefore = "[Tomorrow] " + eventName;
    createEvent(calendar, eventTitleDayBefore, dayBefore);

    // Create the event for the actual date
    var eventTitleToday = "[Today] " + eventName;
    createEvent(calendar, eventTitleToday, eventDate);
  }
}
Step 4 — Implement helper functions
We also need helper functions to create events and to delete existing events (if they exist) before creating new ones. Add the following functions below the sheetsToCalendar() function:
function createEvent(calendar, title, date) {
  deleteExistingEvent(calendar, title, date);
  var event = calendar.createAllDayEvent(title, date);
  event.setColor(CalendarApp.EventColor.PALE_BLUE);
  event.addEmailReminder(0); // Email reminder at midnight
}

function deleteExistingEvent(calendar, title, date) {
  var events = calendar.getEventsForDay(date);
  for (var j = 0; j < events.length; j++) {
    if (events[j].getTitle() === title) {
      events[j].deleteEvent(); // Delete the existing event
    }
  }
}
Step 5 — Run your script manually
Instead of setting up an automatic trigger, we'll run the script manually:
Go back to the script editor.
Make sure you've saved all your changes.
Click the "Run" button at the top of the page.
If prompted, authorize your script.
Note: Remember to run manually
You'll need to run this script manually whenever you make changes to your spreadsheet, such as adding new events or modifying existing ones. It's a good practice to run the script at the beginning of each year to create events for the upcoming year.
Step 6 — Check your Google Calendar
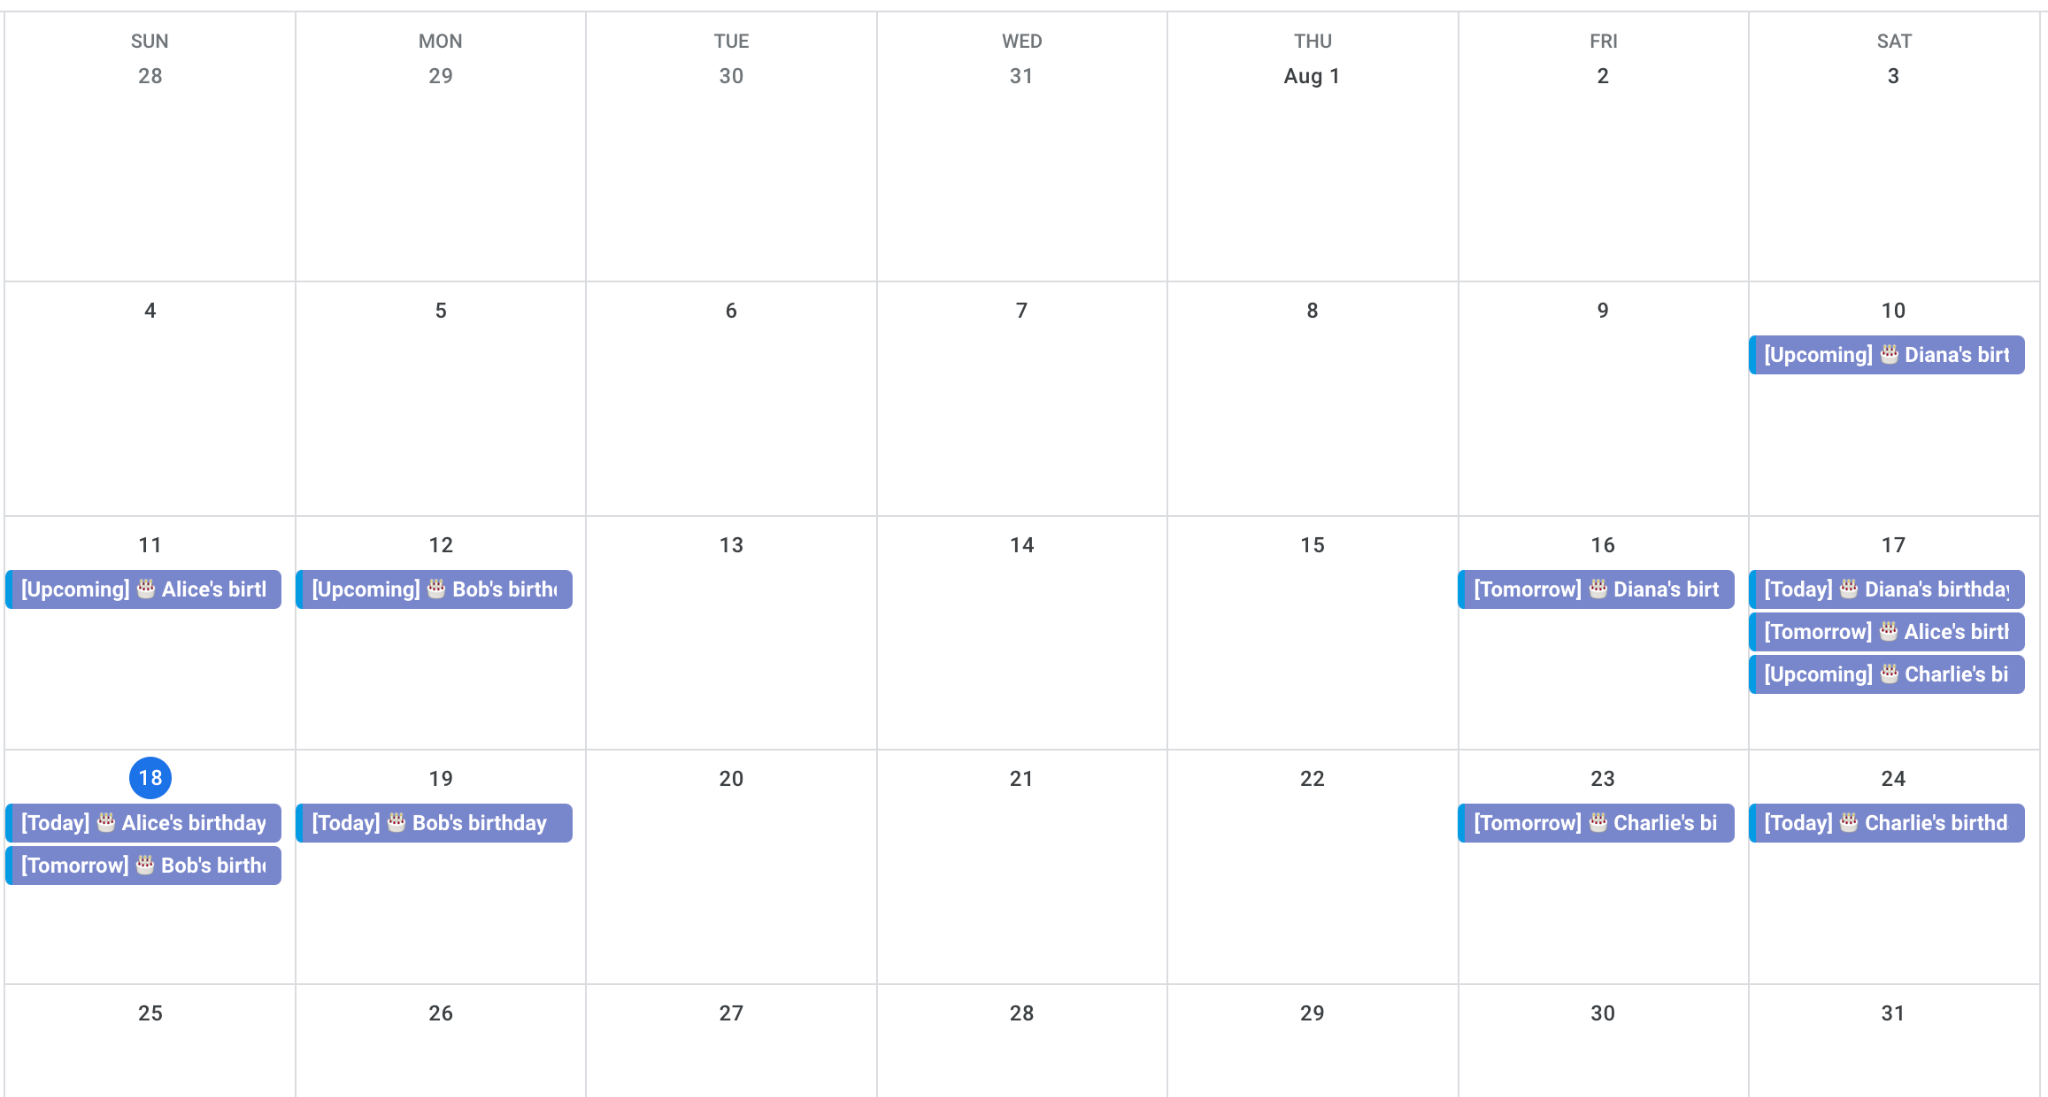
After running the script, check your Google Calendar to ensure the events have been created correctly:
Open Google Calendar in a new tab.
Look for the newly created events. They should appear as all-day events with the specified titles and colors.
Verify that the events are created for the correct dates and that there are no duplicates.
Removing events
If you no longer want annual reminders for a specific event, you'll need to manually delete the calendar events for that year. The script doesn't automatically remove events that are deleted from the spreadsheet.
Yearly execution
This script only creates events for the current year. Make sure to run the script at the beginning of each year (or at the end of the previous year) to create events for the upcoming year
Full code
Here's the complete code for easy copy-pasting:
//@OnlyCurrentDoc
function sheetsToCalendar() {
  // Open the spreadsheet and get the active sheet
  var sheet = SpreadsheetApp.getActiveSpreadsheet().getActiveSheet();

  // Get all the data in the sheet (assuming two columns: Event, Date)
  var data = sheet.getDataRange().getValues();

  // Get the default calendar
  var calendar = CalendarApp.getDefaultCalendar();

  // Loop through each row of data, skipping the header row
  for (var i = 1; i < data.length; i++) {
    var eventName = data[i][0]; // Event
    var eventDate = new Date(data[i][1]); // Date

    if (!eventName || !eventDate) {
      continue; // Skip rows with missing event or date
    }

    // Create the event for the date one week in advance
    var oneWeekBefore = new Date(eventDate);
    oneWeekBefore.setDate(eventDate.getDate() - 7);
    var eventTitleOneWeekBefore = "[Upcoming] " + eventName;
    createEvent(calendar, eventTitleOneWeekBefore, oneWeekBefore);

    // Create the event for the date the day before
    var dayBefore = new Date(eventDate);
    dayBefore.setDate(eventDate.getDate() - 1);
    var eventTitleDayBefore = "[Tomorrow] " + eventName;
    createEvent(calendar, eventTitleDayBefore, dayBefore);

    // Create the event for the actual date
    var eventTitleToday = "[Today] " + eventName;
    createEvent(calendar, eventTitleToday, eventDate);
  }
}

function createEvent(calendar, title, date) {
  deleteExistingEvent(calendar, title, date);
  var event = calendar.createAllDayEvent(title, date);
  event.setColor(CalendarApp.EventColor.PALE_BLUE);
  event.addEmailReminder(0); // Email reminder at midnight
}

function deleteExistingEvent(calendar, title, date) {
  var events = calendar.getEventsForDay(date);
  for (var j = 0; j < events.length; j++) {
    if (events[j].getTitle() === title) {
      events[j].deleteEvent(); // Delete the existing event
    }
  }
}
How the code works
Let's break down the main parts of our script:
Accessing the spreadsheet and calendar:
These lines open the active sheet, get all the data, and access the default Google Calendar.
var sheet = SpreadsheetApp.getActiveSpreadsheet().getActiveSheet();
var data = sheet.getDataRange().getValues();
var calendar = CalendarApp.getDefaultCalendar();
Looping through the data:
We loop through each row of data, starting from the second row (index 1) to skip the header. We extract the event and date, and skip any rows with missing information.
for (var i = 1; i < data.length; i++) {
  var eventName = data[i][0]; // Event
  var eventDate = new Date(data[i][1]); // Date

  if (!eventName || !eventDate) {
    continue; // Skip rows with missing event or date
  }
Creating events:
For each event, we create three calendar events: one week before, the day before, and on the day. We calculate the date, create a title, delete any existing event with the same title (to avoid duplicates), create a new all-day event, set its color to red, and add an email reminder.
var oneWeekBefore = new Date(eventDate);
oneWeekBefore.setDate(eventDate.getDate() - 7);
var eventTitleOneWeekBefore = "[Upcoming] " + eventName;
createEvent(calendar, eventTitleOneWeekBefore, oneWeekBefore);
The helper function createEvent() creates the event on the specified date with the specified title. It sets the color of the event to pale blue and turns on email notifications.
function createEvent(calendar, title, date) {
  deleteExistingEvent(calendar, title, date);
  var event = calendar.createAllDayEvent(title, date);
  event.setColor(CalendarApp.EventColor.PALE_BLUE);
  event.addEmailReminder(0); // Email reminder at midnight
}
Deleting existing events:
This helper function checks for existing events on a specific date with a specific title and deletes them. This ensures we don't create duplicate events if the script runs multiple times.
function deleteExistingEvent(calendar, title, date) {
  var events = calendar.getEventsForDay(date);
  for (var j = 0; j < events.length; j++) {
    if (events[j].getTitle() === title) {
      events[j].deleteEvent(); // Delete the existing event
    }
  }
}
Customizing for different event types:
The beauty of this script is its flexibility. By changing the event titles and potentially adding more columns to your spreadsheet, you can adapt it for various types of annual events. For example:
var eventTitle = "[Today] " + event;This line could be customized based on the type of event. For a work anniversary, it might be:
var eventTitle = "[Today] " + employeeName + "'s " + yearsOfService + " Year Work Anniversary";For a subscription renewal:
var eventTitle = "[Action Required] Renew " + subscriptionName + " subscription";Conclusion
Congratulations! You've just created a versatile automated annual reminder system using Google Sheets and Google Calendar. This script will help you stay on top of important dates across various aspects of your personal and professional life, without the need for manual data entry into your calendar. You've learned how to interact with Google Sheets and Google Calendar using Apps Script, and automate a common task that can be adapted for numerous purposes. Thanks for reading!
DISCLAIMER: This content is provided for educational purposes only. All code, templates, and information should be thoroughly reviewed and tested before use. Use at your own risk. Full Terms of Service apply.
Thanks for your feedback!
Your input helps improve the content for everyone.
