Find out which menu item was selected from a custom menu in Google Sheets
In a previous tutorial, I showed you how to build a navigation menu in Google Sheets using custom menus. The Apps Script code that we used in that tutorial defined a separate function for every menu item. And every one of these functions used the same business logic to navigate to the sheet corresponding to the selected menu item.
// ...

// Activate the sheet named sheetName in the spreadsheet.
function setActiveSpreadsheet(sheetName) {
 SpreadsheetApp.getActive().getSheetByName(sheetName).activate();
}

// One function per menu item.
// One of these functions will be called when users select the
// corresponding menu item from the navigation menu.

function sales() {
 setActiveSpreadsheet("Sales");
}

function marketing() {
 setActiveSpreadsheet("Marketing");
}

function finance() {
 setActiveSpreadsheet("Finance");
}

// ... etc.
There is a lot of repetitive code here. We're defining a number of functions that simply call a common function.
The question is: is there a different way to do this? The answer is … yes! There is a way to find out which menu item was selected in a custom menu with a lot less code. However, before explaining how to do that, let me be upfront: this approach sacrifices some code clarity for maintainability, and it's really only worthwhile if you have a substantial number of menu items (think 10+ items) or specific use cases that I'll describe below.
When you'd actually want to use this approach
Before getting into the technical details, let's discuss realistic scenarios where this technique becomes genuinely useful:
Dynamic menu generation: When your menu items are created based on data that changes. For example, if you're building menus from sheet names, user permissions, or configuration settings that get updated regularly.
Shared business logic with variations: When menu items trigger similar workflows but with different parameters, like connecting to different data sources, calling different API endpoints, or processing different file types using the same core logic.
Compliance and auditing: When you need to log all menu interactions to the same audit trail, apply consistent role-based access controls, or track usage patterns across all menu items.
If you're just building a menu with 3 to 4 items that do completely different things, stick with the separate functions approach. It's clearer and easier to debug.
Prerequisites
This tutorial assumes that you're familiar with the following concepts:
What are we trying to accomplish?
We want to use a single function definition for multiple menu items in a custom menu. That is to say, we want a single handler function that we can attach to every menu item such that this function can figure out which menu item was selected.
This centralized approach means all your menu-handling logic lives in one place, making it easier to add features like logging, access control, or complex business rules that apply to multiple menu items.
Understanding the caller of a function
The key concept that we will be using in this tutorial is the caller of a function. Let us first understand what the "caller" of a function means.
Consider two functions A and B that both call (i.e., invoke) a third function C. When function C is executed because A called it, the caller of C is A. When C is executed because B called it, the caller of C is B.
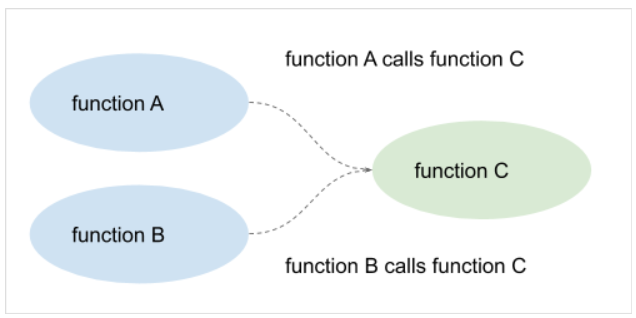
Within function C, you can access the function that called it by using the caller property: C.caller. Also, C.caller.name is the name of the caller function.
Note
C.caller.toString() will convert the caller function into a string representation. This string representation is the caller function's source code. We will be using this later in this tutorial.
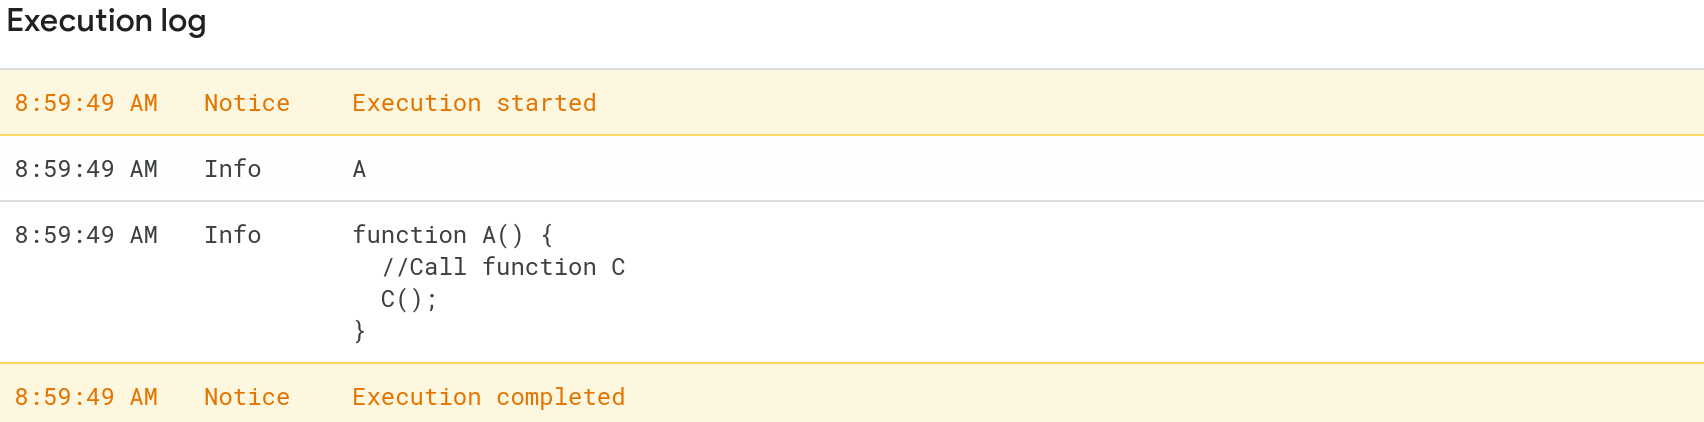
The code below demonstrates the concept of a function's caller.
function A() {
//Call function C
C();
}
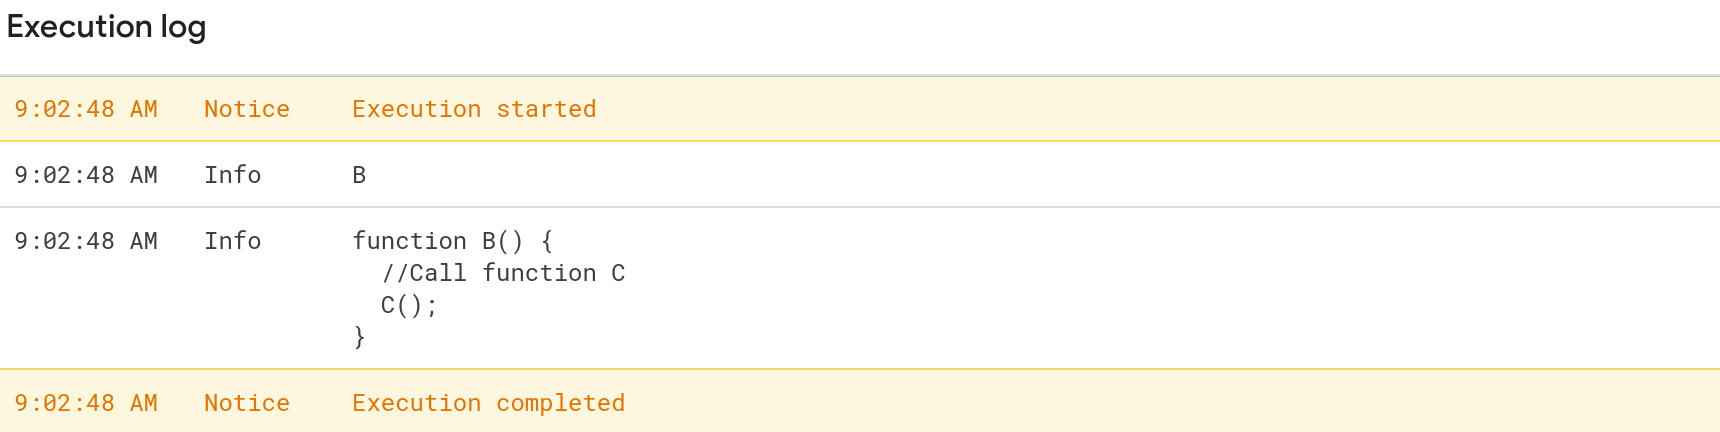
function B() {
//Call function C
C();
}
function C() {
//Log the caller's name
Logger.log(C.caller.name);
//Log the caller function's code
Logger.log(C.caller.toString());
}When you run function A, it will call function C, which will then log the name and source code of its caller function A.
Similarly, when you run function B, it will call function C which will log the name and source code of its caller function B.
Now, let's see what happens when we declare a variable D and assign the function C to it.
var D = C;When you run the function D, function C will be run since the value of function D is C. Interestingly, the caller function here is actually an anonymous function that returns the function D.
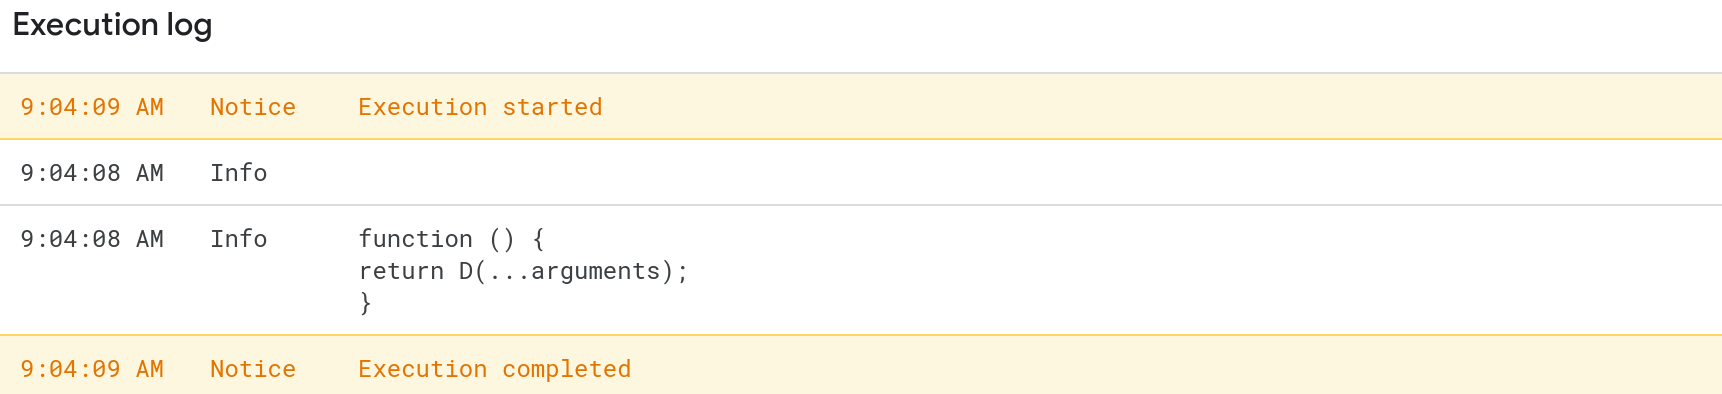
We're able to figure out that function D led to calling function C from the source code of the caller function (i.e., from C.caller.toString()). Here, we did not define a separate function D. We simply created a variable D and assigned the function C to it.
Now, inside function C, we can use the string methods indexOf() and slice() to extract the name D from C.caller.toString().
function C() {
  var caller = C.caller.toString();
  var startIndex = caller.indexOf("return") + 7;
  var endIndex = caller.indexOf("(...arguments);");
  var callerFunctionName = PROPER_CASE(caller.slice(startIndex, endIndex));
  Logger.log(callerFunctionName);
}

var D = C;

// This is not needed for the code to work but the Apps Script
// editor will only let you run D() if you declare it like a function
function D() {}

Using the caller of a function to figure out which menu item was selected in a custom menu
We can now use the above approach to figure out which menu item was selected without defining separate functions for each menu item.
In the code below, we define a single function common() that handles menu selections and it figures out which menu item was selected based on its caller. The benefit of this approach is that all of the business logic for handling menu selections is centralized in a single function. This makes updating the logic easy to do since you only have to make updates in a single place.
//@OnlyCurrentDoc

// Create a menu using an onOpen simple trigger
function onOpen() {
 SpreadsheetApp.getUi().createMenu("Test")
   .addItem("A", "A")
   .addItem("B", "B")
   .addItem("C", "C")
   .addToUi();
}

// All of the business logic for handling menu selections
// goes into this function. In this example, this function
// displays a toast notification with the
function common() {
  var caller = common.caller.toString();
  var startIndex = caller.indexOf("return") + 7;
  var endIndex = caller.indexOf("(...arguments);");
  var callerFunctionName = caller.slice(startIndex, endIndex);
  SpreadsheetApp.getActive().toast(callerFunctionName);
}

// We declare a variable for each menu item and we assign
// the function common to them. We pick the variable's name such that
// we can deduce which menu item was selected from this name.
var A = common;
var B = common;
var C = common;
Here is a video that demonstrates this feature:
Here's a more realistic example that shows why you might actually want to use this approach:
function common() {
  var menuItem = getCallerName();

  // Log all menu interactions for compliance auditing
  logMenuUsage(menuItem, Session.getActiveUser().getEmail(), new Date());

  // Apply role-based access control consistently
  if (!hasPermission(menuItem)) {
    SpreadsheetApp.getUi().alert("Access denied for " + menuItem + " feature");
    return;
  }

  // Process data based on menu selection with shared error handling
  try {
    var dataSource = getDataSourceFor(menuItem);
    var config = getConfigFor(menuItem);
    processData(dataSource, config);

    // Update usage counter for analytics
    incrementUsageCounter(menuItem);

  } catch (error) {
    logError(menuItem, error);
    SpreadsheetApp.getUi().alert("Error processing " + menuItem + ": " + error.message);
  }
}

function getCallerName() {
  var caller = common.caller.toString();
  var startIndex = caller.indexOf("return") + 7;
  var endIndex = caller.indexOf("(...arguments);");
  return caller.slice(startIndex, endIndex);
}
Trade-offs to consider
While this approach can be powerful, it's important to understand what you're giving up:
Debugging becomes harder: When something breaks, it's less obvious which menu item caused the issue since everything flows through the same function. You'll need to rely on logging to trace execution.
Code flow is less clear: Other developers (or future you) will need to understand the caller mechanism to follow the code logic, whereas separate functions are immediately obvious.
Testing becomes more complex: You can't easily test individual menu actions in isolation. You need to set up the caller mechanism or extract the business logic into separate testable functions.
Refactoring risk: If you need to change how one menu item works significantly, you might find yourself adding conditional logic that defeats the purpose of the centralized approach.
When to use each approach
Use separate functions when:
You have fewer than 10 menu items
Menu items do completely different things
Code clarity is more important than maintainability
Your team prefers explicit, easy-to-debug code
Use the unified caller approach when:
You have many menu items (10+) with similar logic
You need consistent cross-cutting concerns (logging, security, error handling)
Menu items are generated dynamically
You're building a framework-like solution where consistency matters
Conclusion
In this tutorial, I showed you how to figure out which menu item was selected in a custom menu without defining separate functions for each menu item. I also explained what the caller of a function is and how to apply this concept to the problem at hand.
We've effectively created a single "handler" function for all menu selections such that the handler can determine which menu item was selected. This technique is particularly useful when you need to apply consistent logic across many menu items, but it does come with trade-offs in terms of code clarity and debugging complexity.
I've been trying to figure out how to do this for some time now and I finally came up with the above approach that seems to work well. If you know of a better way to do this, please do let me know using the form below.
Thanks for reading!
DISCLAIMER: This content is provided for educational purposes only. All code, templates, and information should be thoroughly reviewed and tested before use. Use at your own risk. Full Terms of Service apply.
Thanks for your feedback!
Your input helps improve the content for everyone.
