Insert an image into a cell in Google Sheets using Apps Script
In this tutorial, I will show you how to insert an image into a cell in a Google Sheets spreadsheet using Apps Script.
Note
This feature was recently added to Apps Script and I've called out some quirks (perhaps they're bugs?) below. I'll update this post if I figure out how to work around these issues
What is a cell image?
A cell image is simply an image that is inserted into a cell. It has been possible to insert images into cells in Google Sheets using the =IMAGE() function in Google Sheets for some time. However, this wasn't possible using Apps Script up until recently.
For example, let's say we want to insert the following image into cell A1 in the active sheet.
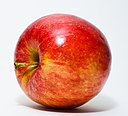
Image credit: Abhijit Tembhekar from Mumbai, India, CC BY 2.0, via Wikimedia Commons
Previously, the only way to insert this image into cell A1 would be using a formula and the =IMAGE() function.
=IMAGE("https://upload.wikimedia.org/wikipedia/commons/thumb/1/15/Red_Apple.jpg/128px-Red_Apple.jpg")Insert an image into a cell in Google Sheets using Apps Script
Now, you can also insert images into cells using Apps Script. The function insertCellImage() below does just that. It accepts a range and the url of the image and inserts the image into all the cells in that range. You can also optionally supply an alternate title and description for the image to help improve the accessibility of content in your spreadsheet.
Note
If the range contains multiple cells, the image will be inserted into each cell in the range.
function insertCellImage(range, imageUrl, altTitle = "", altDescription = "") {

 let image = SpreadsheetApp
                 .newCellImage()
                 .setSourceUrl(imageUrl)
                 .setAltTextTitle(altTitle)
                 .setAltTextDescription(altDescription)
                 .build();
  range.setValue(image);

}
Reading cell images from a Google Sheets spreadsheet using Apps Script
Now that you can insert images into cells, you might encounter images while reading values from a range in your spreadsheet using Apps Script.
In the above example, we inserted the image of the apple into cell A1. Now, suppose that cell is the current cell (i.e. the cell that is active in the spreadsheet). You can get its value using SpreadsheetApp.getCurrentCell().getValue(). This value will be an image. The function getCellImage() below shows you how to find out if a value is a cell image or not.
function getCellImage(cell) {
  let val = cell.getValue();

  //Check if the value in the cell is an image.
  if(val.toString() === "CellImage") {
    Logger.log(val.getUrl());
    Logger.log(val.getAltTextTitle());
    Logger.log(val.getAltTextDescription());
  }
}
Note
Based on my testing, I am able to successfully check if a value in a cell is a cell image or not. I am also able to get the image's alternate text and description. However, the image's URL is always empty. I am not sure if this is a quirk, or a bug that will be fixed at some point, or something that I'm doing incorrectly. I'll update this post when I figure out how to get the URL.
Conclusion
You learned how to insert images into cells in Google Sheets using Apps Script. Hope this tutorial was helpful. Thanks for reading!
DISCLAIMER: This content is provided for educational purposes only. All code, templates, and information should be thoroughly reviewed and tested before use. Use at your own risk. Full Terms of Service apply.
Thanks for your feedback!
Your input helps improve the content for everyone.
