How to submit responses to a Google Form using Apps Script?
In this tutorial, I will show you how to submit a response to a Google Form using Google Apps Script.
Prerequisites
This tutorial assumes that you're familiar with:
Google Sheets
Basic coding concepts - If you're new to coding, check out my beginner-friendly tutorial series on learning to code using Google Sheets and Apps Script.
4 steps to submit a response to a Google Form using Apps ScriptStep 1 — Create a Google Form
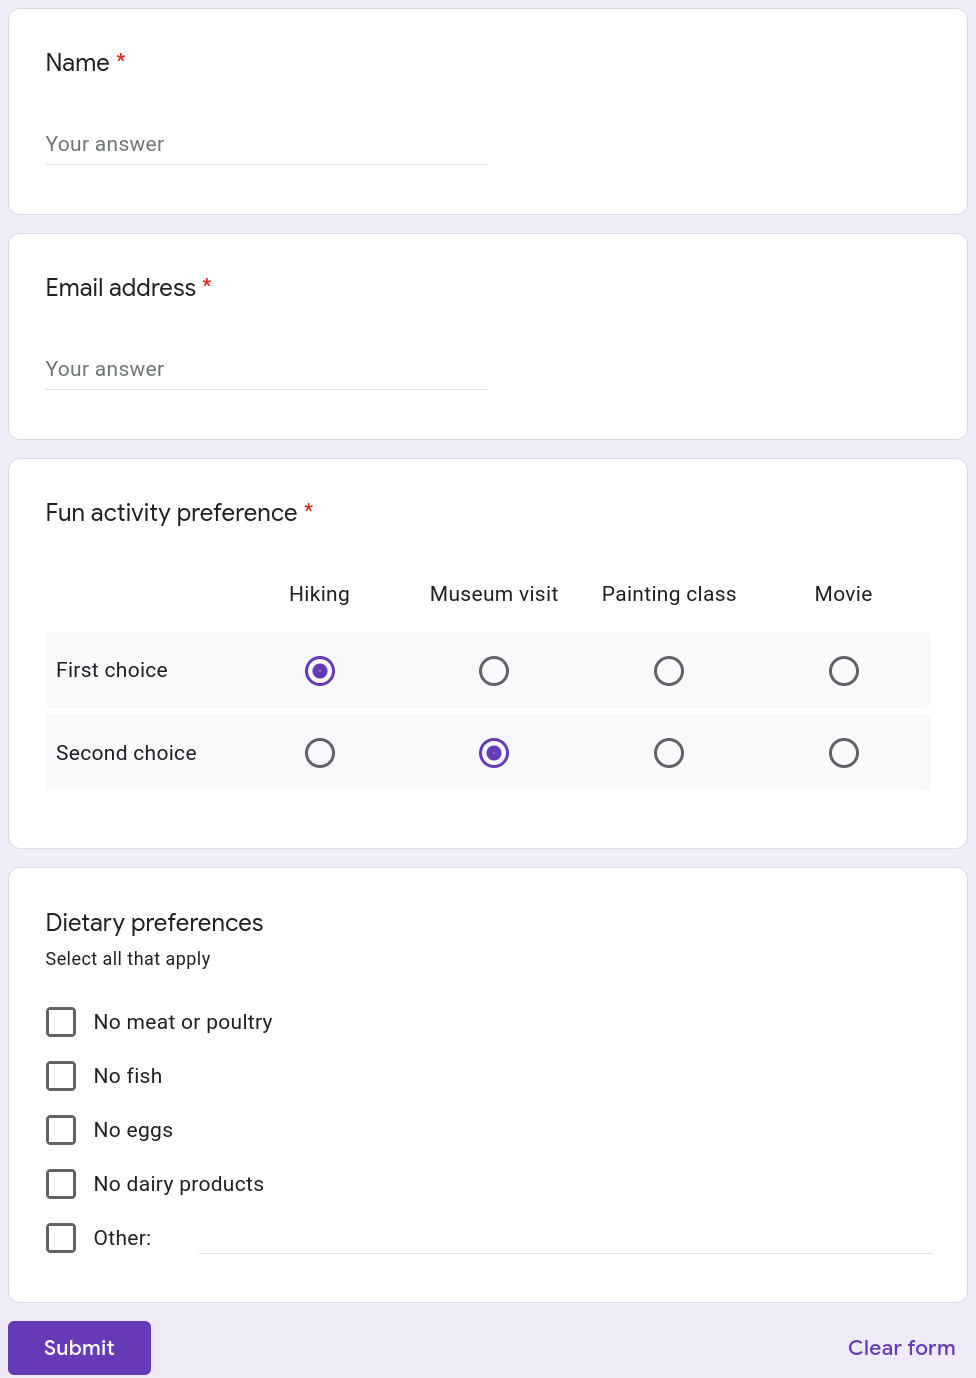
In order to submit responses to a Google Form, we need to first create the form. If you already have a form, please open it. If not, please create one. In this tutorial, I will use a form containing four questions:
Name: Name of the person signing up for a fun activity
Email address: Their email address
Fun activity preference: Their preferences for fun activities they'd like to participate in
Dietary preferences: Dietary restrictions that they may have

Note
While I will use the above Google Form in this tutorial, you can customize your form based on your use case. The questions you add to your form will be based on your use case and that is totally fine.
Step 2 — Get a pre-filled link for the Google Form
Once you create your Google Form, the next step is to get a pre-filled link. A pre-filled link is a link that will pre-fill responses to some or all of the questions in the form.
If you can predict the "likely" response a specific user will enter for a question, you can pre-fill that response to save the user time. In our case, we will be using these pre-filled links to extract information that will help us go one step further and automatically submit information to the Google Form using Apps Script.
The steps to get the pe-filled link are:
Select the "three dots" ( ⠇) menu on the form that you see on the right hand side of the Send button.
Select the Get pre-filled link menu item. This will open the form in a new tab (or a new browser window).
Enter a sample response to each question on the form.
Click the Get link button at the bottom of the form.
A toast notification will appear on the screen that will allow you to copy the link to pre-fill the form with the responses you entered previously. Click the COPY LINK button on that notification to copy the link to your clipboard.
The video below demonstrates how to complete the above steps.
Once you complete the steps to get the pre-filled link, you should have it saved in your clipboard. Paste the link somewhere where you can retrieve it later. We will be using this link in step 3 of this tutorial.
The link should look like this:
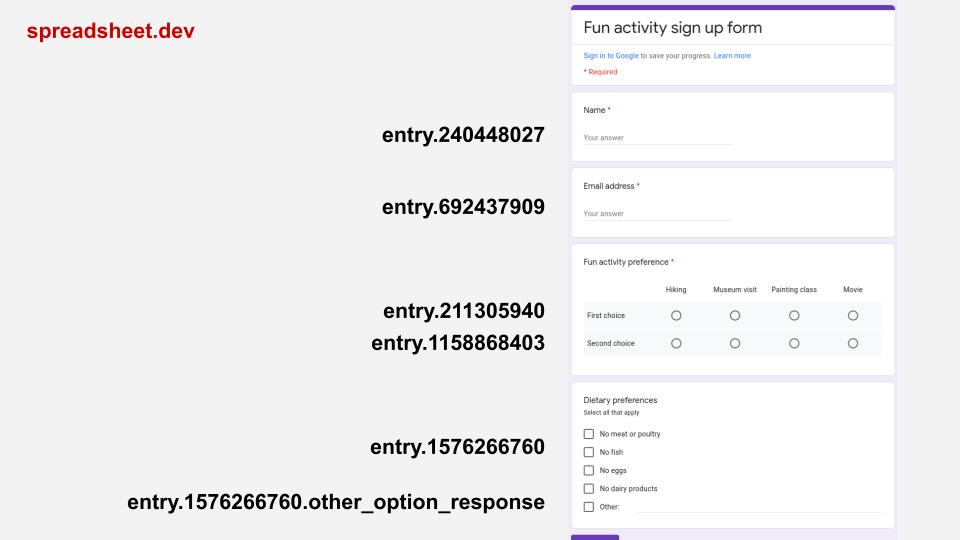
https://docs.google.com/forms/d/e/<FORM_ID>/viewform?usp=pp_url&entry.240448027=Name&entry.692437909=name@example.com&entry.211305940=Hiking&entry.1158868403=Museum+visit&entry.1576266760=No+meat+or+poultry&entry.1576266760=No+eggs&entry.1576266760=__other_option__&entry.1576266760.other_option_response=No+nuts+pleaseEach of the URL parameters that start with "entry" correspond to a field in the form. For example, in the above URL the parameter entry.240448027 is for the Name field. The parameter entry.692437909 is for the email address field, and so on.
The image below illustrates how the URL parameters map to the fields on the form I am using in this tutorial. The parameters will be different for your form so you'll need to create this mapping once you get the pre-filled link for your form.

Note
You can have multiple URL parameters for a single question in your form. For example, there are two URL parameters entry.211305940 and entry.1158868403 for entering a user's first and second fun activity preference.
Please also note that if you have a question where a user can select multiple checkboxes, you will use the same parameter multiple times to submit multiple selections. In the above example, the parameter entry.1576266760 appears multiple times in the URL to select multiple dietary restrictions.
Finally, there is a special way to enter a custom (i.e. 'Other") response. In order to enter a custom dietary restriction, the URL parameter entry.1576266760 is set to __other_option__ which indicates that a custom response will be provided. Then, the actual response is provided via the parameter entry.1576266760.other_option_response.
Step 3 — Publish your Google Form
This step may or may not be required depending on when you created your Google Form. Forms created more recently require this step, whereas those created earlier (around 2021, for example) may not.
It IS required if your Google Form has a "Publish" button on the top-right corner.
It MAY NOT be required if your Google Form has a "Send" button on the top-right corner.
If your Google Form has a "Publish" button, click it.
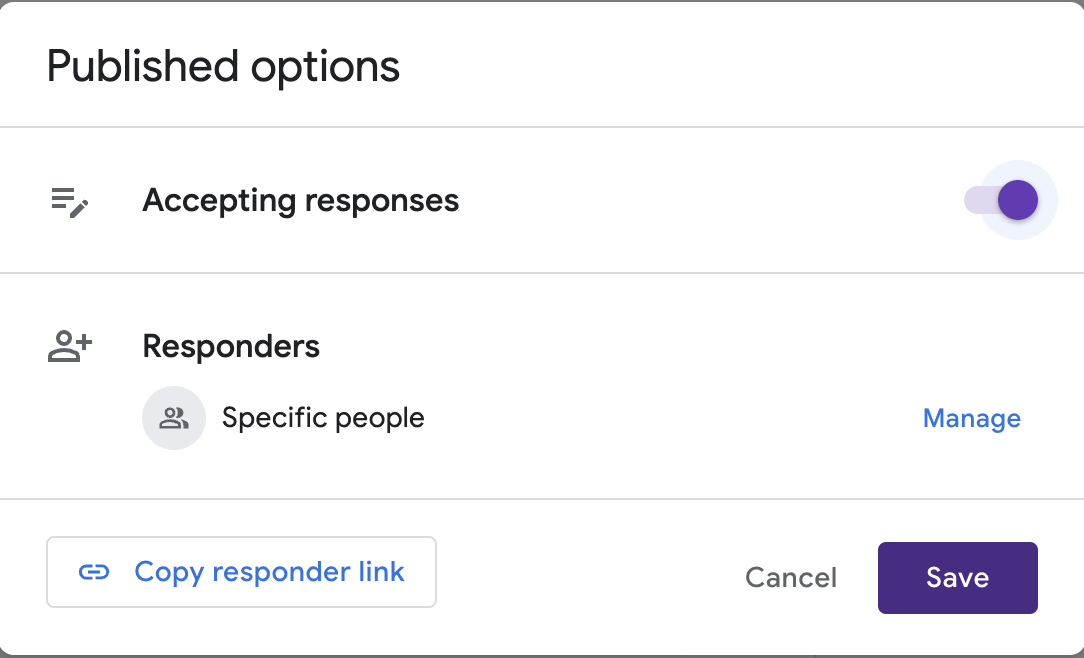
Then, ensure that your Form is accepting responses. The "Accepting responses" toggle should be enabled like in the screenshot below.

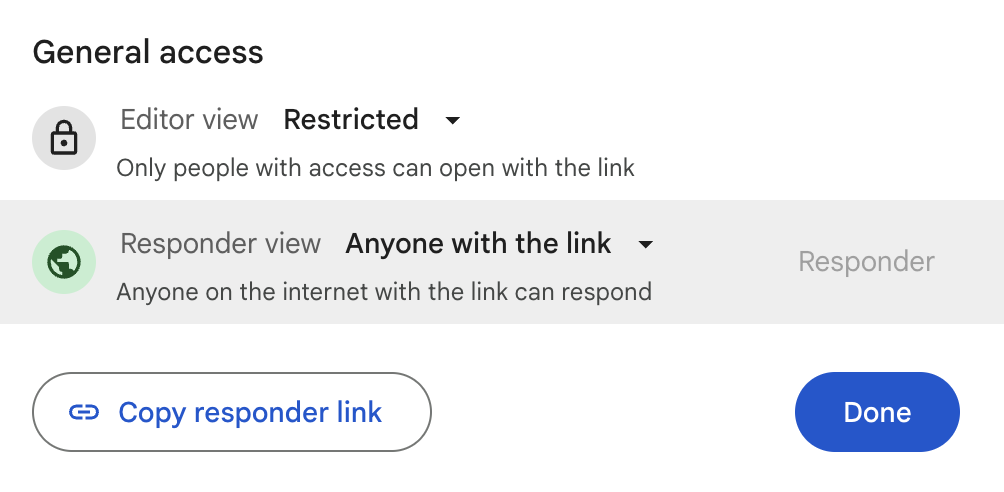
Then, click the "Manage" link next to Responders, change the "Responder view" to "Anyone with the link", and click "Done". This is required for Apps Script to be able to submit responses to your Form.
Note
Please note that changing the "Responder view" to "Anyone with the link" will also enable any person with the link to your form to submit responses.

Warning
Do not change access controls for the "Editor view" unless this is intentional since doing so will enable others to edit your form.
When you are done, the button on the top-right corner will say "Published", like in the screenshot below.

Step 4 — Use Apps Script to submit responses to the Google Form using the pre-filled link
The final step is to submit a response to the Google Form via a GET request made using UrlFetchApp. To do this we need to make two changes to the URL:
1. Replace viewForm in the URL with formResponse
The original URL is the one below. Replace viewForm with formResponse.
https://docs.google.com/forms/d/e/<FORM_ID>/viewform?usp=pp_url&entry.240448027=Name&entry.692437909=name@example.com&entry.211305940=Hiking&entry.1158868403=Museum+visit&entry.1576266760=No+meat+or+poultry&entry.1576266760=No+eggs&entry.1576266760=__other_option__&entry.1576266760.other_option_response=No+nuts+please
The modified URL should look like the following:
https://docs.google.com/forms/d/e/<FORM_ID>/formResponse?usp=pp_url&entry.240448027=Name&entry.692437909=name@example.com&entry.211305940=Hiking&entry.1158868403=Museum+visit&entry.1576266760=No+meat+or+poultry&entry.1576266760=No+eggs&entry.1576266760=__other_option__&entry.1576266760.other_option_response=No+nuts+please
Note: Don't forget to replace <FORM_ID> with the actual ID of your form.
2. Replace the placeholder values for each form field with the actual values you want submitted
The URL is currently configured to enter the placeholder values that you entered while creating the pre-filled URL. Please replace these parameters in the URL with the actual ones that you want to submit.
https://docs.google.com/forms/d/e/<FORM_ID>/formResponse?usp=pp_url&entry.240448027=Name&entry.692437909=name@example.com&entry.211305940=Hiking&entry.1158868403=Museum+visit&entry.1576266760=No+meat+or+poultry&entry.1576266760=No+eggs&entry.1576266760=__other_option__&entry.1576266760.other_option_response=No+nuts+please
If you decide not to submit an "other" entry for dietary preferences, please delete the corresponding parameters:
https://docs.google.com/forms/d/e/<FORM_ID>/formResponse?usp=pp_url&entry.240448027=Name&entry.692437909=name@example.com&entry.211305940=Hiking&entry.1158868403=Museum+visit&entry.1576266760=No+meat+or+poultry&entry.1576266760=No+eggs&entry.1576266760=__other_option__&entry.1576266760.other_option_response=No+nuts+please
Note: Don't forget to replace <FORM_ID> with the actual ID of your form.
Submit your entry to the Google Form using Apps Script
The final step is to submit your entry to the Google Form using Apps Script. The function submitEntryToGoogleForm() makes a GET request which submits the entry to the Google Form.
function submitEntryToGoogleForm() {

  let url = "https://docs.google.com/forms/d/e/<FORM_ID>/formResponse?usp=pp_url&entry.240448027=Jake+Miles&entry.692437909=miles@example.com&entry.211305940=Hiking&entry.1158868403=Museum+visit&entry.1576266760=No+meat+or+poultry&entry.1576266760=No+eggs&entry.1576266760=__other_option__&entry.1576266760.other_option_response=No+nuts+please";

  let response = UrlFetchApp.fetch(url);

}
Here is a video demonstrating the submission:
That's it, you successfully submitted a response to a Google Form using Apps Script.
Note
If you get a "Request failed" error like the one below, it means that your Form is unable to accept responses. Ensure you completed Step #3 of this tutorial.
Exception: Request failed for https://docs.google.com returned code 401. Truncated server response: <!DOCTYPE html><style nonce="Nwa1gsr1an7bsI0HxuLumUfgJ-Q">body{height:100%;margin:0;width:100%}@media (max-height:350px){.button{font-size:10px}.button-... (use muteHttpExceptions option to examine full response)Conclusion
In this tutorial, you learned how to programmatically submit responses to a Google Form using UrlFetchApp in Apps Script.
Hope this tutorial helped you and thanks for reading!
DISCLAIMER: This content is provided for educational purposes only. All code, templates, and information should be thoroughly reviewed and tested before use. Use at your own risk. Full Terms of Service apply.
Thanks for your feedback!
Your input helps improve the content for everyone.

