Convert each row in Google Sheets into a slide in Google Slides using Apps Script
In this tutorial, I will show you how to use Apps Script to insert a slide in a Google Slides presentation for every row in a Google Sheets spreadsheet.
Suppose you collect information about students from teachers or parents. This could be information about their grades or information for the school yearbook. You then want to create a presentation using this information where each student's information is added to a separate slide.
Doing this manually can be tedious so I will show you how you can automatically achieve this using Apps Script.
Prerequisites
This tutorial assumes that you're familiar with:
Basic coding concepts (If you're new to coding, please check out a series of tutorials that I've written on learning to code using Google Sheets and Apps Script.).
How to create and run simple Apps Script scripts using the script editor in Google Sheets?
Reading from and writing to a range in Google Sheets using Apps Script.
You may also find the following tutorial helpful: Iterating through rows in a Google Sheet using Apps Script.
4 steps to create slides in a presentation from information in a Google Sheets spreadsheetStep 2 — Open the Google Sheets spreadsheet containing information and open the Apps Script editor
Step 4 — Optionally create a button in Google Sheets to run your script
Step 1 — Create the Google Slides presentation
Step 2 — Open the Google Sheets spreadsheet containing information and open the Apps Script editor
Step 4 — Optionally create a button in Google Sheets to run your script
Create a Google Slides presentation where you'd like slides to be created based on the information in your Google Sheets spreadsheet.
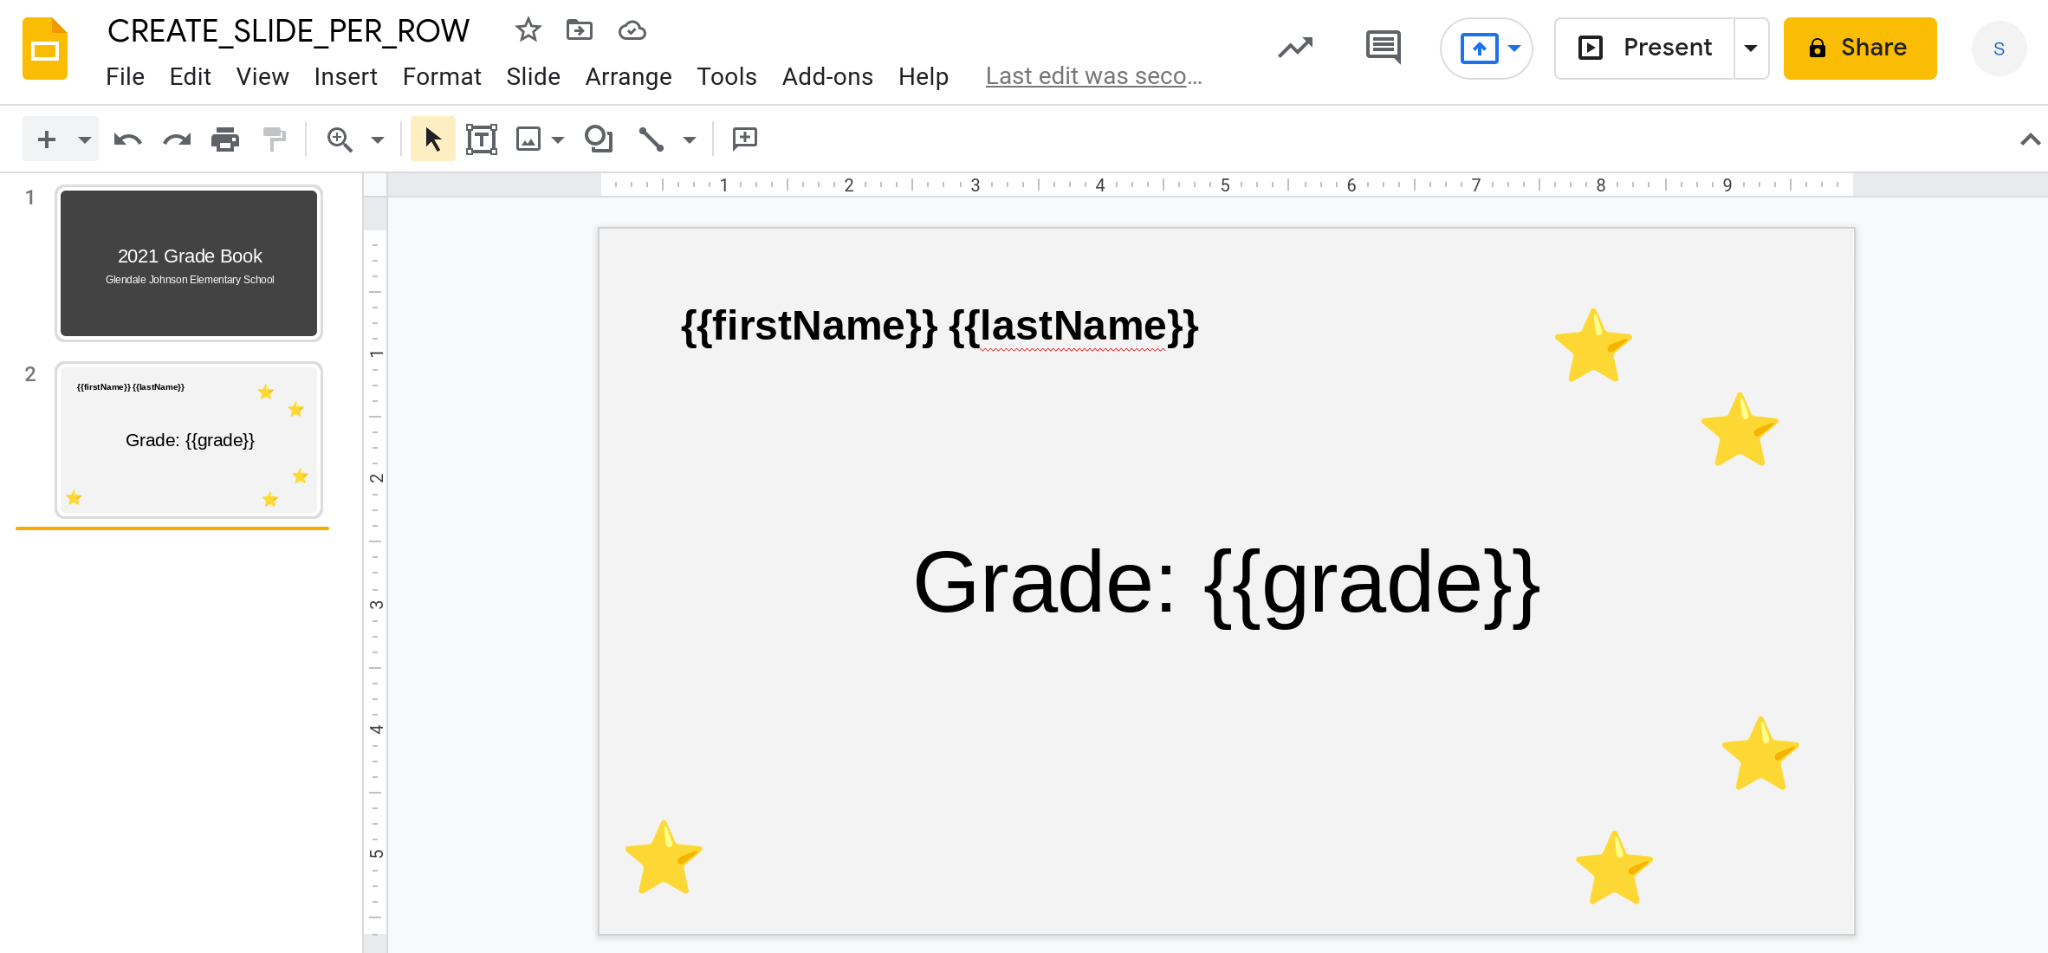
This will be the master slide deck. The code we will write in step 3 will assume that there are two slides in this master deck:
A title slide in this presentation which we will not modify.
A second slide that will serve as the template. This template slide will be duplicated once per row in the spreadsheet. This template can contain placeholder values for"mail merging" data from the spreadsheet.

In this tutorial, I will be using template slide that contains three placeholder values:
: The first name of the student.
: The last name of the student.
: The student's grade.
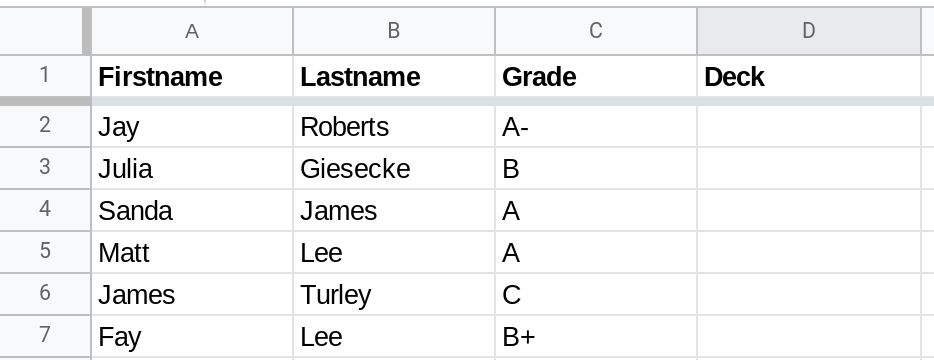
Each row in the spreadsheet should contain the above information for a student. If the class has 20 students then the spreadsheet must have 21 rows: 1 header row and 20 rows (one per student) containing information.
Step 2 — Open the Google Sheets spreadsheet containing information and open the Apps Script editor
Open the Google Sheets spreadsheet containing information that will be used to insert slides in the presentation. The script we will write in step 3 assumes that this spreadsheet contains a single header row and then every other row will result in a corresponding slide being inserted in the presentation using the template slide.

Open the Apps Script editor from the spreadsheet by selecting Extensions —> Apps Script.
Step 3 — Use Apps Script to create one slide in the presentation for every row of information in the spreadsheet
Replace the code in the editor with the code below. The createOneSlidePerRow() function will create a slide in the Google Slides presentation for every row in the Google Sheets spreadsheet.
Note
Please replace "<INSERT_SLIDE_DECK_ID>" with the ID of the presentation where you want slides created.
function createOneSlidePerRow() {

  // Replace <INSERT_SLIDE_DECK_ID> wih the ID of your
  // Google Slides presentation.
  let masterDeckID = "<INSERT_SLIDE_DECK_ID>";

  // Open the presentation and get the slides in it.
  let deck = SlidesApp.openById(masterDeckID);
  let slides = deck.getSlides();

  // The 2nd slide is the template that will be duplicated
  // once per row in the spreadsheet.
  let masterSlide = slides[1];

  // Load data from the spreadsheet.
  let dataRange = SpreadsheetApp.getActive().getDataRange();
  let sheetContents = dataRange.getValues();

  // Save the header in a variable called header
  let header = sheetContents.shift();

  // Create an array to save the data to be written back to the sheet.
  // We'll use this array to save links to the slides that are created.
  let updatedContents = [];

  // Reverse the order of rows because new slides will
  // be inserted at the top. Without this, the order of slides
  // will be the inverse of the ordering of rows in the sheet.
  sheetContents.reverse();

  // For every row, create a new slide by duplicating the master slide
  // and replace the template variables with data from that row.
  sheetContents.forEach(function (row) {

    // Insert a new slide by duplicating the master slide.
    let slide = masterSlide.duplicate();

    // Populate data in the slide that was created
    slide.replaceAllText("", row[0]);
    slide.replaceAllText("", row[1]);
    slide.replaceAllText("", row[2]);

    // Create the URL for the slide using the deck's ID and the ID
    // of the slide.
    let slideUrl = `https://docs.google.com/presentation/d/${deck.getId()}/edit#slide=id.${slide.getObjectId()}`;

    // Add this URL to the 4th column of the row and add this row
    // to the data to be written back to the sheet.
    row[3] = slideUrl;
    updatedContents.push(row);
  });

  // Add the header back (remember it was removed using
  // sheetContents.shift())
  updatedContents.push(header);

  // Reverse the array to preserve the original ordering of
  // rows in the sheet.
  updatedContents.reverse();

  // Write the updated data back to the Google Sheets spreadsheet.
  dataRange.setValues(updatedContents);

  // Remove the master slide if you no longer need it.
  masterSlide.remove();

}
Try running this function. You will be asked to authorize the script. Once you authorize it, a number of slides will be inserted into your presentation based on the information in your Google Sheets spreadsheet. The information in each row of the spreadsheet will have been "mail merged" into the placeholder variables in the template slide.
Step 4 — Optionally create a button in Google Sheets to run your script
To make it easy to run your code, you can either create a button in Google Sheets or create a custom menu.
Conclusion
In this tutorial I showed you how you can use Apps Script to convert rows in a Google Sheets spreadsheet into slides in your Google Slides presentation.
Thanks for reading!
DISCLAIMER: This content is provided for educational purposes only. All code, templates, and information should be thoroughly reviewed and tested before use. Use at your own risk. Full Terms of Service apply.
Thanks for your feedback!
Your input helps improve the content for everyone.

