Reading from and writing to a Range in Google Sheets using Apps Script
In this tutorial, I will walk you through several ways to read data from and write data to your Google Sheets spreadsheet using Google Apps Script.
Prerequisites
This tutorial will assume that you are familiar with:
The concept of a range in Google Sheets.
What you'll learn in this tutorialThe basics of working with a range in Google Sheets using Google Apps Script
There are several ways to access a range in your spreadsheet from your script
Reference the range that the user has selected in the spreadsheet
Reference the range containing all of the data in a given sheet
Once you reference (i.e., access) a range, you can read values from it using the getValues() method or write values to it using the setValues() method.
Understanding the basics of working with a range in Google Sheets using Google Apps Script
The basics of working with a range in Google Sheets using Google Apps Script
There are several ways to access a range in your spreadsheet from your script
Reference the range that the user has selected in the spreadsheet
Reference the range containing all of the data in a given sheet
Once you reference (i.e., access) a range, you can read values from it using the getValues() method or write values to it using the setValues() method.
The first thing you should know is that a range is just a rectangular grid of cells. A range can contain just a single cell or multiple cells. When a range contains multiple cells, they can span across just one row, just one column or multiple rows and columns.
Working with a range using Google Apps Script is pretty simple:
First, you need to access the range you want to work with. This is also known as referencing a range of cells.
Then you can read data from this range or write data to it.
When you read data from a range, the data will be structured as a two-dimensional array. Similarly, when you write data to a range, you must structure the data to be written as a two-dimensional array to ensure that the data is written to the range correctly. In addition, when writing data to a range, it is important to ensure that the dimensions of the two-dimensional array (i.e., the number of rows and columns in the array) matches the dimensions of the range exactly.
For example, consider the range A1:C6 in the spreadsheet below.
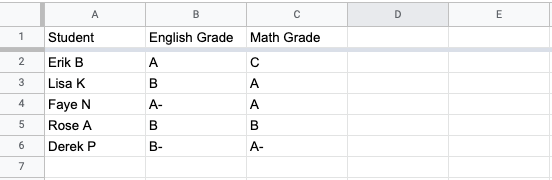
When you access the data in this range using Google Apps Script, it will be structured as a two-dimensional array. The outer array will be an array of rows in the range and each row will be an array of columns in that row.
function readDataFromRange() {
  //Read data from the range Sheet1!A1:C6
  var data = SpreadsheetApp.getActive().getRange("Sheet1!A1:C6").getValues();

  //Log the data that was read.
  Logger.log(JSON.stringify(data));
}
When you run the above function and inspect logs (select View —> Logs or use a keyboard shortcut), you should see the following log containing data from the range.
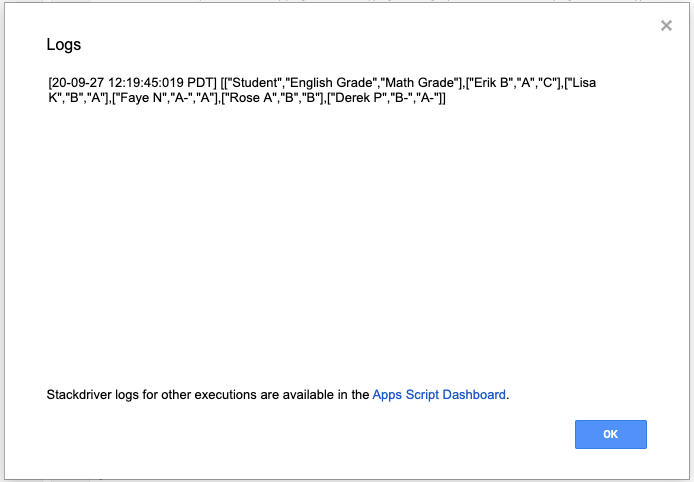
The data that was logged is the following two-dimensional array. I've formatted it to make it easier to read its contents.
[
    ["Student", "English Grade", "Math Grade"],
    ["Erik B", "A", "C"],
    ["Lisa K", "B", "A"],
    ["Faye N", "A-", "A"],
    ["Rose A", "B", "B"],
    ["Derek P", "B-", "A-"]
]
Similarly, if you want to write data to the range A1:C6, you need to provide a two-dimensional array of values to be written to the range.
★ Important

When writing values to a range, the number of rows and columns in the two-dimensional array of values must exactly match the number of rows and columns in the range.
function writeDataToRange() {
//Create a two-dimensional array with the values to be written to the range.
var dataToBeWritten = [
["Student", "English Grade", "Math Grade"],
["Erik B", "A", "C"],
["Lisa K", "B", "A"],
["Faye N", "A-", "A"],
["Rose A", "B", "B"],
["Derek P", "B-", "A-"]
];
//Write the data to the range A1:C6 in Sheet1
SpreadsheetApp.getActive().getRange("Sheet1!A1:C6").setValues(dataToBeWritten);
}When you read data from just a single row, say A1:C1, the data will be structured as a two-dimensional array with just one row and several columns.
[
    ["Student", "English Grade", "Math Grade"]
]
When you read data from just a single column, say A1:A6, the data will be structured as a two-dimensional array with several rows that each contain a single column.
[
    ["Student"],
    ["Erik B"],
    ["Lisa K"],
    ["Faye N"],
    ["Rose A"],
    ["Derek P"]
]
In the rest of this tutorial, we'll apply this basic knowledge to explore several ways to read data from and write data to a range in a Google Sheets spreadsheet.
There are several ways to specify the range that you want to work withReference a Named Range by using its name
Google Sheets has a feature where you can give a range a unique name. Once you do this, you can reference this range in formulas and in scripts by using its name. I highly recommend using this feature since it really makes it easy to understand what your script is doing.
As an example, consider the following two code snippets:
SpreadsheetApp.getActive().getRange("Sheet1!A1:C6");SpreadsheetApp.getActive().getRangeByName("StudentGrades")
They both do the exact same thing but the second approach helps you understand the type of data contained in the range. Named ranges improve the readability of your code.
Reading data from a Named Range
To read data from a named range, first reference the named range by using the getRangeByName() function on the Spreadsheet object. Then, read the values in the range by using the getValues() method.
function readNamedRange() {
  var range = SpreadsheetApp.getActive().getRangeByName("StudentGrades");
 var values = range.getValues();
 Logger.log(JSON.stringify(values));
}
How does the above code work?
First the code accesses the spreadsheet that the script is associated with.
var range = SpreadsheetApp.getActive();Next, it accesses the range named "StudentGrades" in the spreadsheet by using the getRangeByName() method.
var range = SpreadsheetApp.getActive().getRangeByName("StudentGrades");Then it gets the values in the range by using the getValues() method. These values will be structured as a two-dimensional array.
var values = range.getValues();Finally, it logs these values after converting it into a string by using the JSON.stringify() function.
Logger.log(JSON.stringify(values));⚠ Please note that the getRangeByName() method is only available from a Spreadsheet object and not a Sheet object.
SpreadsheetApp.getActiveSheet().getRangeByName("StudentGrades");The above code references the currently active sheet within the spreadsheet and this object does not have a method called getRangeByName().
The method getRangeByName() is only available from the spreadsheet object.
SpreadsheetApp.getActive().getSheetByName("Sheet1").getRangeByName("StudentGrades");The above code references the sheet named "Sheet1" within the spreadsheet and this object does not have a method called getRangeByName().
Therefore when you see the error message "getRangeByName is not a function", check to see if you're referencing the spreadsheet or a sheet within it.
★ Note
When you use getValue() instead of getValues(), only the value in the first cell (top left cell) of the range will be returned.
Writing data to a Named Range
The code below writes the two-dimensional array dataToBeWritten into the range named StudentGrades.
function writeToANamedRange() {
  var range = SpreadsheetApp.getActive().getRangeByName("StudentGrades");

  var dataToBeWritten = [
      ["Student", "English Grade", "Math Grade"],
      ["Erik B", "A", "C"],
      ["Lisa K", "B", "A"],
      ["Faye N", "A-", "A"],
      ["Rose A", "B", "B"],
      ["Derek P", "B-", "A-"]
  ];

 range.setValues(dataToBeWritten);
}
★ Important
When writing values to a range, the number of rows and columns in the two-dimensional array of values must exactly match the number of rows and columns in the range.How does the above code work?
First, the code accesses the range where the data needs to be written. In this case, the range has been given a name so the getRangeByName() function is used to reference it.
var range = SpreadsheetApp.getActive().getRangeByName("StudentGrades");Next, the data to be written into the range is structured as a two-dimensional array.
var dataToBeWritten = [
    ["Student", "English Grade", "Math Grade"],
    ["Erik B", "A", "C"],
    ["Lisa K", "B", "A"],
    ["Faye N", "A-", "A"],
    ["Rose A", "B", "B"],
    ["Derek P", "B-", "A-"]
  ];
Finally, this data is written to the range using the setValues() method.
range.setValues(dataToBeWritten);★ Note
When you use setValue() instead of setValues(), the value will be written to every cell in the range.
//The value 5 will be written to every cell in the range A1:C6
SpreadsheetApp.getActiveSheet().getRange("A1:C6").setValue(5);
When you write data to a range, Apps Script will try and preserve the data types of the values
The code below demonstrates this by writing four values that are of different data types to the spreadsheet. These values are correctly written to the spreadsheet.
function dataTypes () {
  var values = [
    ["String", "text"],
    ["Number", 6],
    ["Date", new Date()],
    ["Boolean", true]
  ];

  var range = SpreadsheetApp.getActive().getSheetByName("Sheet7").getRange("A1:B7").setValues(values);
}
You'll see in the screenshot below that the values and their types were correctly written to the spreadsheet.

Reference a range by using its A1 notation
You can also reference a range by using A1 notation. The notation Sheet1!A1:C6 refers to the range that spans columns A to C and rows 1 to 6 in Sheet1.
function readRangeA1Notation() {
  var range = SpreadsheetApp.getActive().getRange("Sheet5!A1:C6");
  var values = range.getValues();
  Logger.log(JSON.stringify(values));
}
You can also explicitly specify the sheet by using the getSheetByName() method and then omit the name of the sheet from the range.
The code below references the range A1:C6 in Sheet1.
var range = SpreadsheetApp.getActive().getSheetByName("Sheet1").getRange("A1:C6");The code below references the same range A1:C6 in Sheet5.
var range = SpreadsheetApp.getActive().getSheetByName("Sheet5").getRange("A1:C6");Once you reference the range, you can read values from it and write values to it using the getValues() and setValues() method described earlier in this tutorial.
⚠ Always specify the sheet explicitly while referencing a range using A1 notation
If you do not specify the sheet explicitly and there are multiple sheets in your spreadsheet, your script's behavior can be unpredictable since by default Apps Script will try and read from the sheet that is active and this can be unreliable. So, to be safe, please specify the sheet explicitly when referencing the range using A1 notation.
Reference a range by using row and column indices
Another way to reference a range is by using row and column indices. This method will only work in the context of a specific sheet.
You can specify the sheet either by using the getActiveSheet() method or by using getSheetByName().
getActiveSheet(): will return the sheet that is currently active.getSheetByName(): will return the sheet whose name you specify. For example,getSheetByName("Sheet1")will return a reference to Sheet1.
Once you specify the sheet, you can access a range within it by using one of the following three methods:
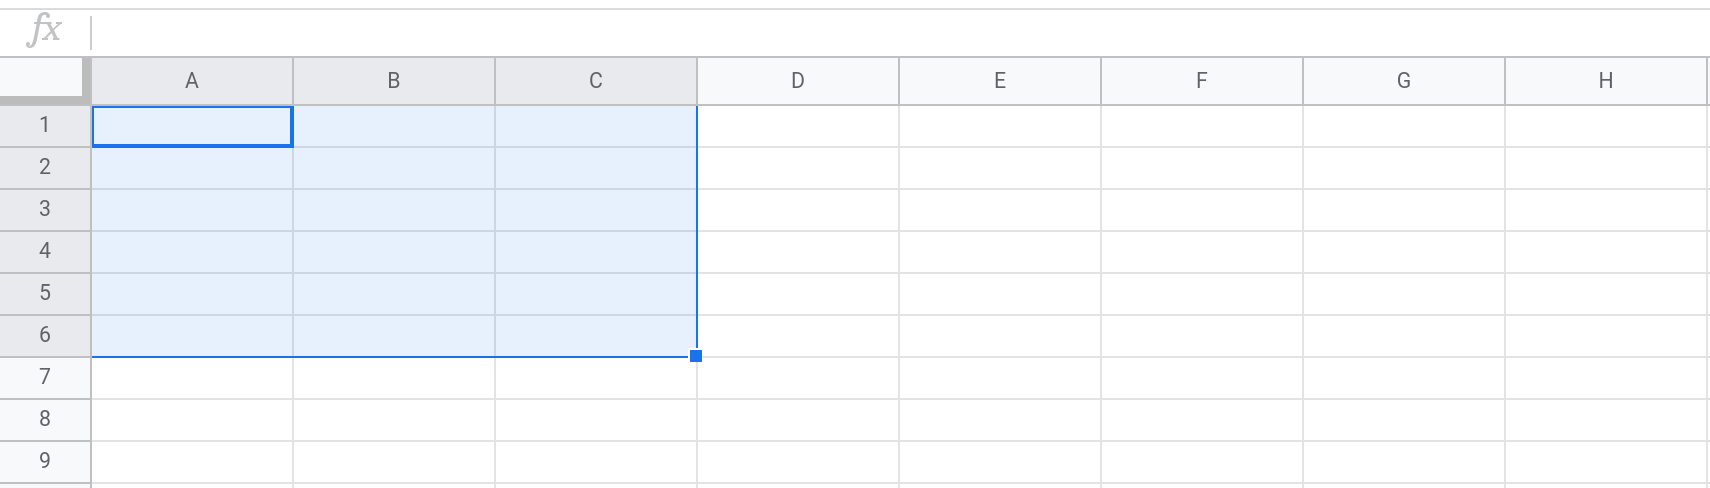
getRange(row, col): returns a reference to a single cell that is at the intersection of the row and column. The code below returns a reference to the range that is a single cell at the intersection of row 3 and column C. var range =SpreadsheetApp.getActiveSheet().getRange(3,3);
getRange(row, col, numRows): returns a reference to a vertical range spanning numRows rows beginning at the cell at the intersection of the specified row and column coordinates. The code below returns a reference to the range spanning 2 rows beginning at the cell at the intersection of row 3 and column C. var range =SpreadsheetApp.getActiveSheet().getRange(3,3,2);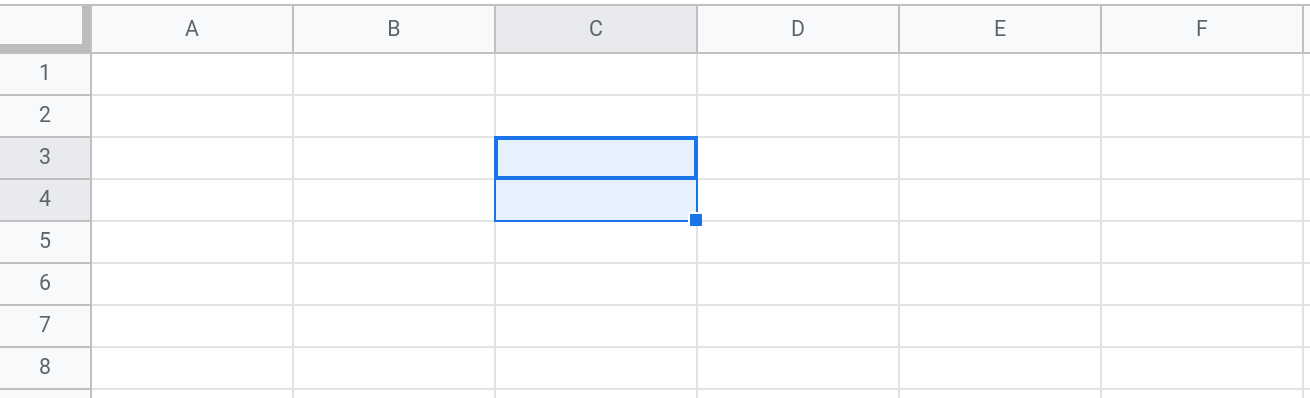
getRange(row, column, numRows, numColumns): returns a reference to range spanning numRows rows and numColumns columns beginning at the cell at the intersection of the specifiedrowandcolumncoordinates. The code below returns a reference to the range spanning 2 rows and 2 columns beginning at the cell at the intersection of row 3 and column C. var range =SpreadsheetApp.getActiveSheet().getRange(3,3,2,2);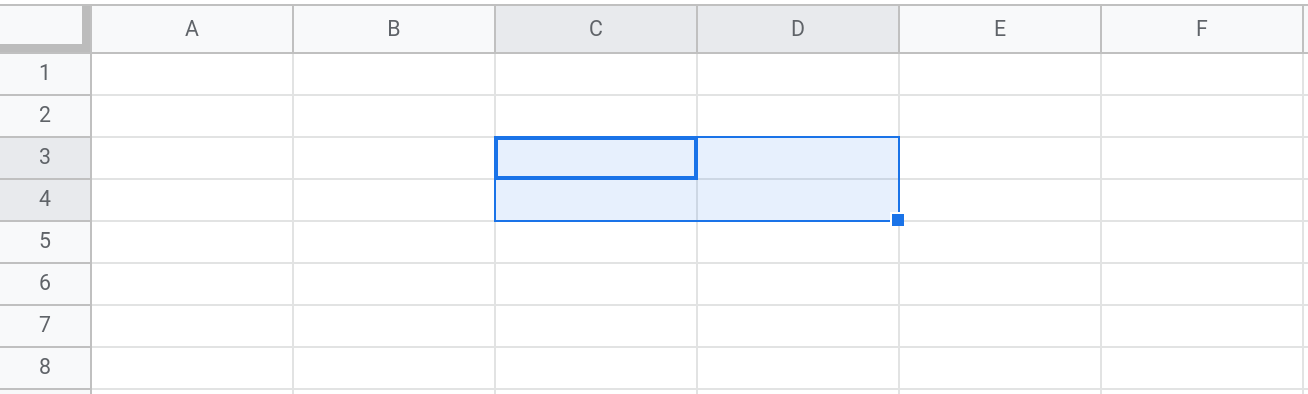
Once you get a reference to a range using the getRange() method, you can read values from it or write values to it by using the getValues() or setValues() methods respectively.
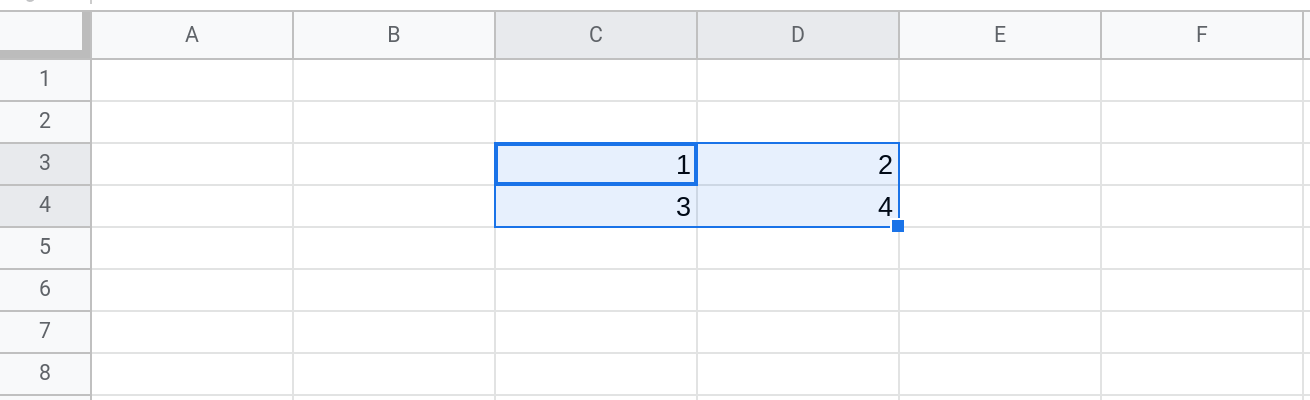
function rangeCoordinates() {
  var range = SpreadsheetApp.getActiveSheet().getRange(3,3,2,2);

  //Read values from the range

  var values = range.getValues();
  Logger.log(JSON.stringify(values));

  var newData = [
    [1, 2],
    [3, 4]
  ];

  //Write values to the range. The dimensions of the 2D array newData
  //must exactly match the dimensions of the range.

  range.setValues(newData);
}
Reference the range that the user has selected in the spreadsheet
Sometimes you might want your script to work with a range that the user has selected in the spreadsheet. For example, you might write a helper function to apply a custom formatting to the selected range. The user can then select any range and then run the function to format it.
Use getActiveRange() to reference the range that the user has selectedfunction formatSelectedRange() {
var range = SpreadsheetApp.getActive().getActiveRange();
range.setBackgroundColor("#333333");
range.setFontColor("#FFFFFF");
}
function formatSelectedRange() {
  var range = SpreadsheetApp.getActive().getActiveRange();
  range.setBackgroundColor("#333333");
  range.setFontColor("#FFFFFF");
}
In the code above, the getActiveRange() method returns the range that the user has selected.
Use getCurrentCell() to reference the cell that the user has selected
You can also get a reference to the cell that is currently active using getCurrentCell().
function formatActiveCell() {
  var range = SpreadsheetApp.getActive().getCurrentCell();
  range.setBackgroundColor("#333333");
  range.setFontColor("#FFFFFF");
}
If a range spanning multiple cells is selected, the first cell in the range will be returned. For example, in the screenshot below, the range C3:D4 is highlighted so getCurrentCell() will return a reference to the first cell C3 in the range.
Use getCurrentCell() instead of getActiveCell()
The methods getCurrentCell() and getActiveCell() both return a reference to the cell that is currently selected. Use getCurrentCell() instead of getActiveCell().
Reference the range containing all of the data in a given sheet
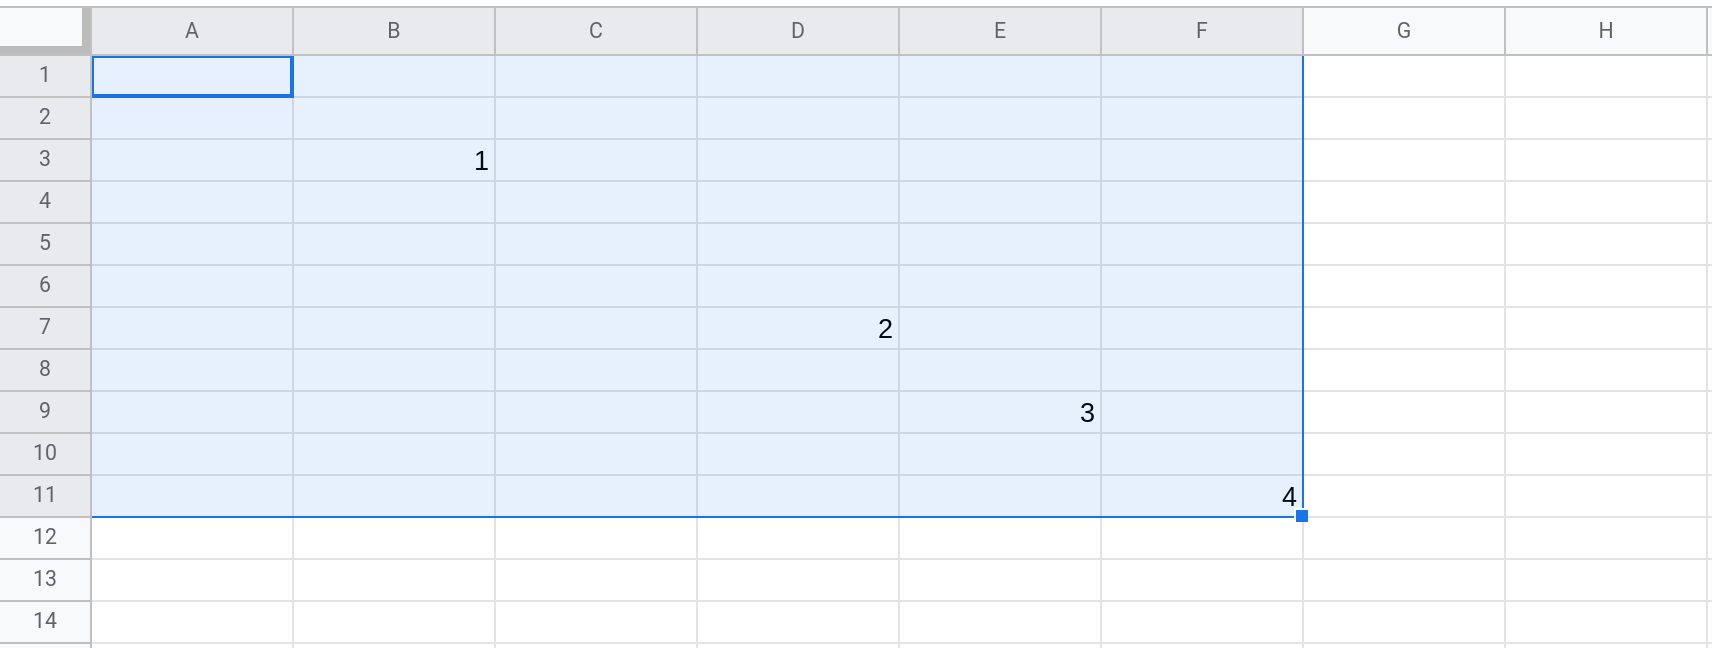
In Google Sheets, the Data Range is the range containing all of the non-empty values in a sheet. It is the range that starts at cell A1 and then stretches until it contains all of the non-empty values in the sheet.
In the screenshot below, the Data Range is A1:F11.
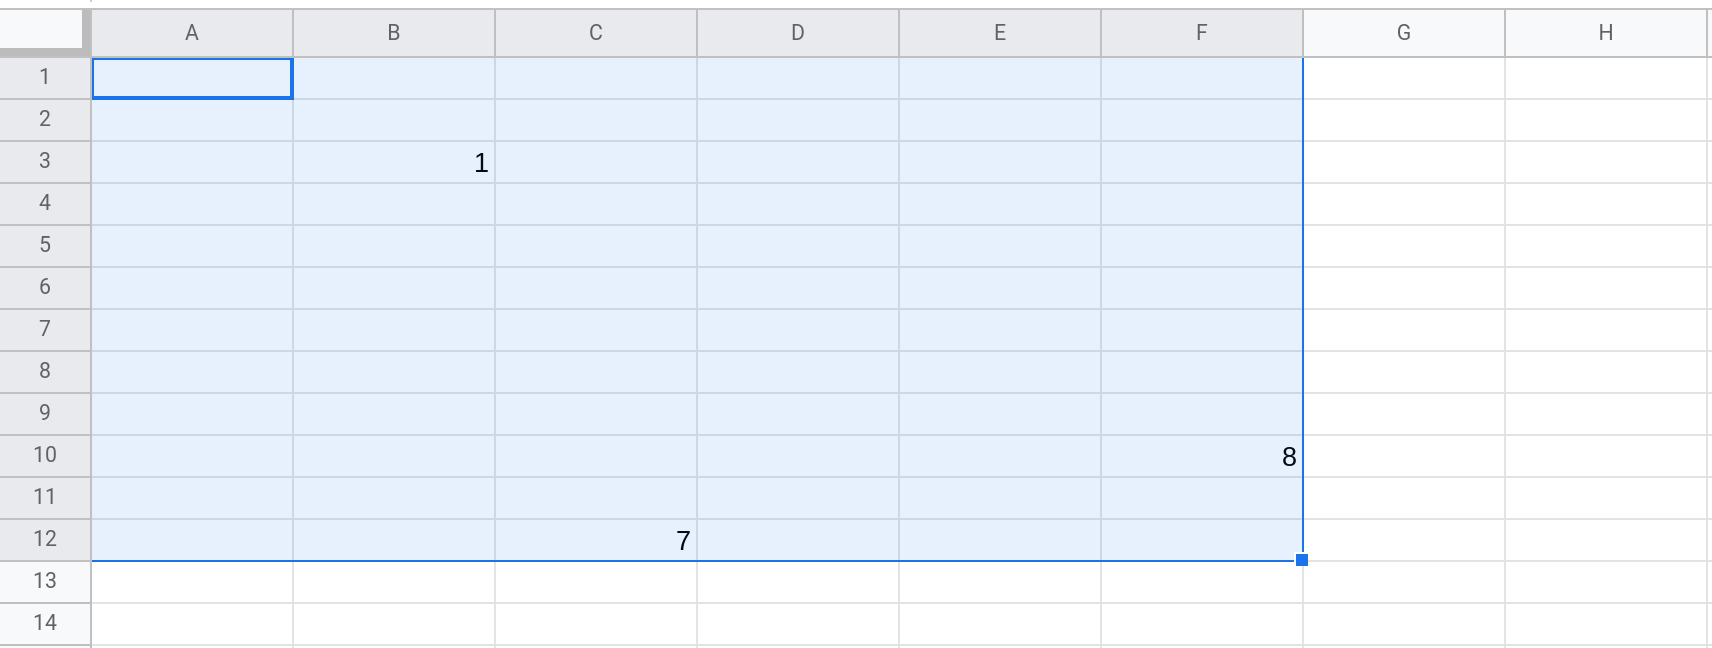
In the screenshot below, the Data Range is A1:F12.
Use the getDataRange() method to reference the range containing all of the data in a given sheet.
function readDataRange() {
  var range = SpreadsheetApp.getActive().getSheetByName("Sheet7").getDataRange();
  var values = range.getValues();
  Logger.log(JSON.stringify(values));
}
This is one of the most common ways to read data from a Google Sheets spreadsheet using Apps Script. This is especially useful when you need to process all of the rows in the sheet and take some action based on the data in each row.
For example, the code below reads the data range from Sheet5 and then logs the contents of each row.
function logEachRowInSheet() {
  var range = SpreadsheetApp.getActive().getSheetByName("Sheet5").getDataRange();
  var values = range.getValues();
  values.forEach(function (row) {
    Logger.log(JSON.stringify(row));
  });
}
You can adapt the code to do something else instead of logging the contents of each row. For example, you might want to send an email for each row in the spreadsheet.
Conclusion
In this tutorial you learned several ways to reference a range in your Google Sheets spreadsheet using Apps Script.
Use
getRangeByName()to reference a named range by using its name.Use
getRange()to reference a range using its A1 notation or row and column indices.When using this approach, always remember to explicitly specify the sheet either in the A1 notation (
"Sheet7!A1:C6") or by using thegetSheetByName()method.Use
getActiveRange()(orgetCurrentCell()) to reference the rage (or cell) that the user has selected in the spreadsheet.Use
getDataRange()to reference the range containing all the data in a sheet.
You can read values from a range or write values to it by using the getValues() and setValues() methods respectively.
The
getValues()method returns a two-dimensional array of values andsetValues()accepts a two-dimensional array of values as an argument.When writing data to a range, the data must be formatted as a two-dimensional array and its dimensions (i.e., number of rows and columns) must match the dimensions of the range exactly.
DISCLAIMER: This content is provided for educational purposes only. All code, templates, and information should be thoroughly reviewed and tested before use. Use at your own risk. Full Terms of Service apply.
Thanks for your feedback!
Your input helps improve the content for everyone.
